KE2010.Instruction Manual.Ver.2.01,Rev.08.pdf - 第647页
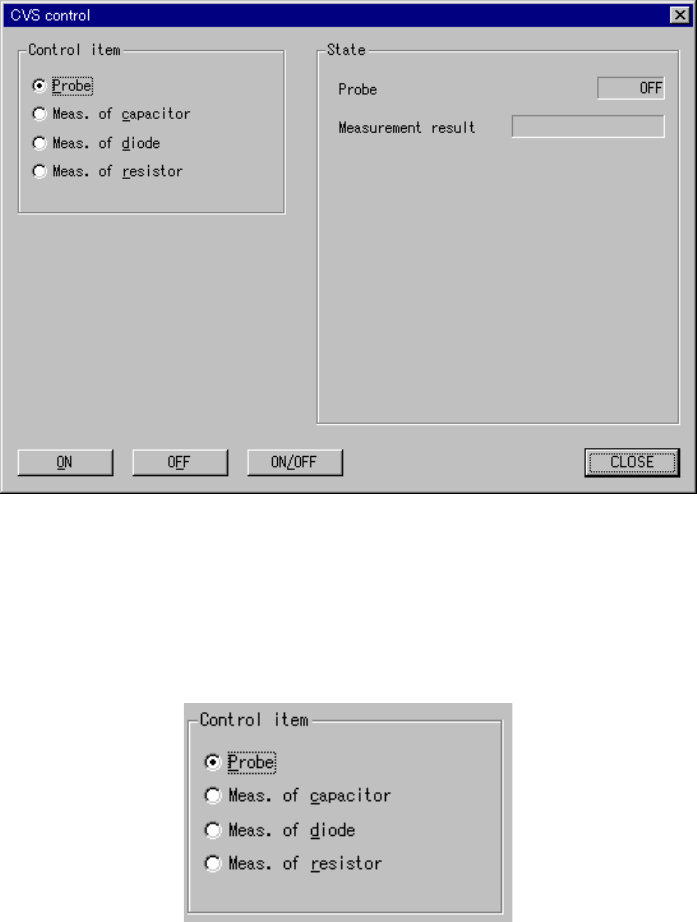
8 − 58 8.6.3 Component verification W hen you select the [Others] command on the [Ctrl] menu, then the [CVS control ] command, t he following “CVS cont rol” dialog box appears on the screen. Figure 8.6. 3 CVS control dia…
8 − 57
1) Red
This item turns on/off or flashes the red signal light.
- When the control item “Red” is checked, select the <ON>, <OFF>,
<ON/OFF> or <BLINK> button, or press the F3, F4, F5 or F6 key or
ALT + 4 keys to control the red signal light.
The state display is updated when the red signal is controlled
completely.
2) Yellow
This item turns on/ off or flashes the yellow signal light.
- When the control item “Yellow” is checked, select the <ON>, <OFF>,
<ON/OFF> or <BLINK> button, or press the F3, F4, F5 or F6 key or
ALT + 4 keys to control the yellow signal light.
The state display is updated when the yellow signal light is controlled
completely.
3) Green
This item turns on/off or flashes the green signal light.
- When the control item “Green” is checked, select the <ON>, <OFF>,
<ON/OFF> or <BLINK> button, or press the F3, F4, F5 or F6 key or
ALT + 4 keys to control the green signal light.
The state display is updated when the green light is controlled completely.
4) Buzzer
This item turns on and/or off the buzzer.
- When the control item “Buzzer” is indicated with a check mark, select
the <ON>, <OFF> or <ON/OFF> button or press the F3, F4or F5 key to
control the buzzer.
The state display is updated when the buzzer is controlled completely.
5) Mini signal light (Front)
This item turns on and/or off the front mini signal light.
- When the control item “Mini signal light (Front)” is checked, select the
<ON>, <OFF> or <ON/OFF> button or press the F3, F4or F5 key to
control the front mini signal light.
The “State” display is updated when the front mini signal light is
controlled completely.
6) Mini signal light (Rear)
This item turns on and/or off the rear mini signal light.
- When the control item “Mini signal light (Rear)” is checked, select the
<ON>, <OFF> or <ON/OFF> button or press the F3, F4or F5 key to
control the rear mini signal light.
The “State” display is updated when the rear mini signal light is
controlled completely.
(3) State display
The state display of each unit is updated when the unit is controlled completely.
8 − 58
8.6.3 Component verification
When you select the [Others] command on the [Ctrl] menu, then the [CVS control]
command, the following “CVS control” dialog box appears on the screen.
Figure 8.6.3 CVS control dialog box
(1) Control item
Select a control item with the corresponding radio button.
(2) Control button
Execute the selected control item with its control button.
The display of the control buttons varies depending on the control item you
selected.
8 − 59
1) Probe
This item turns on and/or off the probe.
- When the control item “Probe” is checked, click the <ON>, <OFF>, or
<ON/OFF> button or press the F3, F4or F5 key to control the probe.
The state display is updated when the probe is controlled completely.
2) Meas. of capacitor
This item measures the capacity of a capacitor component.
- When the control item “Meas. of capacitor” is checked, click the
<Measurement> or <Mode> button, or press F3 or F4 key to control
measurement of a capacitor.
The state display is updated at end of control.
3) Meas. of diode
This item measures the capacity of a diode component.
- When the control item “Meas. of diode” is checked, click the
<Measurement> or <Mode> button, or press F3 or F4 key to control
measurement of a capacitor.
The state display is updated at end of control.
4) Meas. of resistor
This item measures the capacity of a resistor component.
- When the control item “Resistor measurement” is checked, click the
<Measurement> or <Mode> button, or press the F3 or F4 key to control
measurement of a resistor.
The state display is updated when the capacity of a resistor is
measured.
(3) State display
The state of each unit is displayed when the unit is controlled completely.