KE2010.Instruction Manual.Ver.2.01,Rev.08.pdf - 第712页
11 − 3 Table 11.3 Functions availabl e to each user level Menu and button Function Operator Programmer Manager Maintenance Service Engineer New (Editor) × ○ ○ ○ ○ Editor × ○ ○ ○ ○ Producti on ○ ○ ○ ○ ○ Wa r m ○ ○ ○ ○ ○ S…
11 − 2
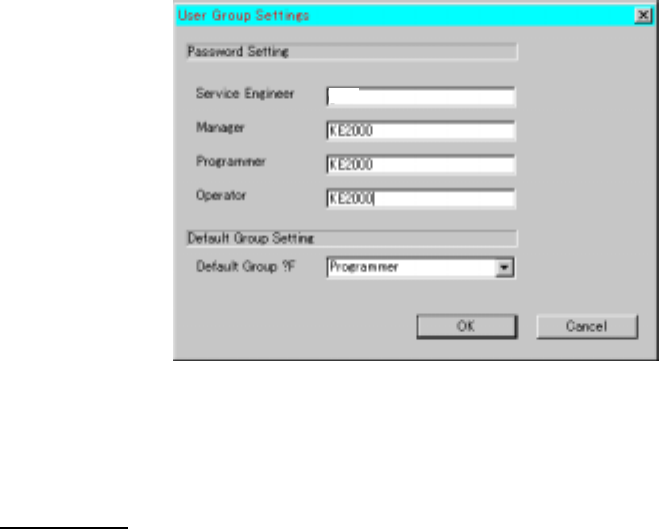
11.3 Setting the User Group
How to set the user group:
Select the [Options] command on the menu bar of the main menu, then the [Listing
User Group Passwords] command.
The following dialog box allows you to change each password and set the default user
group.
Note that you cannot see nor change the password(s) of the user group(s) which is
(are) higher than the current user level.
You cannot change the default user group to any user group whose level is higher
than the current user group level either.
Figure 11.3 "User Group Settings" dialog box
All of the passwords for the current user level or lower are displayed in a list.
User level list
Operator: The basic operation for producing PWBs is available.
Production program editing or various setting are not available.
Programmer: Operations such as production, editing of a production program,
and setting of the operation options are available.
Some mechanical operations of the machine are prohibited.
Manager: All operations such as production, editing of a production program,
setting of the operation options, setup for feeder changeover and
manual control are available.
Note that operation such as repairs and re-adjustment of the
machine is prohibited.
Maintenance level: Any features for ordinary operations are available with this level.
Although you cannot repair/adjust the machine, maintenance work
like installation of main unit software are allowed.
Service Engineer: Tasks such as re-adjustment of the machine, change of the setting
required to replace components, repairs of the machine,
replacement of a main component and change of an optional unit
as well as all operations of the machine are available.
This level is provided to limit the operation that may cause extreme
danger without sufficient knowledge of the machine.

11 − 3
Table 11.3 Functions available to each user level
Menu and
button
Function Operator Programmer Manager Maintenance
Service
Engineer
New (Editor)
×
○
○
○
○
Editor
×
○
○
○
○
Production
○
○
○
○
○
Warm
○
○
○
○
○
Setup
×
×
○
○
○
Manual
×
×
○
○
○
Command
Button
Exit
○
○
○
○
○
New
×
○
○
○
○
Open
○
○
○
○
○
Save
○
○
○
○
○
Tool Button
Vision
○
○
○
○
○
New
×
○
○
○
○
Open
○
○
○
○
○
Save
○
○
○
○
○
Save as
○
○
○
○
○
File Management
×
○
○
○
○
Default Folder
○
○
○
○
○
Print
○
○
○
○
○
Control Data Management
(Save on a floppy disk)
×
×
○
○
○
Control Data Management
(Recovery)
×
×
×
○
○
Data Manager
×
×
×
○
○
File Menu
Exit
○
○
○
○
○
Program Editor
×
○
○
○
○
Program
Editing Menu
Database Editor
×
○
○
○
○
Pwb Production
○
○
○
○
○
Trial Run
○
○
○
○
○
Production
Menu
Dry Run
○
○
○
○
○
Machine Set up
×
×
○
○
○
Setup Menu
Manual Operation
×
×
○
○
○
Warming Up
○
○
○
○
○
Idle mode
○
○
○
○
○
Self-Calibration
×
×
○
○
○
Machine Management
Information
×
○
○
○
○
Mech-Parameter Setting
×
×
×
×
○
Maintenance
Menu
MS-Parameter Setting
×
×
×
×
○
Change User Group
○
○
○
○
○
User Group
Environmental
Settings
○
○
○
○
○
Option Setting
×
○
○
○
○
Option Menu
Environment Setting
×
×
×
×
×
Help Menu About Programs
○
○
○
○
○

11 − 4
11.4 Operation Option
The items to be set as the operation options are shown in Table 4.2
Table 11.4.1 Operation Option Items
N
o.
Operation option
group
Option items
1 Teaching − Align the placement point to BOC.
− Auto-correct reference pin.
2 Production (Display) − Show the number of boards produced in large chatacters.
− Count down the number of boards produced.
− Accumulate planned number of boards produced.
− Changes to the production screen when start selected HLC only.
− Do not inquire for save on exit.
− Set resume production default to ‘Produce newly’.
− Set resume production default to ‘Re-clamp current board’.
3 Production (Function) − Auto-correct pick position.
− Check release of component after placing Z up.
− Begin production after conveyor.
− Simultaneous Nozzle Change.
− Check fiducials before bad circuit marks.
− Resume the production on suspend.
− End system on all circuit bad mark.
− Measure direction while installing nozzles.
− Sequential start on arrival (for a KE-2030 only)
4 Production (Function2) − Do not carry out the PWB on cycle-stop
− Check dirty of Laser sensor.
− SOT direction inspect checked.
− Verify inspect checked.
− Do not IN/OUT PWB sensor auto checked.
− the same component manage alternative feeders.
5 Production (Pause) − Stop system on components run out.
− Stop system on any error.
− Re-measure component height when components run out.
− The verification inspection is done on restart component run out.
− The SOT direction inspection is done on restart, when component
run out.
− Display ‘Supply’ button in the pause dialog.
− Run pick tracking when components run out.
6 Production (Check) − Properties checked
− Information of Coplanarity
− When Copla check fails. (Available with a KE-2020/2040 only)
7 Function enable − Tombstone detection
− Component dimension check
− Component crientation check
− Stop when feeder pitch shift is detected.
− Non-stop operation
− Non-stop operation (MTC) [Not available for a KE-2030]
− Non-stop operation (MTS) [Not available for a KE-2030]
− Non-stop operation (DTS) [Not available for a KE-2030]
− Enable Auto Compo. presence check of MTC
[Not available for a KE-2030]