KE2010.Instruction Manual.Ver.2.01,Rev.08.pdf - 第767页
13 − 11 WA RNING To prevent t he body from injury which can be caused by accidental activation of the machine, turn off the power of the machine before following the operation above. 13.2.8 Notice on Elect ricity 13.2.8.…
13 − 10
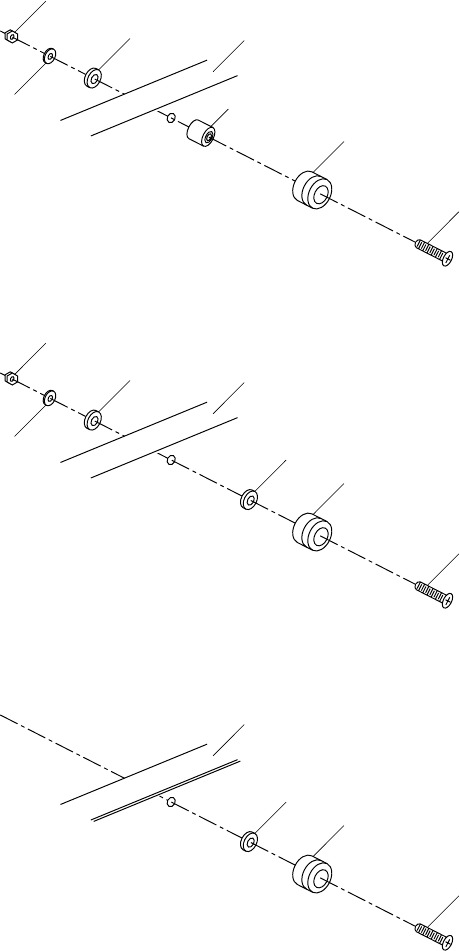
13.2.7 Transport pulley
Check that the pulley turns without resistance.
If it is necessary to replace the pulley, follow the procedure below.
(1) Transfer pulley replacement
1) As shown in Figures 13.2.7.1 to 13.2.7.3, the transport pulleys are fixed at the
front and rear rail plates. Loosen the screws used to fix the pulleys to
replace them.
2) The same as for the transport belt replacement, perform tension adjustment
of the transport belt.
Figure 13.2.7.2
Figure 13.2.7.1
Figure 13.2.7.3
Hexagonal nut
Flat washer
Rail plate
Pulley spacer
Transfer pulley
Holding screw
Spring washer
Hexagonal nut
Flat washer
Rail plate
Pulley spacer
Transfer pulley
Holding screw
Spring washer
Rail plate
Transfer pulley
Holding screw
Flat washer
13 − 11
WARNING
To prevent the body from injury which can be caused by accidental
activation of the machine, turn off the power of the machine before
following the operation above.
13.2.8 Notice on Electricity
13.2.8.1 General notices
WARNING
Cut off the power to the machine before starting to disconnect or
connect the connectors.
CAUTION
Never use the machine with any voltage other than those specified.
Before switching on the machine, be sure that the machine is in a safe
conditions.
Before switching on the machine, be sure that there is no one who is
working in the machine.
Before switching on the machine, be sure that there are no obstacles
(tools and jigs) left in the machine.
Turn off the machine to supply air.
13.2.8.2 Daily routine checks
1. Make sure that the supply voltage is the rated voltage ± 10%.
2. Make sure that the connectors (of devices such as a keyboard and HOD) are all
seated firmly.
WARNING
To avoid a risk of serious injury or death caused by electric shock
hazard, turn off the main power switch of the house current which is
installed in the building where the machine is used.
Note that it is not the main power switch of the machine.
13 − 12
13.3 Cleaning
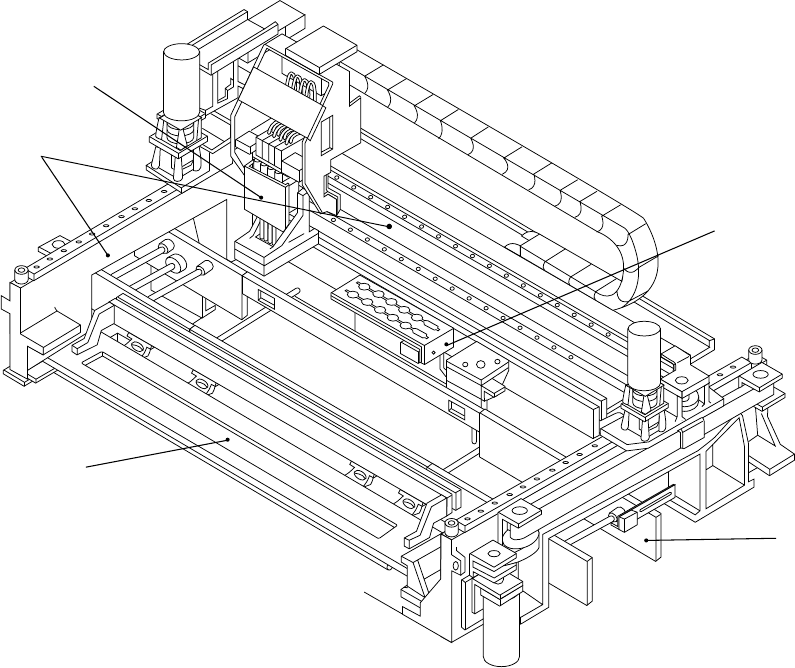
13.3.1 XY axis direct drive unit
Remove dirt, oil, etc. on the XY axis direct drive unit.
① ATC unit ④ PWB transport unit
② Head unit ⑤ Feeder bank unit
③ X-Y unit
Figure 13.3.1
①
④
⑤
②
③