KE2010.Instruction Manual.Ver.2.01,Rev.08.pdf - 第96页
3 − 23 3.6.7.1 Producti on program list This comm and prints a list of product ion progr ams. W hen y ou select the [ File] comm and on the menu bar , the [Print ] command on t he displayed menu, then the [ Production pr…
3 − 22
3.6.6 Default Folder
This command sets up the initial directory from/to which a production program is to be
read/written.
3.6.7 Setting a Printer and Printing
− Setting a printer
Add or set a printer used to print data.
1. Select the [File] command on the menu bar, then click the [Printer Setup]
command on the “File” menu.
2. Click the “Add Printer” icon or an existing printer icon.
3. Follow the instructions displayed with the Printer wizard to set a printer.
Figure 3.6.7.1 Setting a printer
− Print
This command prints the production management information, machine operation
information (by the [Component lifetime management information] command),
machine setup conditions and operation option settings.
When you select the [Print] command, the following sub menu appears on the
screen.
Figure 3.6.7.2 Print
3 − 23
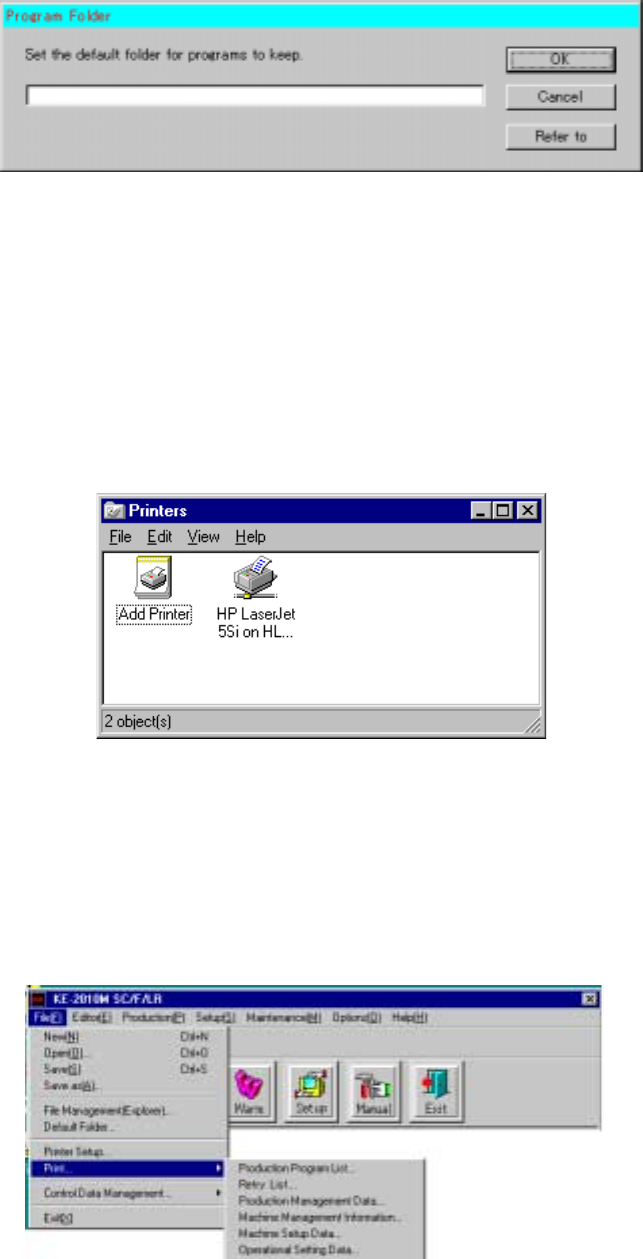
3.6.7.1 Production program list
This command prints a list of production programs.
When you select the [File] command on the menu bar, the [Print] command on the
displayed menu, then the [Production program list] command, the dialog box
appears on the screen as shown in the figure below.
Figure 3.6.7.1.1 "Print the production program list" dialog box
When you click the <View> button, the dialog box for selecting a folder appears on
the screen. Select the desired folder, then click the <OK> button. The dialog box
disappears and the path of the selected folder appears in the "Path" entry box of the
"Print production program list" dialog box.
When you enter the path of the desired folder in the "Path" entry box, then click the
<Print> button, the machine starts printing the list.
When you enter the path of the desired folder in the "Path" entry box, then click the
<Save to file> button, the dialog box for saving a file appears on the screen.
Specify the path and the file name, then click the <Save> button. The selected file
is output as a text file.
When you click the <Cancel> button, the screen displayed before you select the
[Print] command reappears.
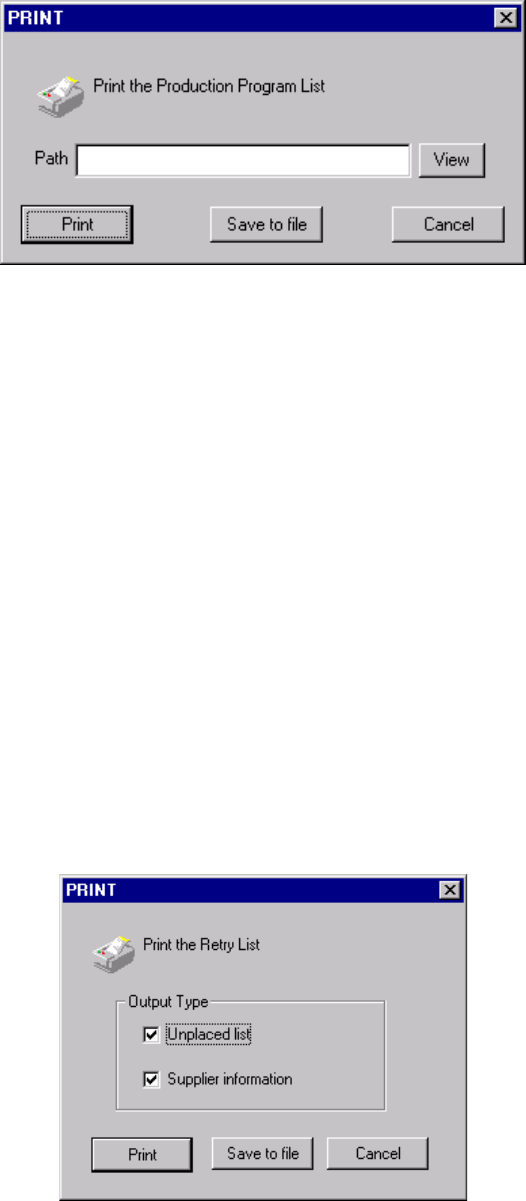
3.6.7.2 Retry List
When you select the [File] command on the menu bar, the [Print] command on the
“File” menu, and the [Retry List] command on the displayed menu, the “PRINT”
dialog box appears as shown in Figure 3.6.7.2.1.
Figure 3.6.7.2.1 PRINT dialog box
3 − 24
<Print> When you click this button, the system starts printing.
<Save to file> When you click this button, the “File Save” dialog box appears on
the screen. Specify the path and file name, then click the <Save>
button. The specified data is output as a text file.
<Cancel> When you click this button, the display returns to the screen
displayed before you selected the [Print] command.
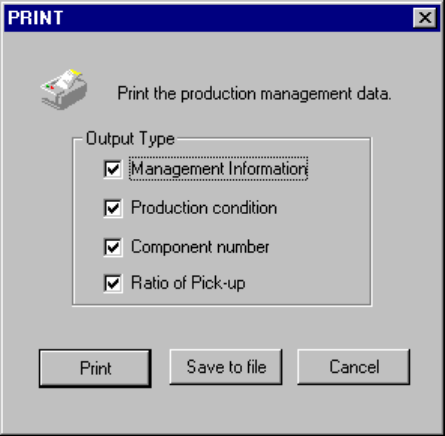
3.6.7.3 Production Management Data
This command prints the production management information.
When you select the [File] command on the menu bar, the [Print] command on the
displayed menu, then the [Production Management Data] command, the dialog box
appears on the screen as shown in the figure below.
Figure 3.6.7.3 "Print production management data" dialog box
− The item checked with a "V" mark is enabled (turned on).
- Select data to be output, then click the <Print> button. The system starts
printing the production management information.
- When you select the output type, or data to be output, and click the <Save to
file> button, the dialog box for saving a file appears on the screen.
Specify the path and file name, then click the <Save> button. The specified
file is output as a text file.