00194440-10_SM_X-Series_Customer_en.pdf - 第156页
Service Work Modular PCB Conveyor System 3.6.4 Replacing the Complete Motor M ount [00367172-xx] 156 Service Manua l SIPLACE X Series 3.6.4 3 . 6 . 4 R e p la c in g t h e C o m p le t e M o t o r M o u n t [ 0 0 3 6 7 1…
Service Work
3.6.3 Replacing the Tape Drive Assembly [00359310-xx] Modular PCB Conveyor System
Service Manual SIPLACE X Series 155
3.6.3
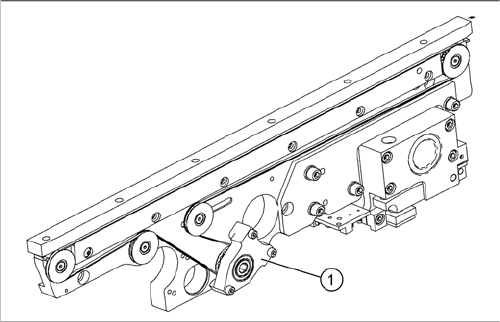
3.6.3 Replacing the Tape Drive Assembly [00359310-xx]
Replacing the Tape Drive Assembly [00359310-xx]
Parts
▪ Tape drive [00359310-xx]
Overview
Removal/installation
► Removal and installation is identical to that for the drive unit [00359284-xx].
See also
3.6.2 Replacing the Complete Drive Unit [00359284-xx] [ ➙ 152]
1. Tape drive
Service Work
Modular PCB Conveyor System 3.6.4 Replacing the Complete Motor Mount [00367172-xx]
156 Service Manual SIPLACE X Series
3.6.4
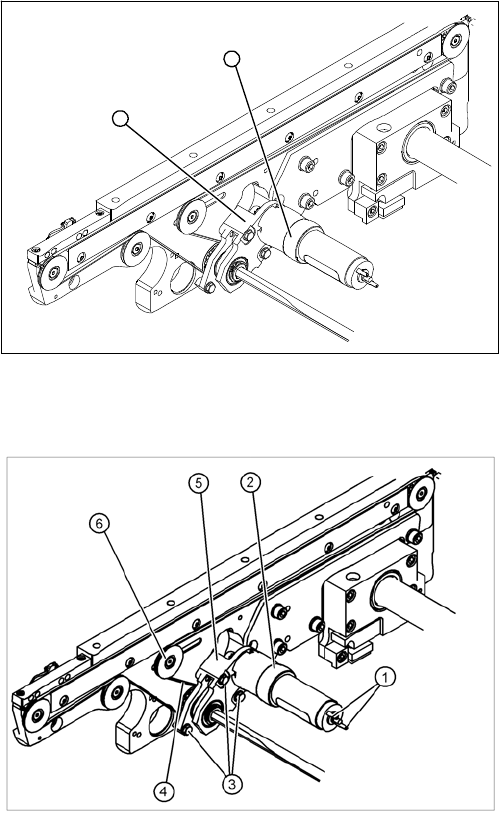
3.6.4 Replacing the Complete Motor Mount [00367172-xx]
Replacing the Complete Motor Mount [00367172-xx]
Parts
▪ Motor mount assembly [00367172-xx]
Overview
Removal
Installation
► Fit the new motor mount by following the instructions in reverse order.
Follow the instructions for the drive unit as described in "3.6.2 Replacing the Complete Drive Unit
[00359284-xx]" [ ➙ 152].
The DC geared motors (1), including the motor mounts
(2) of all five conveyor areas are of like construction.
Please bear in mind the following differences during as-
sembly and disassembly:
▪ The motor mount is installed at an angle (tilted), ac-
cording to the requirements of the installation site.
1
2
► Remove the drive unit as described in "3.6.2 Replac-
ing the Complete Drive Unit [00359284-xx]" [ ➙ 152].
► Remove the three screws (3) holding the motor
mount in place.
► Carefully remove the motor mount (5) and gently un-
thread the conveyor toothed belt (4).

Service Work
3.6.5 Replacing the DC Geared Motor [03009269-xx] Modular PCB Conveyor System
Service Manual SIPLACE X Series 157
3.6.5
3.6.5 Replacing the DC Geared Motor [03009269-xx]
Replacing the DC Geared Motor [03009269-xx]
Overview
Removal
► Remove the drive unit as described in "3.6.2 Replacing the Complete Drive Unit [00359284-xx]"
[ ➙ 152]. Also observe the following instructions:
1. DC geared motor
2. Fastening screws
3. Toothed disk (conveyor toothed belt)
4. Toothed disk (toothed belt for PCB conveyor drive)
The DC geared motors, including the motor mounts of all
five conveyor areas, are of like construction. Please bear
in mind the following differences during assembly and
disassembly:
▪ The motor mount is installed at an angle (tilted), ac-
cording to the requirements of the installation site.
1
4
3
2
NOTICE
Hexagonal shaft
The geared motor can be dismantled on the drive unit in the conveyor. You do not need to loos-
en the hexagonal shaft!
CAUTION
Do not damage the toothed belt!
The toothed belts must not be stretched or bent!
The minimum radius of the toothed belt is 16 mm.