00194440-10_SM_X-Series_Customer_en.pdf - 第158页
Service Work Modular PCB Conveyor System 3.6.5 Replacing the DC Geared Motor [0 3009269-xx] 158 Service Manua l SIPLACE X Series Installation ► Fro m the outer side of the c onveyor, undo the fixture s holding (2) the DC…

Service Work
3.6.5 Replacing the DC Geared Motor [03009269-xx] Modular PCB Conveyor System
Service Manual SIPLACE X Series 157
3.6.5
3.6.5 Replacing the DC Geared Motor [03009269-xx]
Replacing the DC Geared Motor [03009269-xx]
Overview
Removal
► Remove the drive unit as described in "3.6.2 Replacing the Complete Drive Unit [00359284-xx]"
[ ➙ 152]. Also observe the following instructions:
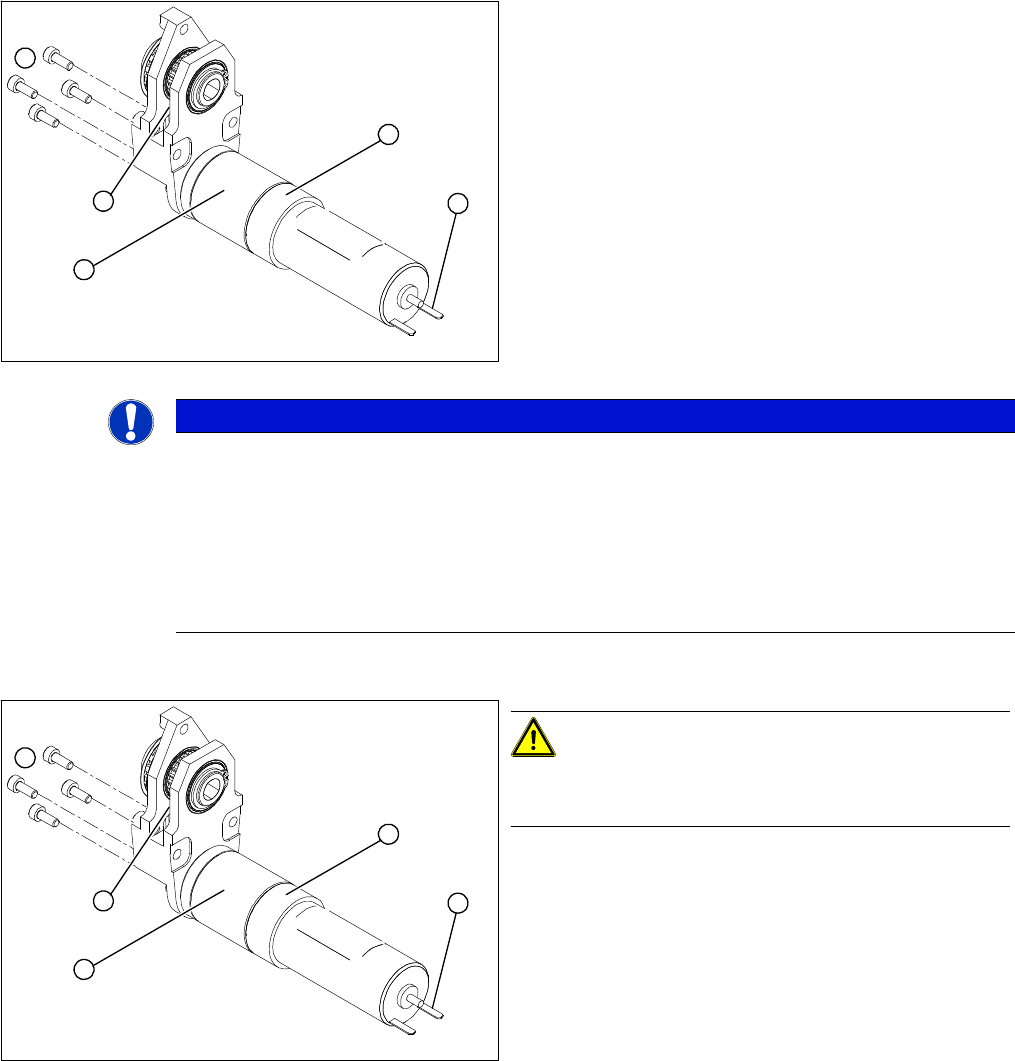
1. DC geared motor
2. Fastening screws
3. Toothed disk (conveyor toothed belt)
4. Toothed disk (toothed belt for PCB conveyor drive)
The DC geared motors, including the motor mounts of all
five conveyor areas, are of like construction. Please bear
in mind the following differences during assembly and
disassembly:
▪ The motor mount is installed at an angle (tilted), ac-
cording to the requirements of the installation site.
1
4
3
2
NOTICE
Hexagonal shaft
The geared motor can be dismantled on the drive unit in the conveyor. You do not need to loos-
en the hexagonal shaft!
CAUTION
Do not damage the toothed belt!
The toothed belts must not be stretched or bent!
The minimum radius of the toothed belt is 16 mm.
Service Work
Modular PCB Conveyor System 3.6.5 Replacing the DC Geared Motor [03009269-xx]
158 Service Manual SIPLACE X Series
Installation
► From the outer side of the conveyor, undo the fixtures
holding (2) the DC geared motor (5).
► Tilt the DC geared motor (5) a little, so that the small
toothed belt (3) comes free of the toothed disk.
► Pull the DC geared motor out.
► Please observe: the toothed disk on the motor shaft
must be moved out in such a manner that it does not
get caught in the toothed belt.
5
1
4
3
2
NOTICE
Break in motor cable
If you have discovered a break in the motor cable during a continuity check, the motor cable
must be unthreaded as far as the conversion board of the conveyor edge (see circuit diagrams
of the same name) and unplugged at the corresponding point.
This might be somewhat complicated depending on the routing of cables inside the machine
base.
► You may wish to contact SIPLACE service team regarding this work.
CAUTION!
Do not damage the toothed belt!
The toothed belts must not be stretched or kinked!
► Insert the new DC geared motor (5) by following the
instructions in reverse order.
The entire width of the toothed belt (3) must engage
at the top and bottom toothed disks.
► Fix the DC geared motor (5) with the four M3 hexag-
onal socket-head screws (2).
► Tension the toothed belt (3) by moving the DC geared
motor in the fastening holes. The belt tension must
be between 10 and 15 N.
► Fit the drive unit as described in "3.6.2 Replacing the
Complete Drive Unit [00359284-xx]" [ ➙ 152].
5
1
4
3
2

Service Work
3.6.6 Replacing the Toothed Belt of the Drive Unit [00355553-xx] Modular PCB Conveyor System
Service Manual SIPLACE X Series 159
3.6.6
3.6.6 Replacing the Toothed Belt of the Drive Unit [00355553-xx]
Replacing the Toothed Belt of the Drive Unit [00355553-xx]
Overview
Removal
► Remove the drive unit as described in "3.6.2 Replacing the Complete Drive Unit [00359284-xx]"
[ ➙ 152].
1. DC geared motor
2. Circlip
3. Four fastening screws
4. Toothed belt
5. Toothed disk
The DC geared motors, including the motor mounts of all
five conveyor areas, are of like construction. Please bear
in mind the following differences during assembly and
disassembly:
▪ The motor mount is installed at an angle (tilted), ac-
cording to the requirements of the installation site.
1
5
4
3
2
► From the outer side of the conveyor, undo the fixtures
holding (2) the DC geared motor (1).
► Tilt the DC geared motor (1) with its toothed disk (4)
a little, so that the small toothed belt comes free of the
toothed disk.
► Pull the DC geared motor out.
► Please observe: the toothed disk on the motor shaft
must be moved out in such a manner that it does not
get caught in the toothed belt.
► Remove the circlip (1) and the shims/washers (2).
► Use a small rubber mallet to carefully knock the
toothed disk (3) out of the motor mount (5).
► Remove the toothed belt (4) from the mount.
5
1
4
3
2
1
5
4
3
2