00194440-10_SM_X-Series_Customer_en.pdf - 第164页
Service Work Modular PCB Conveyor System 3.6.7 Replacing the Conveyor Toothed Belt (2.5 mm Width) 164 Service Manua l SIPLACE X Series ► Loosen the deflection pulley (2) with the slot and re - lieve the tension on the co…
Service Work
3.6.7 Replacing the Conveyor Toothed Belt (2.5 mm Width) Modular PCB Conveyor System
Service Manual SIPLACE X Series 163
3.6.7.2
3.6.7.2 Replacing the Conveyor Toothed Belt (QC)
Replacing the Conveyor Toothed Belt (QC)
Overview
To replace the toothed belt on the conveyor edges (A) and (B) , proceed as described"3.6.7.1 Replacing
the Conveyor Toothed Belt (ET/DT)" [ ➙ 161].
To replace the toothed belt on the conveyor edges (AB) proceed as follows:
Removal
The way in which the conveyor toothed belt is run around the deflection pulley depends upon the trans-
port area concerned. Please observe this belt guidance during assembly and disassembly. Please also
bear in mind the following differences during assembly and disassembly:
▪ The drive unit is installed at an angle (tilted), according to the requirements of the installation site.
▪ Depending on the conveyor cheek, either the tape drive (mount) or the DC drive motor will be in-
stalled.
► Move the PCB conveyor to the position which gives you best access to the conveyor belt
► Move the Y gantries into the area outside the PCB conveyor.
► Switch off the machine and secure it to prevent unauthorized reactivation.
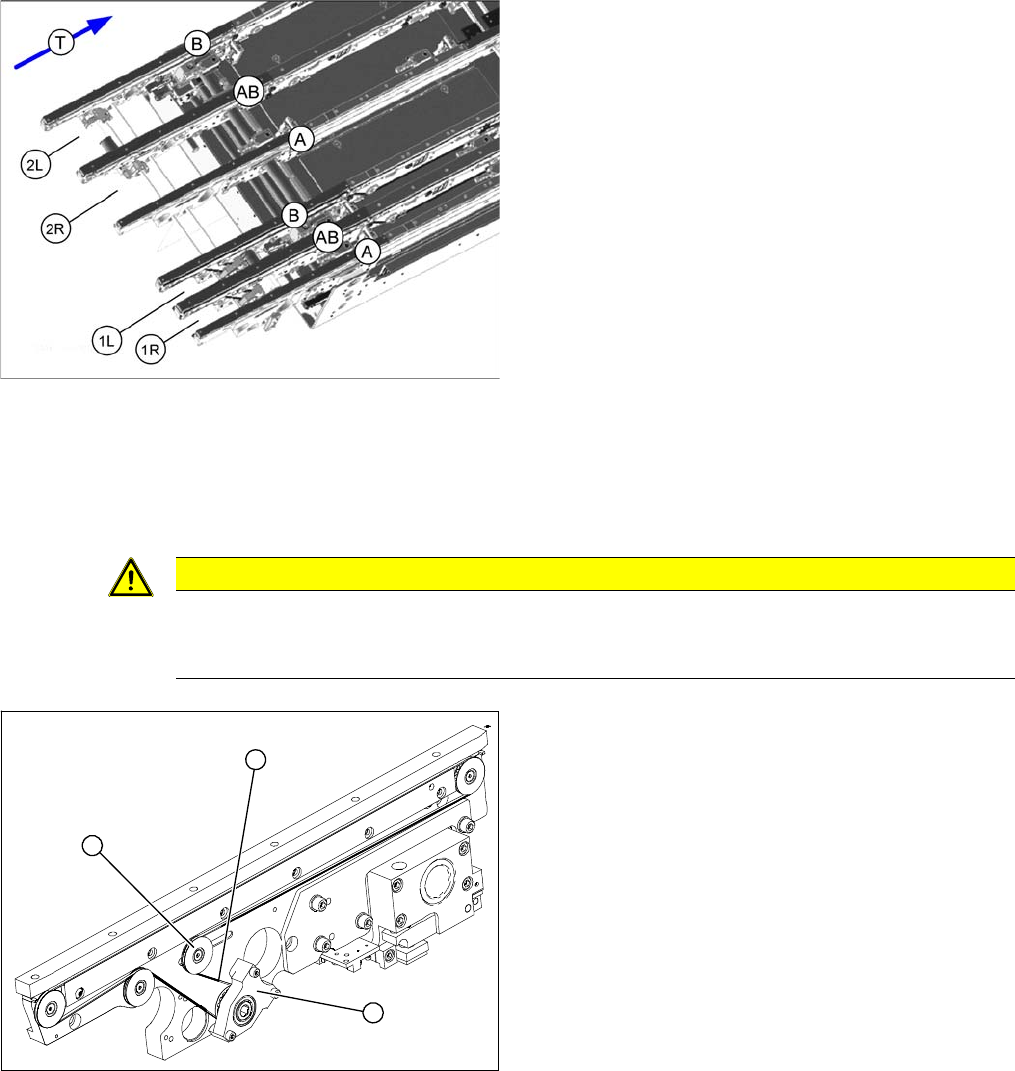
1R: Conveyor lane 1 right
1L: Conveyor lane 1 left
2R: Conveyor lane 2 right
2L: Conveyor lane 2 left
A, AB, B: Conveyor sides
T: Transport direction
CAUTION
Do not damage the toothed belt!
The toothed belts must not be stretched or bent!
The minimum radius of the toothed belt is 16 mm.
1. Tape drive (mount)
2. Deflection pulley with slot
3. Conveyor toothed belt
To replace a toothed belt on the inner edges of a convey-
or lane, you need to loosen the opposite toothed belt in
the same lane.
Example: To replace the toothed belt in the input convey
-
or at edge AB in lane 1R, you need to loosen the toothed
belt in the input conveyor, lane 1R, edge A.
1
3
2
Service Work
Modular PCB Conveyor System 3.6.7 Replacing the Conveyor Toothed Belt (2.5 mm Width)
164 Service Manual SIPLACE X Series
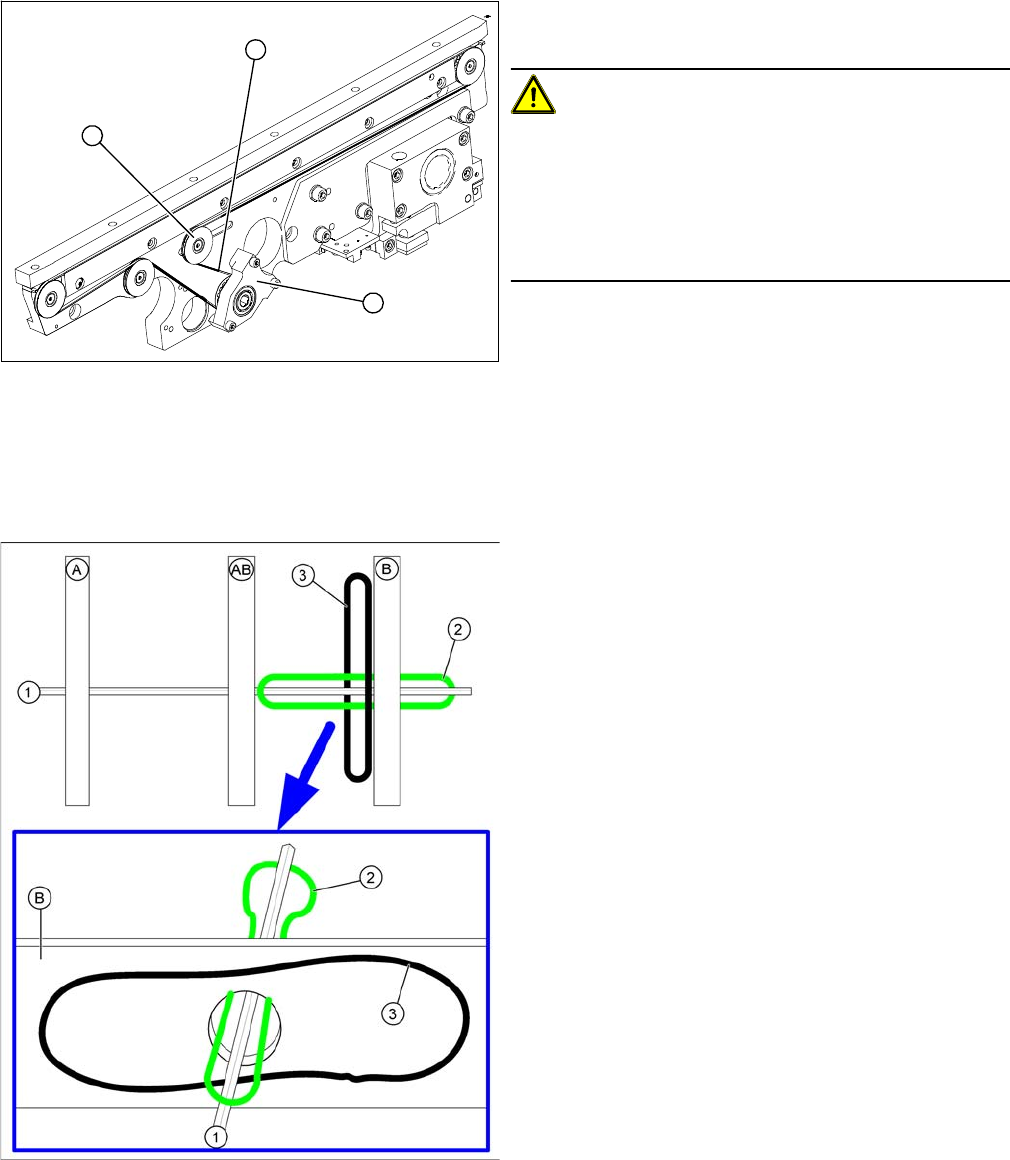
► Loosen the deflection pulley (2) with the slot and re-
lieve the tension on the conveyor toothed belt (3).
CAUTION!
The deflection pulleys have been assembled with sliding
nuts.
The screw for the deflection pulley should only be loos-
ened! If the screw is removed, the sliding nut will fall be-
hind the conveyor cheek side cover. You then need to
dismantle the cover to retrieve the nut.
► Loosen the three screws fastening the drive unit or
tape drive (holder), so that this can be moved on the
hexagonal shaft. In the case of a drive unit, you also
need to strip off the heat-shrinkable hose, mark and
loosen the cable.
► Carefully pull off the tape drive (mount) (1) or the
drive unit, while also gently unthreading the conveyor
toothed belt (3). (See next diagram).
Unthreading the conveyor toothed belt
A, AB, B: Conveyor sides
1. Hexagonal shaft
2. Conveyor belt to be unthread on edge AB
3. Loosened conveyor belt on edge B
1
3
2
Service Work
3.6.7 Replacing the Conveyor Toothed Belt (2.5 mm Width) Modular PCB Conveyor System
Service Manual SIPLACE X Series 165
Installation
CAUTION
Check the toothed belt before fitting it.
► Hold the toothed belt between two fingers and let it hang down. The toothed belt should be
roughly O shaped and when hanging freely may not turn by more than 90°!
CAUTION
Do not damage the toothed belt!
The toothed belts must not be stretched or bent!
The minimum radius of the toothed belt is 16 mm.
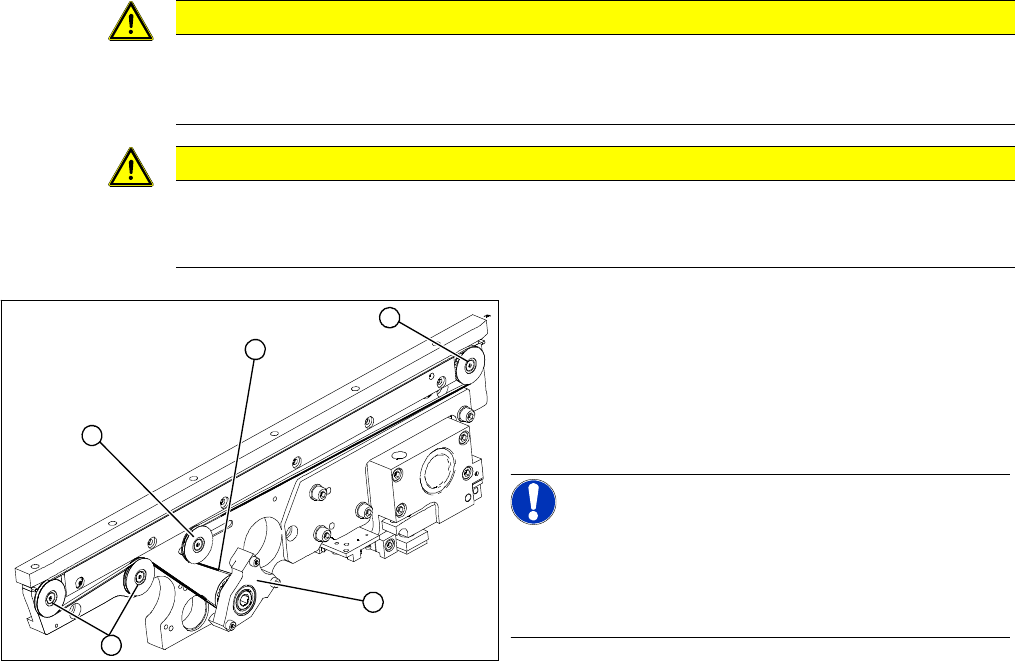
► Feed the new conveyor toothed belt (2) into the drive
unit and weave it round the deflection pulleys (3).
► Insert the tape drive (mount) or drive unit (1) with the
conveyor toothed belt (2) and fasten. In the case of
a drive unit, you will need to restore the cable connec-
tions.
NOTICE!
When replacing the belt on the passive side (tape drive
without drive unit), set the track width to 50 mm. The tape
drive must be aligned towards the active side, allowing
smooth axial movement of the hexagonal shafts.
► Tighten the fastening screws.
► Adjust the belt tension.
► Once you have loosened the drive unit cables, check
their direction of rotation.
3
3
1
3
2