SIPLACE-SX4-DX4-用户手册.pdf - 第52页
Service Work Electrical System 3.2.11 Replaci ng the Protective Contactor C omb ination [00358268-xx] 52 Service Manual SIPLACE SX4/DX4 3.2.11 3 . 2 . 1 1 R e p la c in g t h e P r o t e c t iv e C o n t a c t o r C o m …

Service Work
3.2.10 Replacing the Motor Circuit Breaker with Motor Protection Tripping Unit Electrical System
Service Manual SIPLACE SX4/DX4 51
Removal
► Switch off the machine, disconnect it from the power supply and secure it to prevent unauthorized
reactivation. Observe the instructions in section "1.2 Preparatory Work..." [ ➙ 12].
► Unplug all connections to the motor circuit-breaker. You may want to mark their positions, to make
clear assignment easier later on.
Installation
► Follow the removal instructions in reverse order for installation. Also observe the following instruc-
tions:
Settings
► Set the trigger threshold for the nominal current (left setting disk).
► Set the trigger threshold for the overload class (right setting disk).
► Remove the shaft which connects the motor circuit
breaker (1) to the outer main switch handle. To do
this, press the white plastic clips together (2) and pull
off the shaft(3).
► Loosen the latch for the motor circuit breaker on the
rail and remove the motor circuit breaker. You may
need to read the manufacturer's instructions provid-
ed.
CAUTION
Installation instructions
► Please observe the instructions for correct assembly in the technical information "Retrofit
Guide Axis Support Motor Circuit Breaker PKE32/XTU-32 Assembly 3p. (Main Switch)"
[DE: TI2013-07D10] [EN: TI2013-07E10].
► Remove the shaft from the old switch and fit it on the new switch.
► Set the nominal current and overcurrent (see below)
Motor protection tripping unit
PKE-ZTU-32
Left setting disk
for nominal current
Right setting disk
for overcurrent class
SX1/SX2
3x380V - 3x 415V 8 A 5
3x200V - 3x 230V 13.5 A 5
X series S, SX4/DX4
3x380V to 3x415V
One vacuum pump or none
8 A 5
3x200V - 3x230V
One vacuum pump or none
13.5 A 5
3x380V to 3x415V
Two vacuum pumps
13.5 A 5
3x200V to 3x230V
Two vacuum pumps
17.2 A 5
Service Work
Electrical System 3.2.11 Replacing the Protective Contactor Combination [00358268-xx]
52 Service Manual SIPLACE SX4/DX4
3.2.11
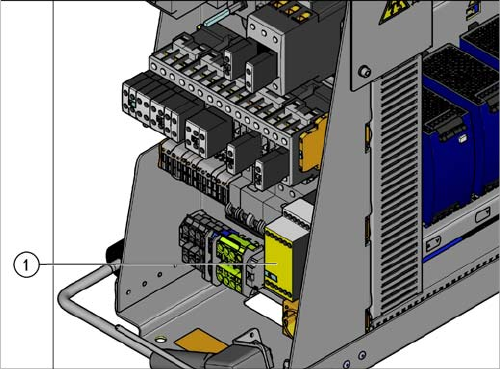
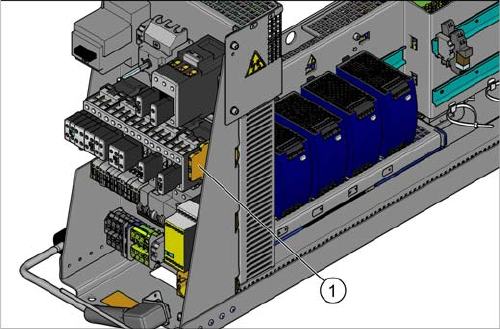
3.2.11 Replacing the Protective Contactor Combination [00358268-xx]
Replacing the Protective Contactor Combination [00358268-xx]
Parts, Equipment and Tools
▪ Protective contactor combination 3TK28 25 [00358268-xx]
Overview
Removal
► Switch off the machine, disconnect it from the power supply and secure it to prevent unauthorized
reactivation. Observe the instructions in section "1.2 Preparatory Work..." [ ➙ 12].
► Unplug all connections to the protective contactor combination. You may want to mark their posi-
tions, to make clear assignment easier later on.
► Take the protective contactor combination off the rail. To do this, press the protective contactor com-
bination upwards slightly and tilt it.
Installation
► Follow the removal instructions in reverse order for installation.
1. Protective contactor combination
Service Work
3.2.12 Replacing the Output Coupling Link (K7) [03065954-xx] Electrical System
Service Manual SIPLACE SX4/DX4 53
3.2.12
3.2.12 Replacing the Output Coupling Link (K7) [03065954-xx]
Replacing the Output Coupling Link (K7) [03065954-xx]
Parts, Equipment and Tools
▪ Output coupling link 24V AC/DC 1W [03065954-xx]
Overview
Removal
► Switch off the machine, disconnect it from the power supply and secure it to prevent unauthorized
reactivation. Observe the instructions in section "1.2 Preparatory Work..." [ ➙ 12].
► Unplug all connections to the output coupling link. You may want to mark their positions, to make
clear assignment easier later on.
► Take the output coupling link off the rail.
Installation
► Follow the removal instructions in reverse order for installation.
1. Output coupling link