YS24X_Ope_E.pdf - 第84页
2-9 2 asic operation n V arious buttons and parameter input boxes V arious types of buttons, selection tabs and parameter input boxes are used on the operation screen. 1 1 2 3 4 5 6 Operation screen basic elements Mark…
2-8
2
asic operation
2. Operation screen and buttons
The basic configuration and operation methods of the software screens are explained in this section. Please
read through this section before operating the machine.
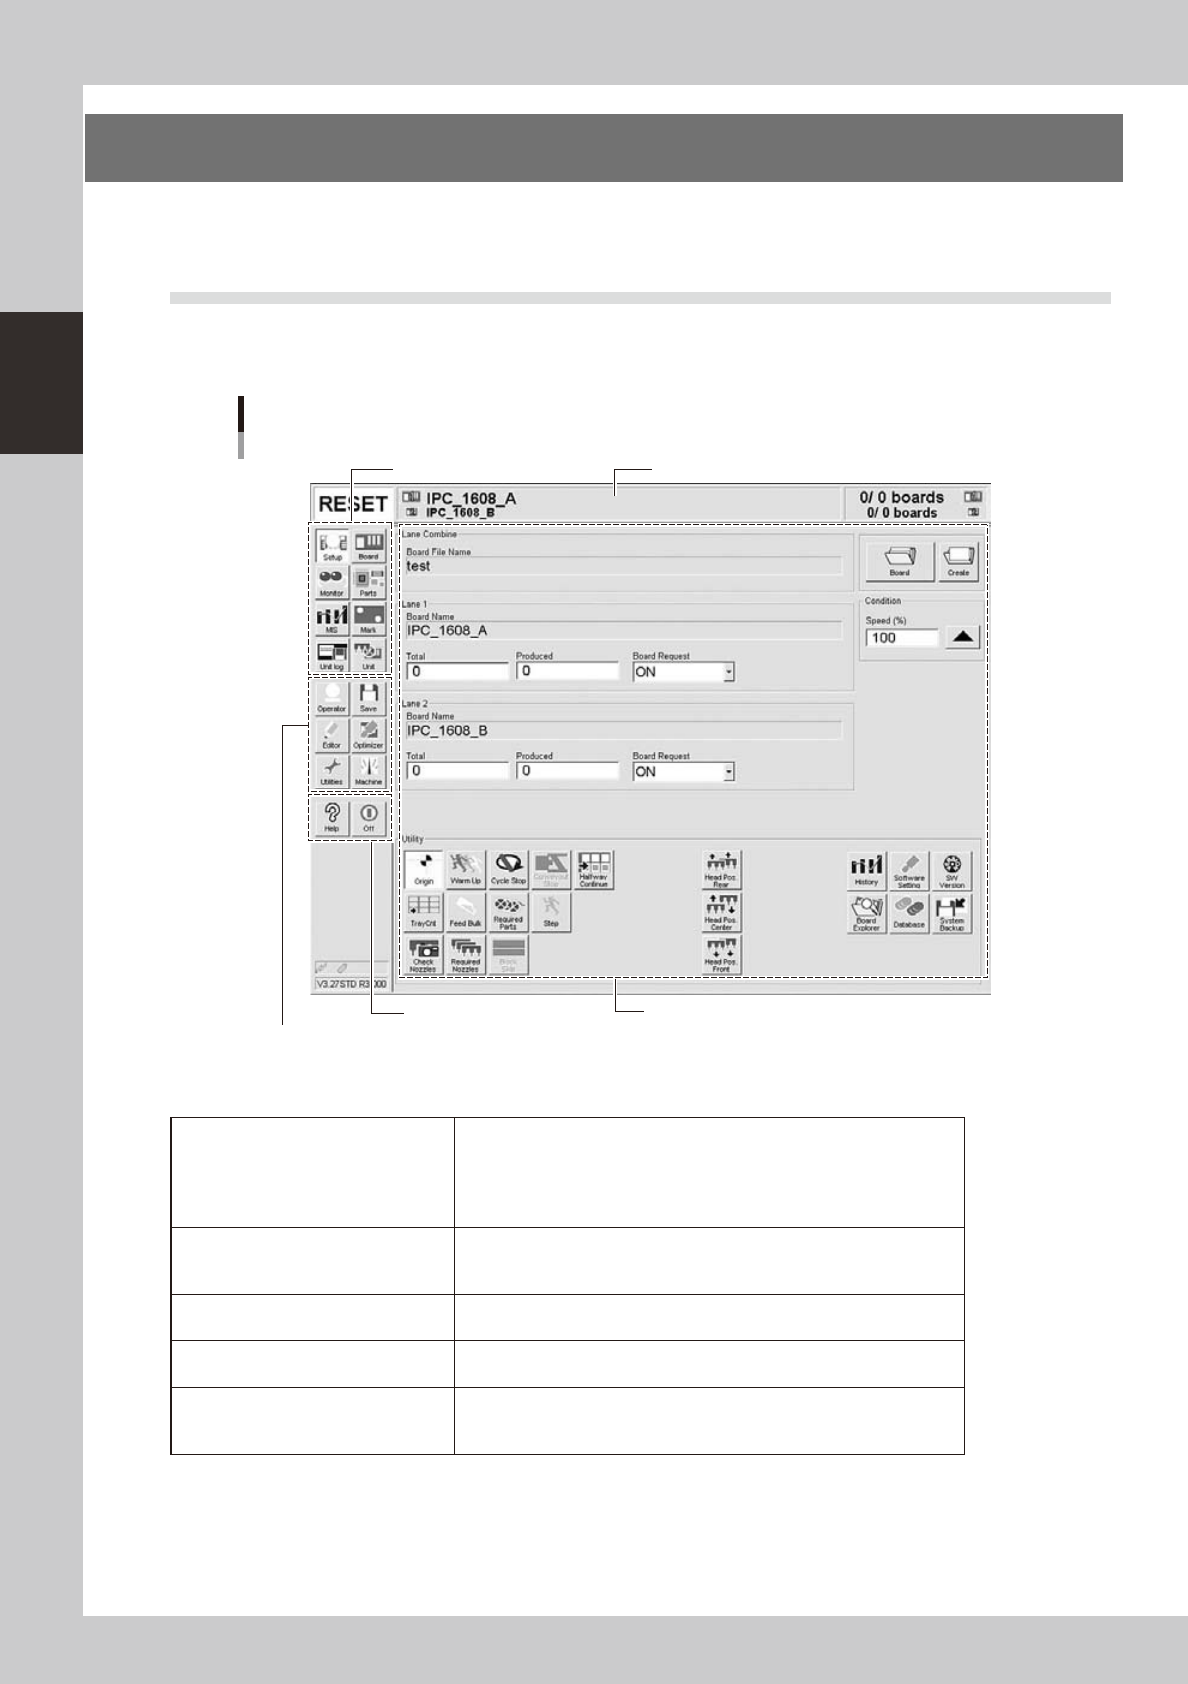
2.1 Basic configuration of operation screen
The YS series operation screen can be divided into the "Status area", "Main menu button area" and "Submenu
button and parameter area" as shown below.
Main menu button area 1
Main menu button area 2
Main menu button area 3
Status area
Operation screen basic configuration
Setup screen ( Example of Dual - lane)
Submenu button and parameter area
24200-L4-20
n
Area on screen
Status area
Displays the current machine status on the left end, the selected board
name in the middle, and the number of boards that have been produced
on the right end. (When producing boards using both lanes of dual-lane
machines, the board name and the number of produced boards for each
lane are displayed.)
Main menu button area 1
Shows the main menu buttons used to operate the machine. The
submenu button and parameter area will change according to the
selected main menu button.
Main menu button area 2
Shows the menu buttons used to call up auxiliary functions of the
machine.
Main menu button area 3
Shows the [Help] button to call up the help screen and also the [Off]
button to quit the software.
Submenu button and parameter area
Displays the submenu buttons and parameters for machine operation
and data setting. This area will change according to the selected main
menu button.
2-9
2
asic operation
n
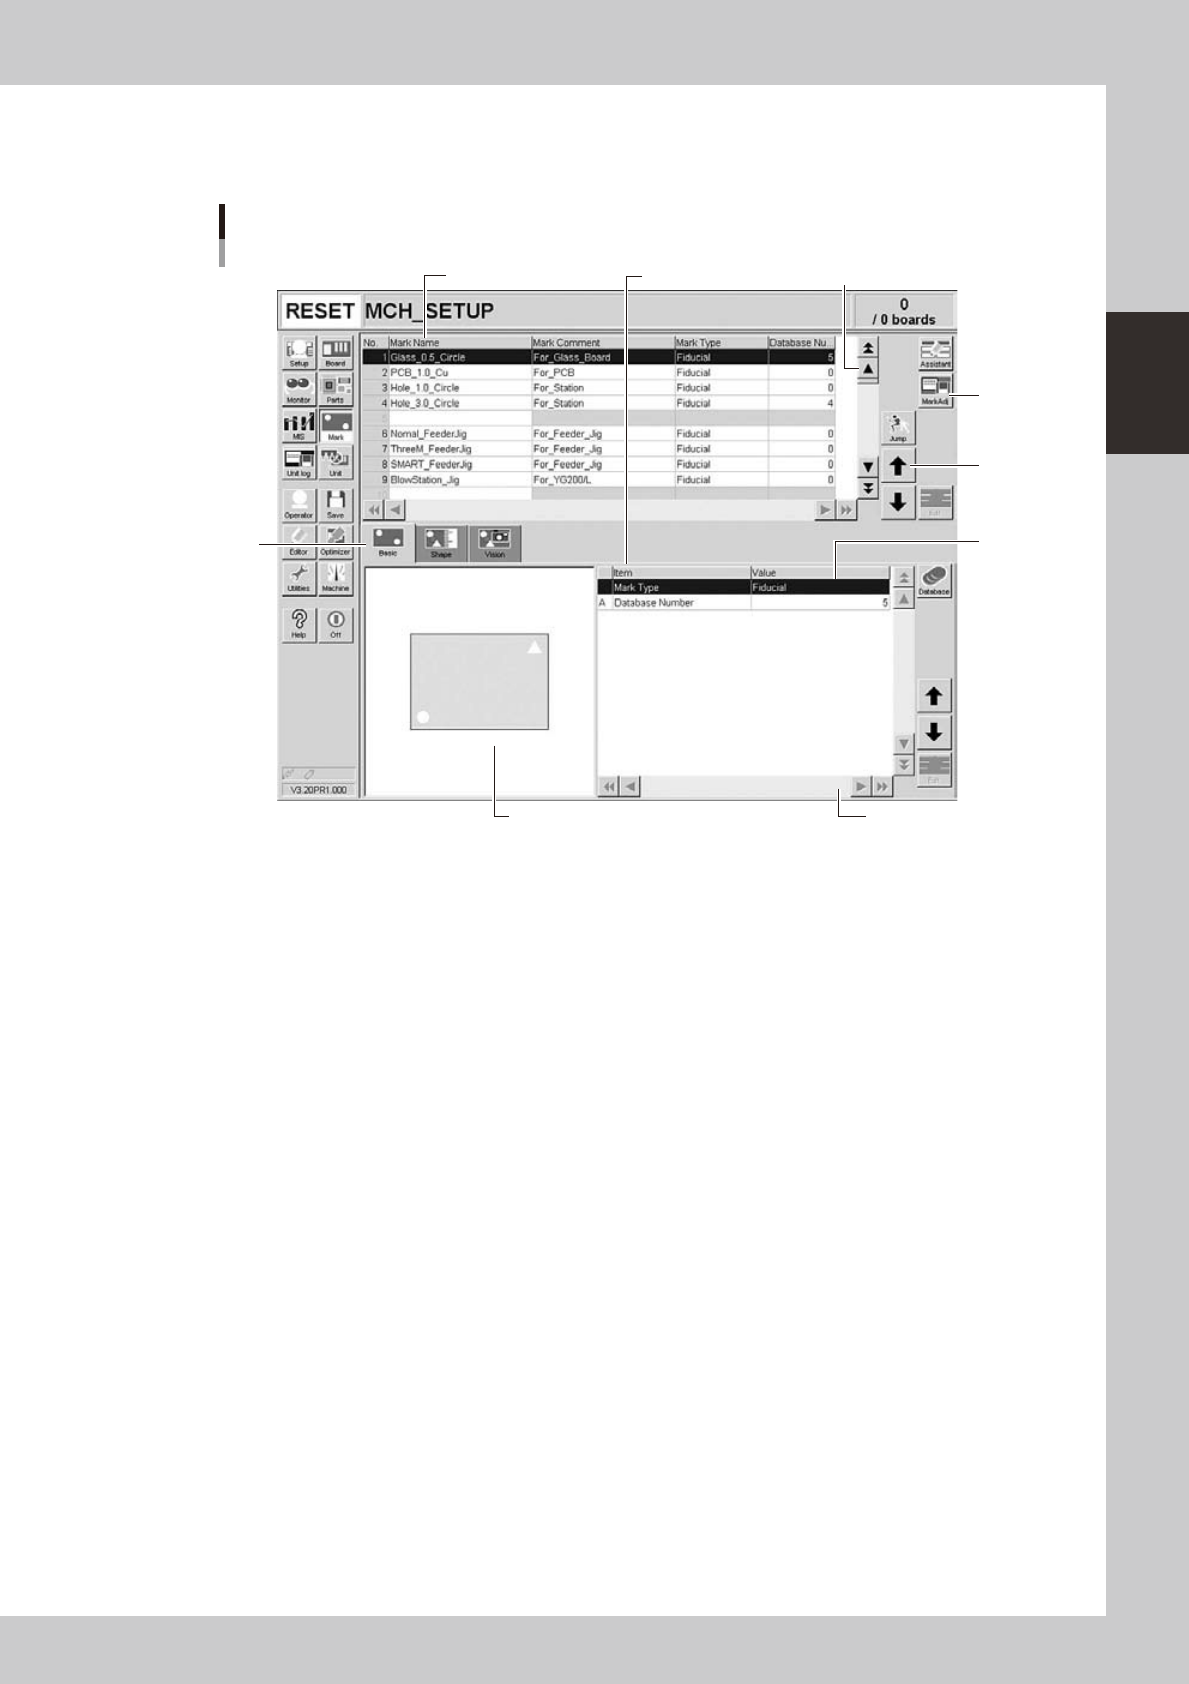
Various buttons and parameter input boxes
Various types of buttons, selection tabs and parameter input boxes are used on the operation screen.
1
1
2
3
4
5
6
Operation screen basic elements
Mark screen
Parameter listData No. list
24201-L4-00
1. Scroll bar and button (up/down, left/right)
Use the scroll bars or arrow buttons to see hidden items in the data No. list or parameter list.
2. Operation button
Press these buttons to open the next operation screen or dialog box.
3. Line up/down button
Use these buttons to move the cursor up or down through the data No. list or parameter list.
4. Parameter input box
Select, enter or edit parameters here. When the keyboard is used, double-click on a parameter input box to enter or edit
the data.
When a touch screen (option) is used, press the [Edit] button on the lower right of the parameter list. The edit box then
pops up for data input and editing.
5. Selection tab
Select this tab to switch the parameter input screen.
6. Assistant screen
Shows an illustration or information useful for parameter input or editing.
Alphabet characters shown in the parameter list and in the illustration on this screen correspond to each other.
Lane select button (dual-lane machines)
This button is displayed when producing boards using both lanes of dual-lane machines. Use this button to select the
lane to be displayed on the operation screen.
2-10
2
asic operation
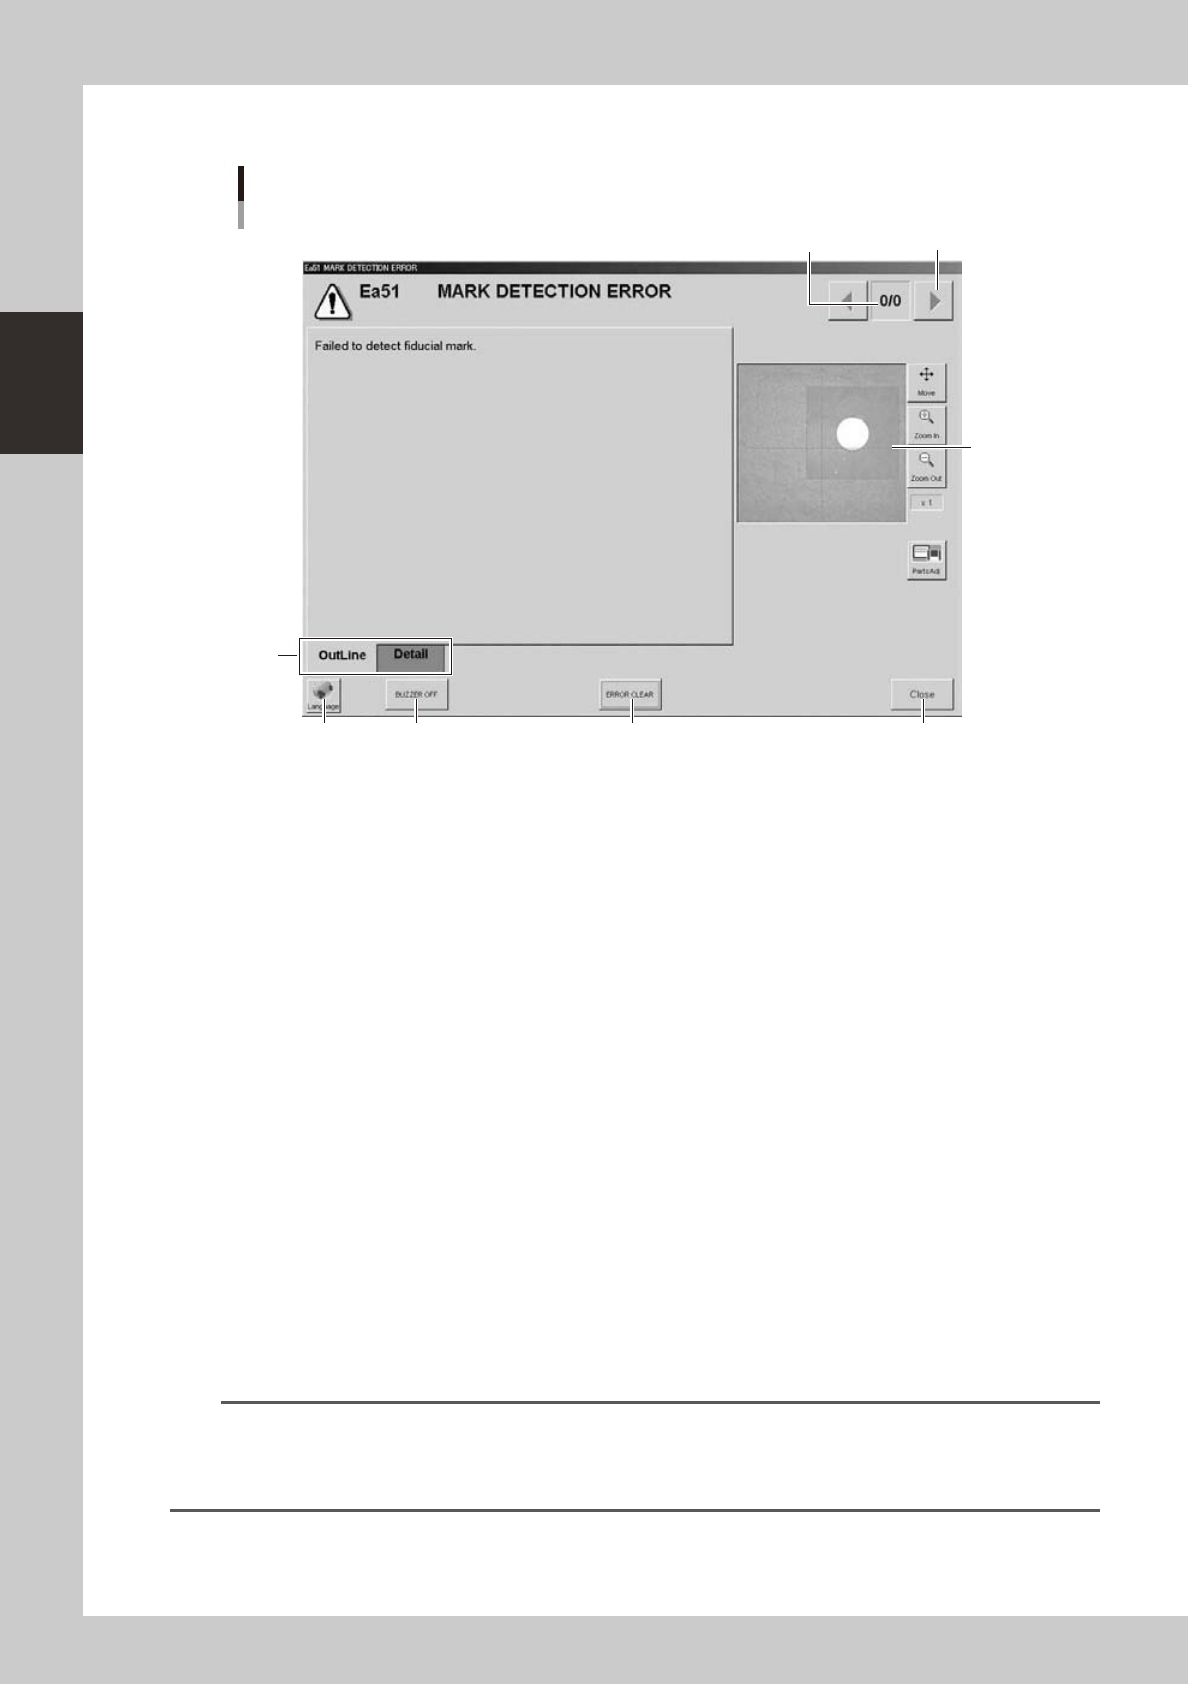
About error screen
Error screen
Mark detection error
1
2
3
7
46 5
[Error Switching] button
24202-L4-00
1. Error count display
Shows the currently displayed error and the total number of errors. If two or more errors occurred, use the [Error
Switching] buttons (right/left arrow buttons) to switch to other error screens.
2. Message switching tab
Outline:
Displays a message for the operator.
Detail:
Displays a message for the administrator/supervisor or service personnel. This tab does not appear unless a message is
available.
3. Recognition image display (component pickup error and mark recognition error screens)
If an error has occurred in image processing during component pickup or mark recognition, the error image is displayed
here.
4. [BUZZER OFF]
Turns off the buzzer.
5. [ERROR CLEAR]
Clears the error that has occurred.
6. [Language] button
Switches the language of the message displayed on the error screen.
7. [Close] button
Closes the error screen without clearing the error.
TIP
After closing the error screen by pressing the [Close] button, you can check the locations where errors have occurred
by opening the [Monitor] - [Production] tab. Pressing the [Error Detail] button on the [Production] tab screen redisplays
the error message. For more details on the [Production] tab screen, refer to Chapter 3, "Starting and ending
production".