Oxford-100-ICP-2-Step-DRIE-SOP-in-PDF-Format.pdf - 第7页
Oxford ICP 2 - step DRIE SOP Page 7 of 10 Revisi on 2- 12 0 321 Table 1 , Deep Etch Recipe Step C 4 F 8 SF 6 Set Pressu re ICP Po wer RF Pow er Temp. (C) Time Flow C 4 F 8 8 0s ccm 0 0 mT 0 0 15 5s Stri ke Plasm a 8 0s c…
Oxford ICP 2-step DRIE SOP Page 6 of 10
Revision 2-120321
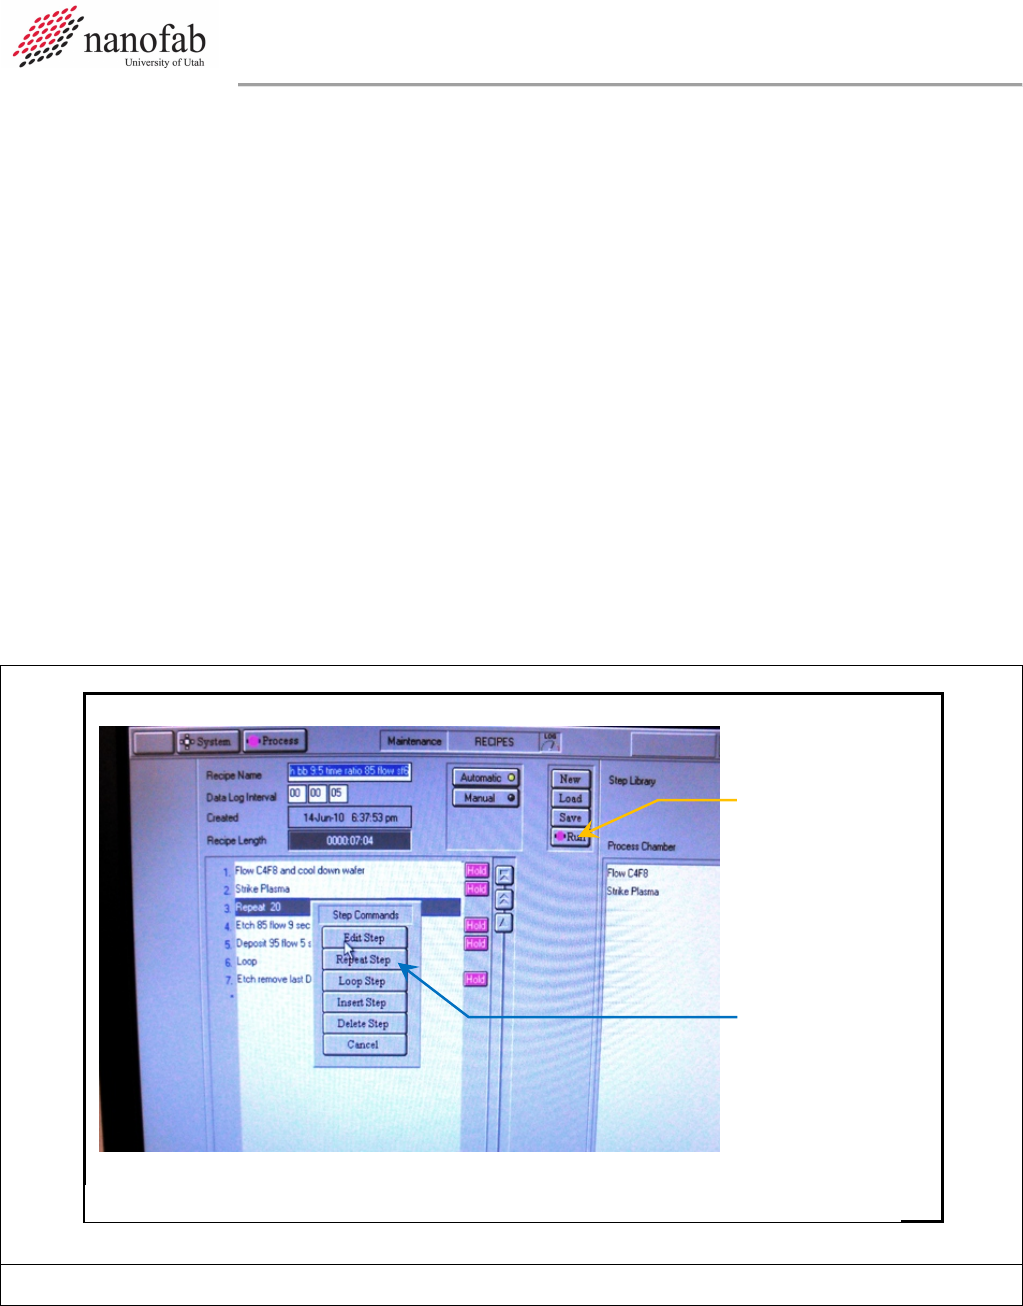
7.1.3 Click on “New” and press ok to clear the current recipe
7.1.4 Click on “Load” and select the desired recipe (typically BB Bosch 12:5 15C 80:80 recipe for
silicon DRIE), and click ok
7.1.5 The recipe steps will be displayed on the left side of the screen.
7.1.6 For Si DRIE set the number of etch cycles
7.1.6.1 Right click on “Repeat”
7.1.6.2 Click on “Repeat Step”
7.1.6.3 Enter the desired number of cycles to repeat the etch and deposition step for the Bosch
process (typically ~0.67 um/cycle) but this varies greatly depending on the area of
exposed silicon (can vary from ~0.4um/cycle to ~1.1 um/cycle).
7.1.6.4 Click OK
7.1.7 For other etch processes set the etch time
7.1.7.1 For other etch processes you can change the etch time by right clicking on the etch step
and then changing the process time.
7.1.7.2 Do not change the gas flows or powers unless it is your own recipe and you know what
you are doing. Click Save when you are done editing to save the recipe.
Figure 6, Load, Edit, and Run Recipe Page
7.1.8 The Bosch etch recipe is as follows:
Repeat Step
Button
Figure 1, Recipe Editor Page
Run Button

Oxford ICP 2-step DRIE SOP Page 7 of 10
Revision 2-120321
Table 1, Deep Etch Recipe
Step
C
4
F
8
SF
6
Set
Pressure
ICP Power
RF Power
Temp.
(C)
Time
Flow
C
4
F
8
80sccm
0
0mT
0
0
15
5s
Strike
Plasma
80sccm
0
0mT
500W
30W
15
7s
Etch
0
80sccm
0mT
500W
25W
15
12s
Deposit
80sccm
0
0mT
500W
10W
15
5s
Repeat
Etch &
Deposit
Steps
7.1.8.1 In all steps the He backing is 10.0.
7.2 Start Etch Process
7.2.1 Make sure the chuck is at the correct temperature. If it is too warm the Bosch process won’t
work correctly.
7.2.2 Click the ‘Run’ button. See Figure 6.
NOTE: The pumpdown and subsequent wafer transfer will begin automatically and the etch process
will start when the wafer is loaded. The wafer will automatically transfer to the load lock
when the process is complete.
7.2.3 Listen closely to the machine during the first steps.
7.2.3.1 If the machine makes a repetitive clicking sound, or the ICP power is greater than 10 or
fluctuating wildly, you need to stop and restart the process.
7.2.3.1.1 Press Stop.
7.2.3.1.2 Return the wafer to load lock-YES
7.2.3.1.3 Click the Run button after you see that the wafer is inside the load lock to restart
the process.
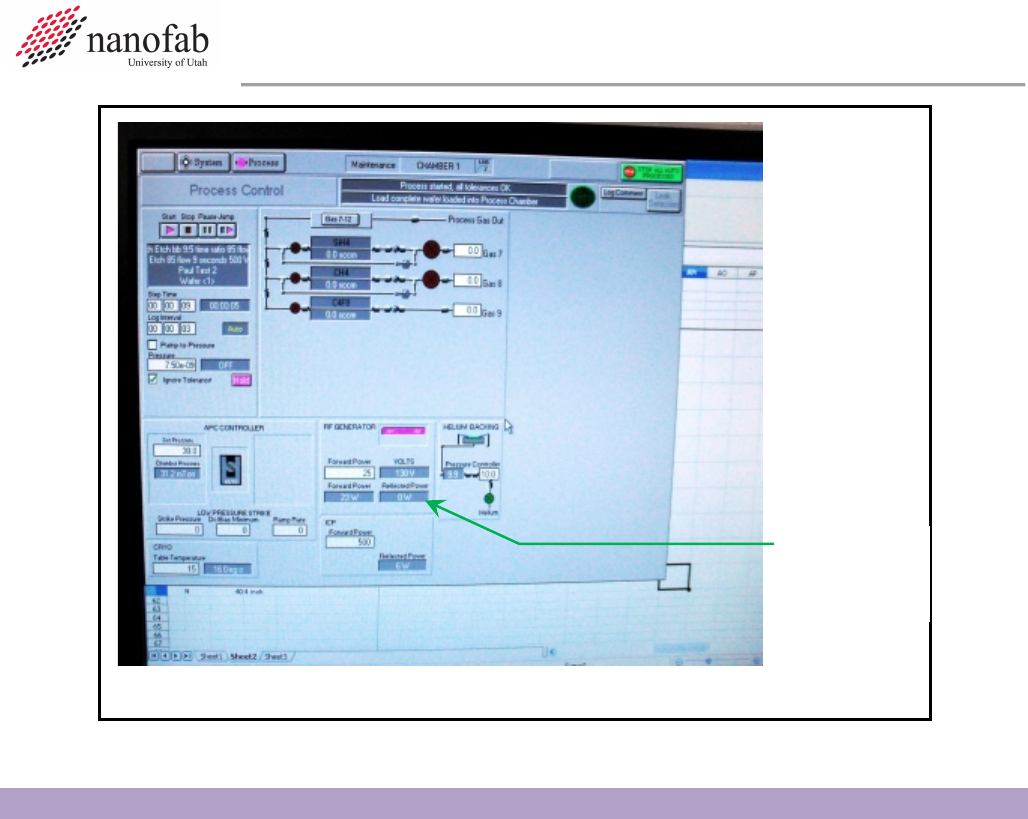
7.2.4 Monitor the parameters during the first few steps of the process.
7.2.4.1 Go to the Process Control page.
7.2.4.2 Monitor the Reflected Power. It should be less than 10. See Figure 7, Process Control
Page.
7.2.4.3 Make sure the temperature cooling is working and stable +/- 1 degree C.
Oxford ICP 2-step DRIE SOP Page 8 of 10
Revision 2-120321
8. Shutdown Procedures
8.1 Vent Load Lock
8.1.1 Click OK when the software says “Process completed”.
8.1.2 Look inside load lock window to make sure wafer has transferred successfully from main
chamber to load lock.
8.1.3 Vent load lock.
8.1.3.1 Press stop button corresponding to the load lock mechanical pump. See Figure 4.
8.1.3.2 Click ok when it says “Wafer has finished processing”.
8.1.3.3 Press vent button. See Figure 4.
8.1.3.4 Wait ~1 min. for the load lock to vent.
8.1.4 Pull up to open load lock lid. Do not force it open, once it is vented it should open easily.
8.1.5 Press stop button to stop venting.
8.1.6 Remove wafer.
8.2 Shutdown System
8.2.1 Set the chuck temperature to 30C. This is important! Otherwise the N2 dewar will run out
overnight and you will be billed for a new tank.
Reflected
Power
Figure 4, Process Control Page