00198505-01_SM_SIPLACE_SmartFeeder_EN.pdf - 第139页
8 Repairs to SmartFeeder 2x8 mm X 8.5 Pickup window Service Manual SIPLACE SmartFeeder 4 - 104 mm X 11/2017 139 8.5 Pickup window Required spare part Fig.45: Pickup window assy. /X2x8 Feeder module Position Item no. Des…
8 Repairs to SmartFeeder 2x8 mm X
8.4 EDIF
138 Service Manual SIPLACE SmartFeeder 4 - 104 mm X 11/2017
8.4.1 Removing the EDIF secondary assembly / X Smart
► Place the feeder on a stable, level and clean sur-
face.
► Remove the left side cover (see 8.3.1 "Removing
the Left Side Cover" [}135]).
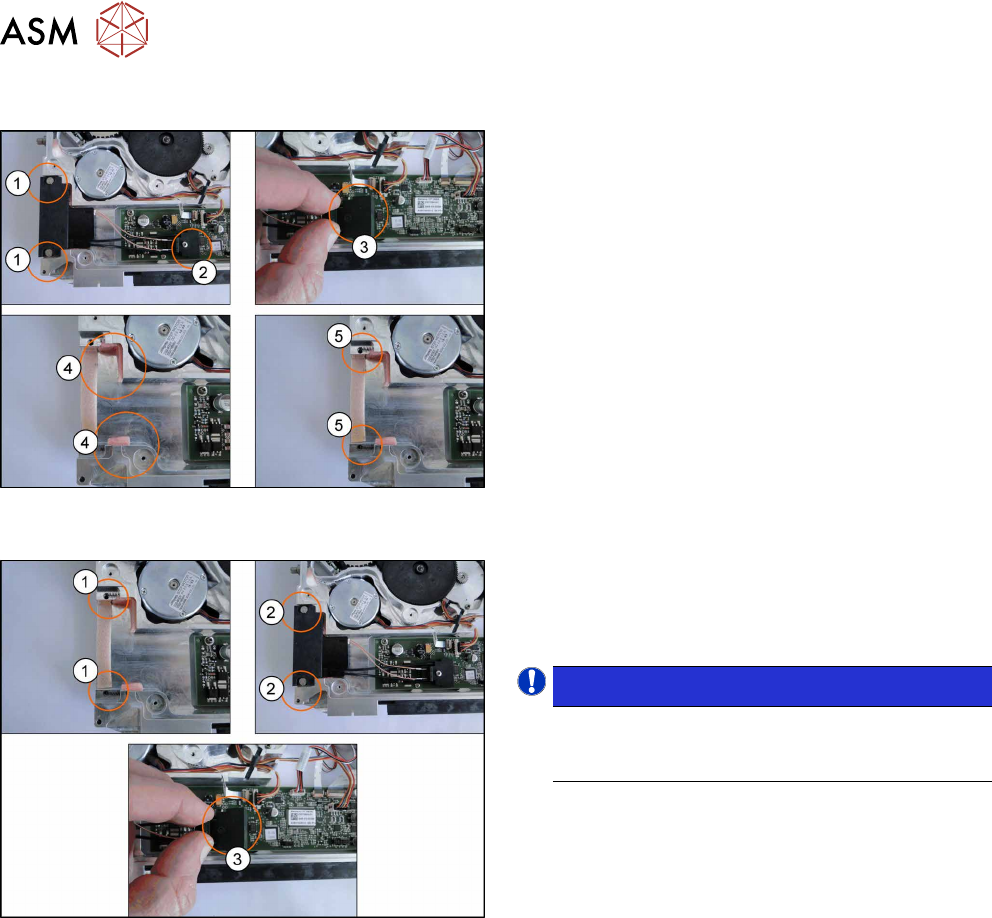
► Loosen and remove the two collar screws(1).
► Loosen and remove the Phillips screw(2).
► Carefully lift the connector from the main
board(3).
► Remove any foam seals present (4).
► Check the pressure springs for damage and re-
place where necessary(5).
8.4.2 Fitting the EDIF secondary assembly X Smart
► Insert the two pressure springs(1) into the ducts
provided.
If the pressure springs are bent, these will need
to be replaced.
NOTICE!
During insertion, make sure that the two
pressure spring point forwards, to the EDIF
and are not distorted.
.
► Push the EDIF(2) into the recess at the front of
the feeder module.
► Fasten the EDIF with the two collar screws.
► Check whether the EDIF springs back to the front
if slight pressure is applied to it.
If the EDIF does not spring back, loosen the two collar
screws(2) and make sure that the two pressure
springs(see 1 previous figure) are aligned towards the
front and are not bent.
► Place the connector on the main board, ensuring
the alignment pins are centered(3).
► Fix the connector to the board with the Phillips
screw and carefully tighten.
► Fit the left side cover (see 8.3.2 "Fitting the Left
Side Cover" [}136]).
8 Repairs to SmartFeeder 2x8 mm X
8.5 Pickup window
Service Manual SIPLACE SmartFeeder 4 - 104 mm X 11/2017 139
8.5 Pickup window
Required spare part
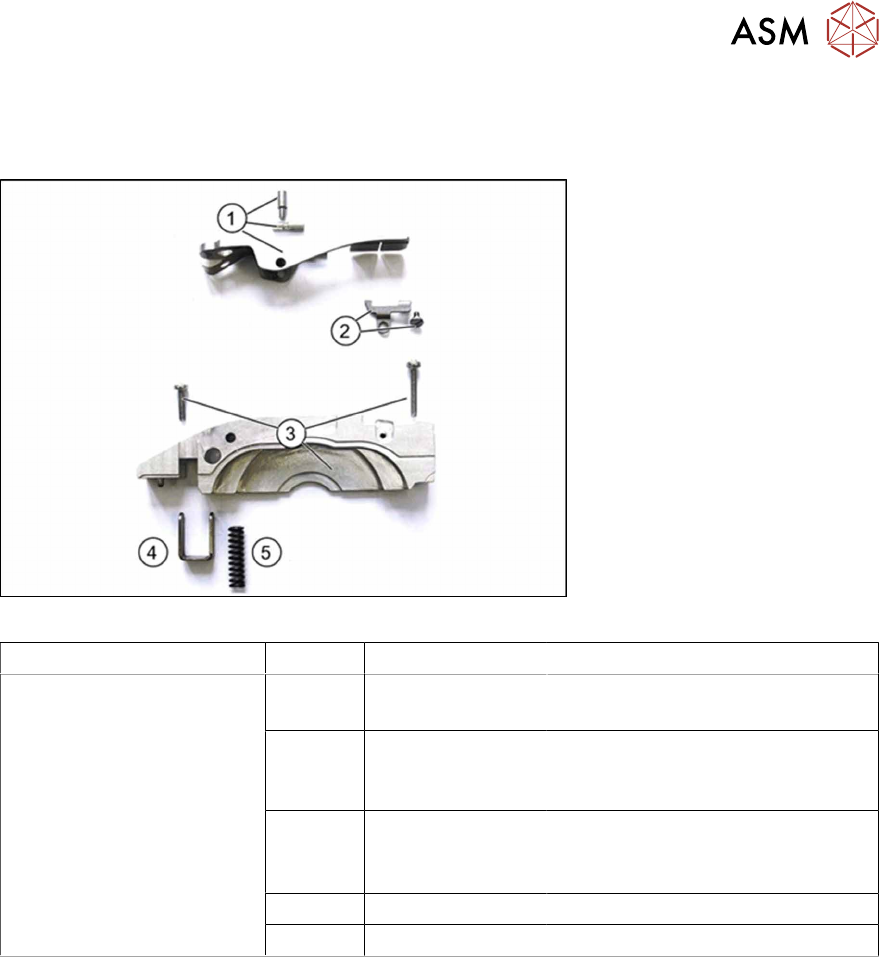
Fig.45: Pickup window assy. /X2x8
Feeder module Position Item no. Designation
SmartFeeder 2x8mm X 1 03078710-xx
03077394-0102
Pickup window assy. /X2x8
Axis pickup window /X2x8
2 03053708Sxx
03077823-xx
Rocker lever /X2x8
(with collar screw)
Collar screws /X2x8
3 03077354-xx
03010210-xx
03010214-xx
Tape duct /X2x8
ISO 7045 - M2.5 x 8-A2-50-H
ISO 7045 - M2.5 x 16-A2-50-H
4 03077381-xx Pressure bracket /X2x8
5 03077928-xx Pressure spring 0.85x5.1x18.3
Required tools
●
Phillips screwdriver
●
Tweezers
●
Allen key 1.5
8 Repairs to SmartFeeder 2x8 mm X
8.5 Pickup window
140 Service Manual SIPLACE SmartFeeder 4 - 104 mm X 11/2017
8.5.1 Removing the pickup window
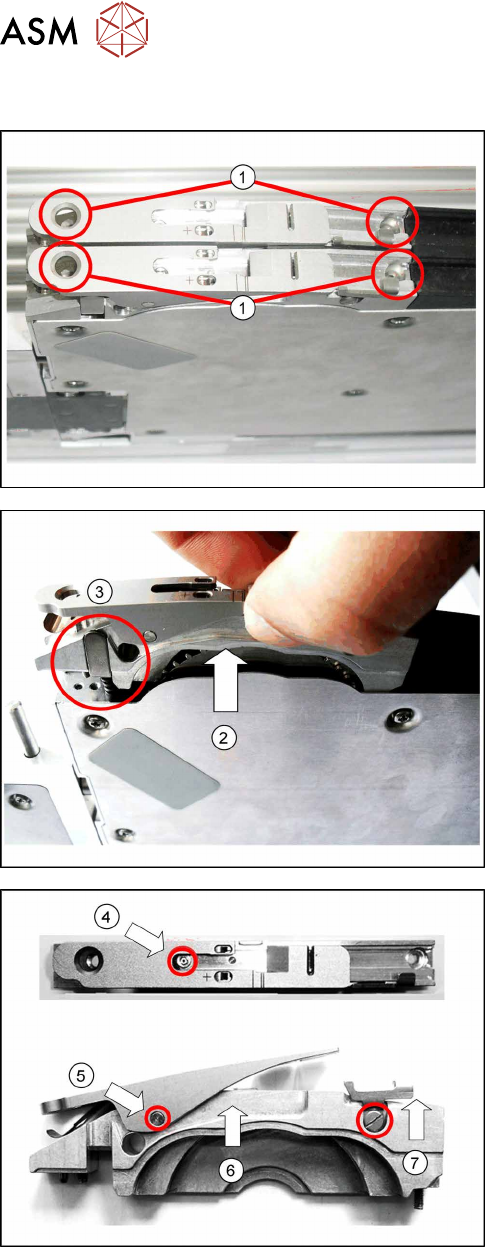
► Remove the 2 marked screws fastening the rel-
evant pickup window and tape duct to the feeder
module. (1)
► Lift the pickup window up and off, together with
the tape duct. (2)
► Also remove the pressure spring and the pres-
sure bracket, to prevent these being lost.(3)
► Remove the fitting screw(4), which is in the tape
duct and which fixes the pickup window axis.
► Loosen the axis on the pickup window(5) and
push this out of the tape duct.
► Lift the pickup window up and off.(6)
► Loosen the collar screw(7) on the rocker lever
and remove this.