00198505-01_SM_SIPLACE_SmartFeeder_EN.pdf - 第185页
9 Repairs to SmartFeeder 12 mm X / 16 mm X 9.4 EDIF Service Manual SIPLACE SmartFeeder 4 - 104 mm X 11/2017 185 9.3.4 Fitting the Right Side Cover ► Carefully place the feeder module with the left- hand side down on a st…
9 Repairs to SmartFeeder 12 mm X / 16 mm X
9.3 Side Covers
184 Service Manual SIPLACE SmartFeeder 4 - 104 mm X 11/2017
9.3.1 Removing the Left Side Cover
► Carefully place the feeder module with the right-
side side down on a stable, level and clean sur-
face.
► Loosen the screws as shown in the diagram.
The 3 red dots point to the screws for which you need
a TORX screwdriver with a torque of 0.6Nm.
The blue dots point to the screws for which you need a
Phillips screwdriver with a torque of 0.6Nm.
9.3.2 Fitting the Left Side Cover
► Carefully place the feeder module with the right-
side side down on a stable, level and clean sur-
face.
► Fix the screws as shown in the diagram. Begin
with the inner screws and work towards the out-
side.
The 3 red dots point to the screws for which you need
a TORX screwdriver with a torque of 0.6Nm.
The blue dots point to the screws for which you need a
Phillips screwdriver with a torque of 0.6Nm.
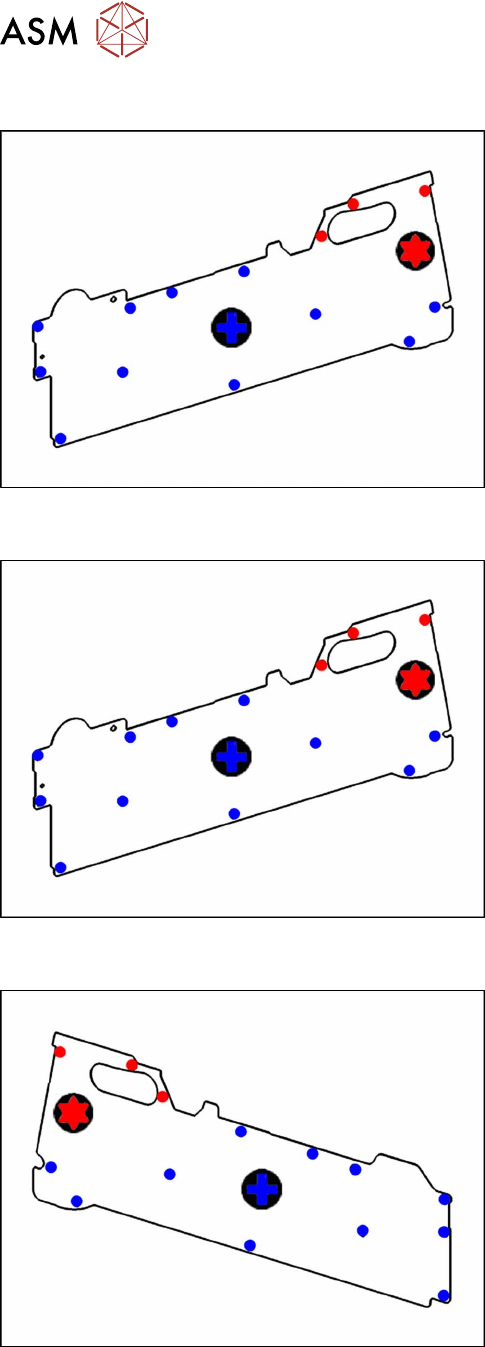
9.3.3 Removing the Right Side Cover
► Carefully place the feeder module with the left-
hand side down on a stable, level and clean sur-
face.
► Loosen the screws as shown in the diagram.
The 3 red dots point to the screws for which you need
a TORX screwdriver with a torque of 0.6Nm.
The blue dots point to the screws for which you need a
Phillips screwdriver with a torque of 0.6Nm.
9 Repairs to SmartFeeder 12 mm X / 16 mm X
9.4 EDIF
Service Manual SIPLACE SmartFeeder 4 - 104 mm X 11/2017 185
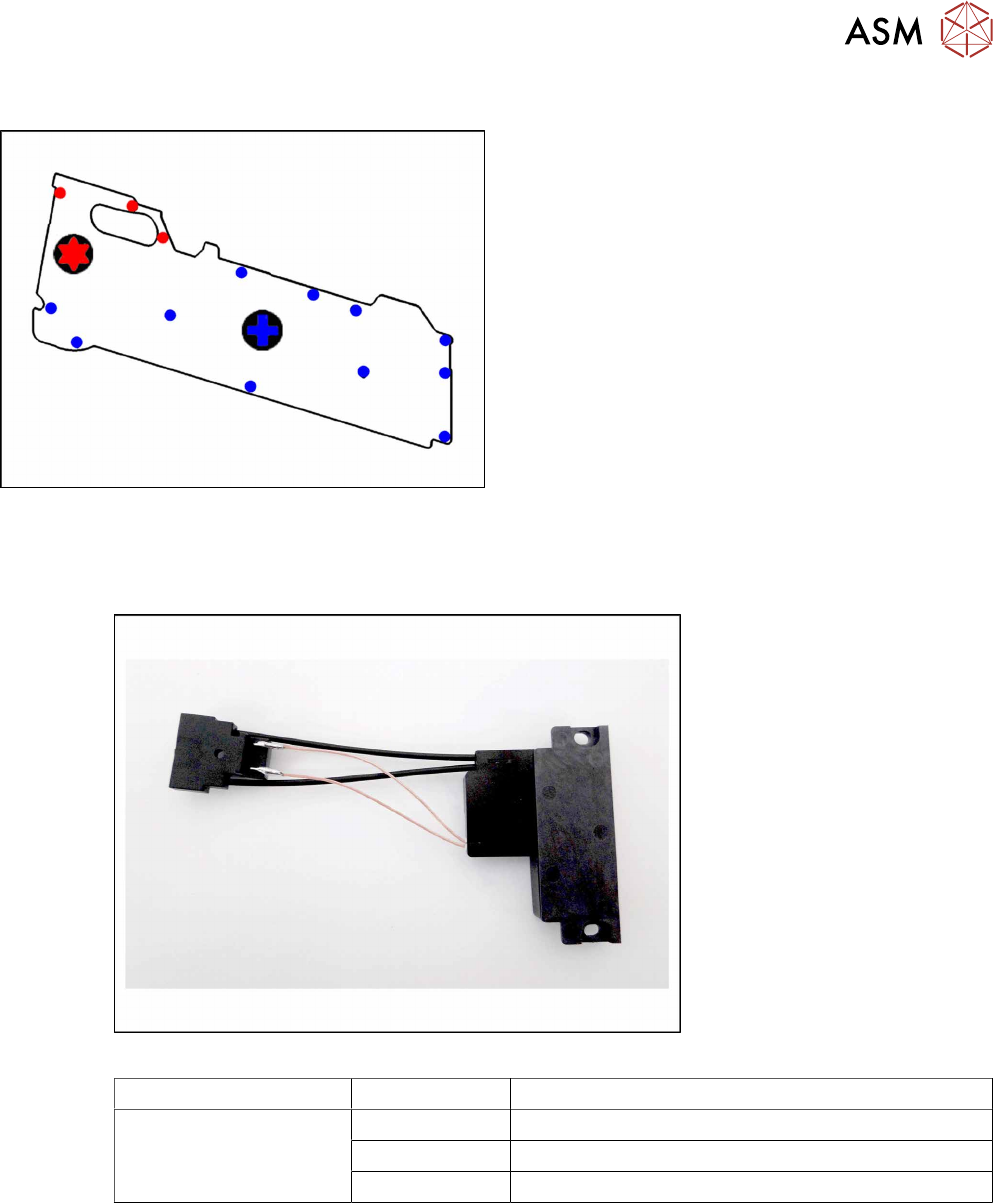
9.3.4 Fitting the Right Side Cover
► Carefully place the feeder module with the left-
hand side down on a stable, level and clean sur-
face.
► Fix the screws as shown in the diagram. Begin
with the inner screws and work towards the out-
side.
The 3 red dots point to the screws for which you need
a TORX screwdriver with a torque of 0.6Nm.
The blue dots point to the screws for which you need a
Phillips screwdriver with a torque of 0.6Nm.
9.4 EDIF
Required spare part
Fig.65: EDIF secondary assembly
Feeder module Item no. Designation
SmartFeeder 12mm X
SmartFeeder 16mm X
03125222-xx EDIF secondary assembly X Smart
03012683-xx Pressure spring D-027
03068667-xx Collar screw ø4x4.5 M3 /X2x8
Required tools
●
Flat-bladed screwdriver 0.6Nm
●
Phillips screwdriver 0.6Nm
●
Phillips screwdriver 0.2Nm
●
TORX screwdriver 0.6Nm, size T8
9 Repairs to SmartFeeder 12 mm X / 16 mm X
9.4 EDIF
186 Service Manual SIPLACE SmartFeeder 4 - 104 mm X 11/2017
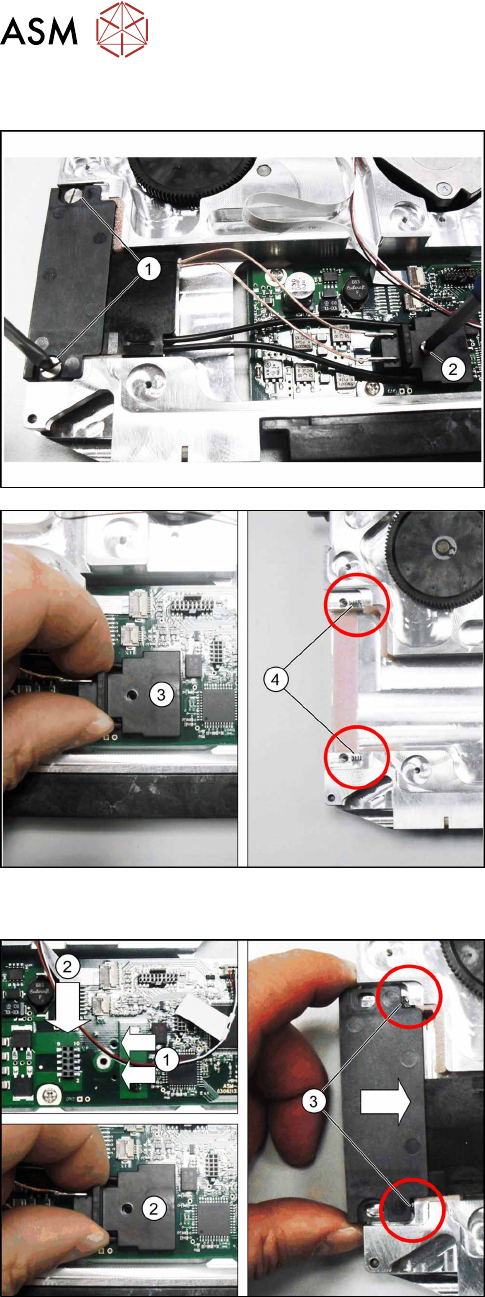
9.4.1 Removing the EDIF
► Remove the left side cover (see 9.3.1 "Removing
the Left Side Cover" [}184].
► Loosen the two screws on the EDIF.(1)
► Loosen the screw on the connector.(2)
► Carefully pull the connector upwards and out.(3)
► Remove the EDIF.
Note:
Make sure that the two springs(4) are not lost.
9.4.2 Fitting the EDIF
► Position the EDIF connector. To do this, insert
the two centering pins on the underside of the
connector in the holes provided on the board.(1)
► Press the EDIF connector onto the marked con-
nection.(2)
► Push the EDIF into the recess at the front of the
feeder module.
Note:
Make sure that the two springs(3) are behind the
EDIF, point straight ahead to the EDIF and are not dis-
torted when inserted.
Replace any bent springs.