00198505-01_SM_SIPLACE_SmartFeeder_EN.pdf - 第208页
9 Repairs to SmartFeeder 12 mm X / 16 mm X 9.7 Drives and gears 208 Service Manual SIPLACE SmartFeeder 4 - 104 mm X 11/2017 9.7.4.1 Removing the Foil Disposal Drive ► Remove the left and right side cover (see 9.3.1 "…
9 Repairs to SmartFeeder 12 mm X / 16 mm X
9.7 Drives and gears
Service Manual SIPLACE SmartFeeder 4 - 104 mm X 11/2017 207
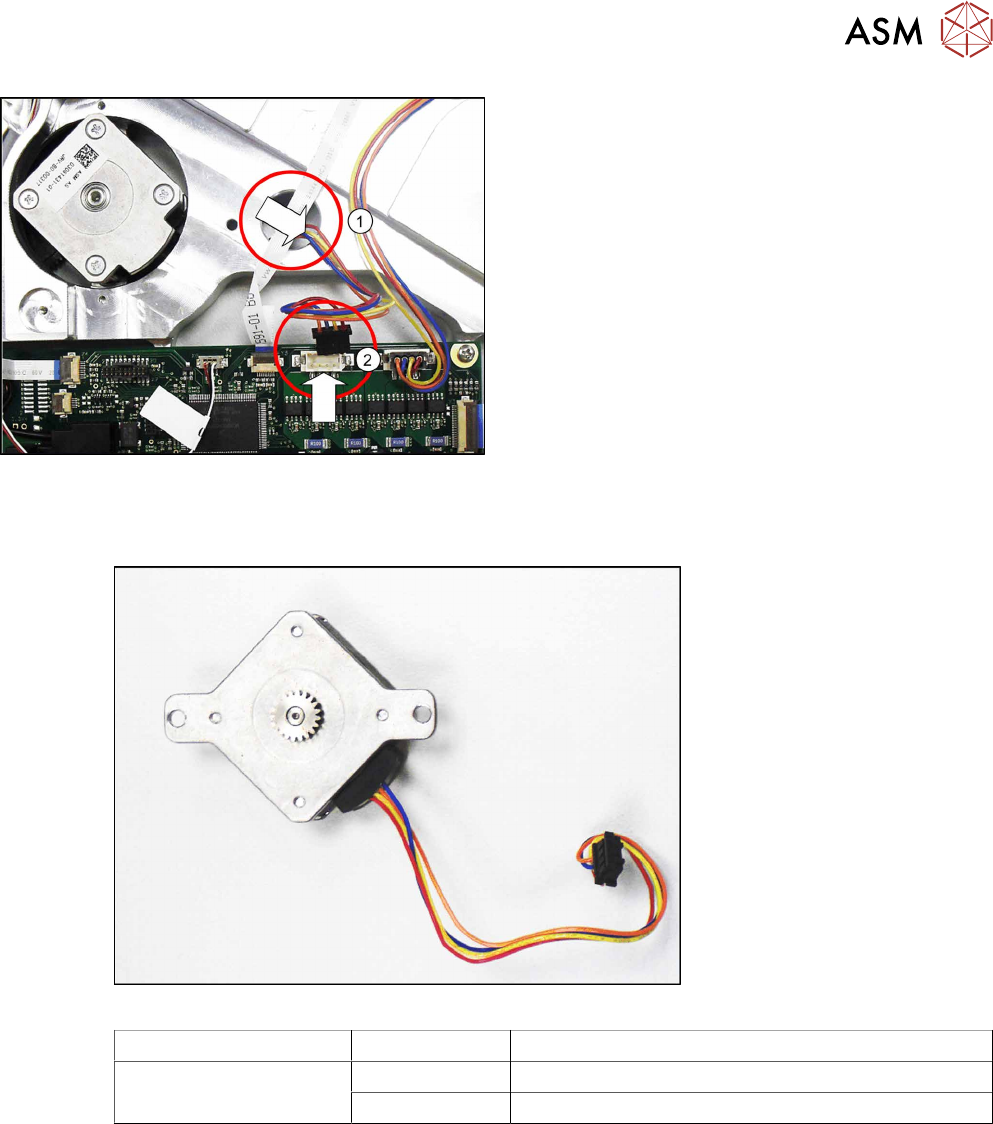
► Guide the tape drive cable through the marked
openingto the other side of the feeder module.
(1)
Make sure that the cable is on the right side of
the feeder module in the cable duct.
► Carefully place the feeder module on its right
side.
► Press the connector of the tape drive cable into
the marked connection on the control board.(2)
► Fasten the left and the right side covers (see
9.3.2 "Fitting the Left Side Cover" [}184], 9.3.4
"Fitting the Right Side Cover" [}185]).
9.7.4 Foil drive (hybrid stepping motor)
Required spare part
Fig.72: Foil disposal drive for hybrid stepping motor assembly
Feeder module Item no. Designation
SmartFeeder 12mm X
SmartFeeder 16mm X
03081431Sxx Hybrid stepping motor assembly /X12-16 V2
03010210-xx ISO 7045 - M2.5 x 8-A2-50-H
Required tools
●
Phillips screwdriver 0.6Nm
●
Phillips screwdriver 0.9Nm
●
TORX screwdriver 0.6Nm, size T8
●
Gauge for foil disposal motor /X12-16 V2 [03085119-xx]
●
Circlip pliers for outer rings 3-10 mm
●
Tweezers
9 Repairs to SmartFeeder 12 mm X / 16 mm X
9.7 Drives and gears
208 Service Manual SIPLACE SmartFeeder 4 - 104 mm X 11/2017
9.7.4.1 Removing the Foil Disposal Drive
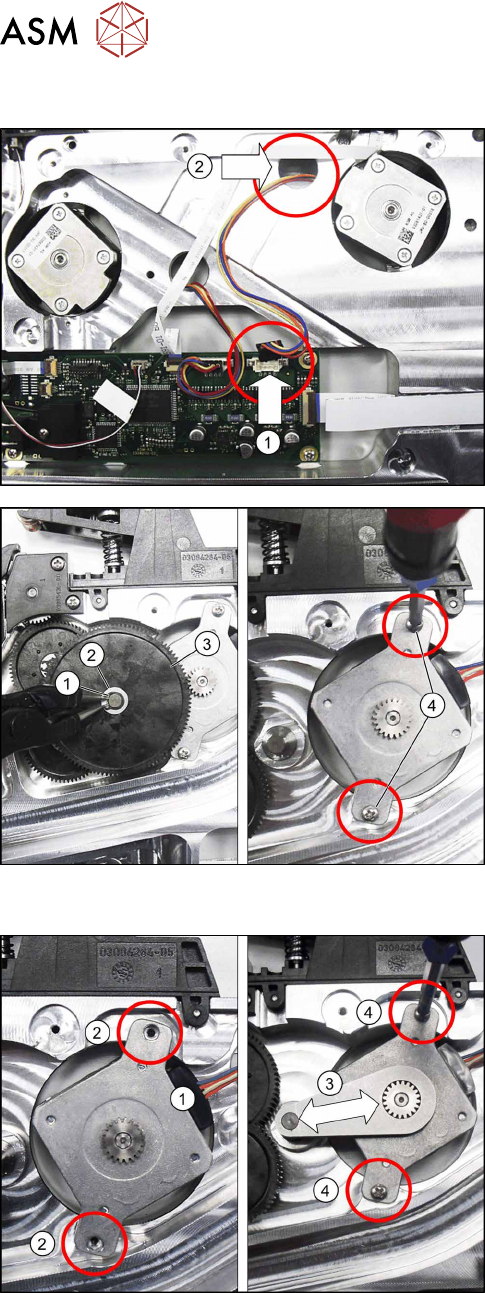
► Remove the left and right side cover (see 9.3.1
"Removing the Left Side Cover" [}184] and 9.3.3
"Removing the Right Side Cover" [}184]).
► Carefully place the feeder module on its right
side.
► Unplug the connector on the foil disposal drive
cable from its connection on the control
board.(1)
► Guide the cable through the marked opening(2)
to the other side of the feeder module.
► Carefully place the feeder module down on its left
side.
► Remove the circlip(1) on gear stage1.
► Remove the washer (2) on gear stage1
► Remove gear stage 1.(3)
► Remove the two screws which fasten the foil dis-
posal drive.(4)
► Remove the foil disposal drive.
9.7.4.2 Fitting the Foil Disposal Drive
► Carefully place the feeder module down on its left
side.
► Insert the foil disposal drive into the recess.
Make sure that the cable of the foil disposal drive
is on the right side.
► Run the cable in the cable duct.(1)
► Position the foil disposal drive so that you can
see the drilled holes in the feeder module base
unit, through the holes in the drive frame.(2)
► Fit the gauge as shown, with the level side point-
ing upwards, onto the pinion of the foil disposal
drive and onto the axle of gear stage1.(3)
► Position the foil disposal drive so that the pinion
and gauge can not catch in one another.
► Fix the foil disposal drive with the two Phillips
screws ISO 7045 M2.5x8. Use a Phillips screw-
driver with 0.9Nm for this.
► Remove the gauge.
9 Repairs to SmartFeeder 12 mm X / 16 mm X
9.7 Drives and gears
Service Manual SIPLACE SmartFeeder 4 - 104 mm X 11/2017 209
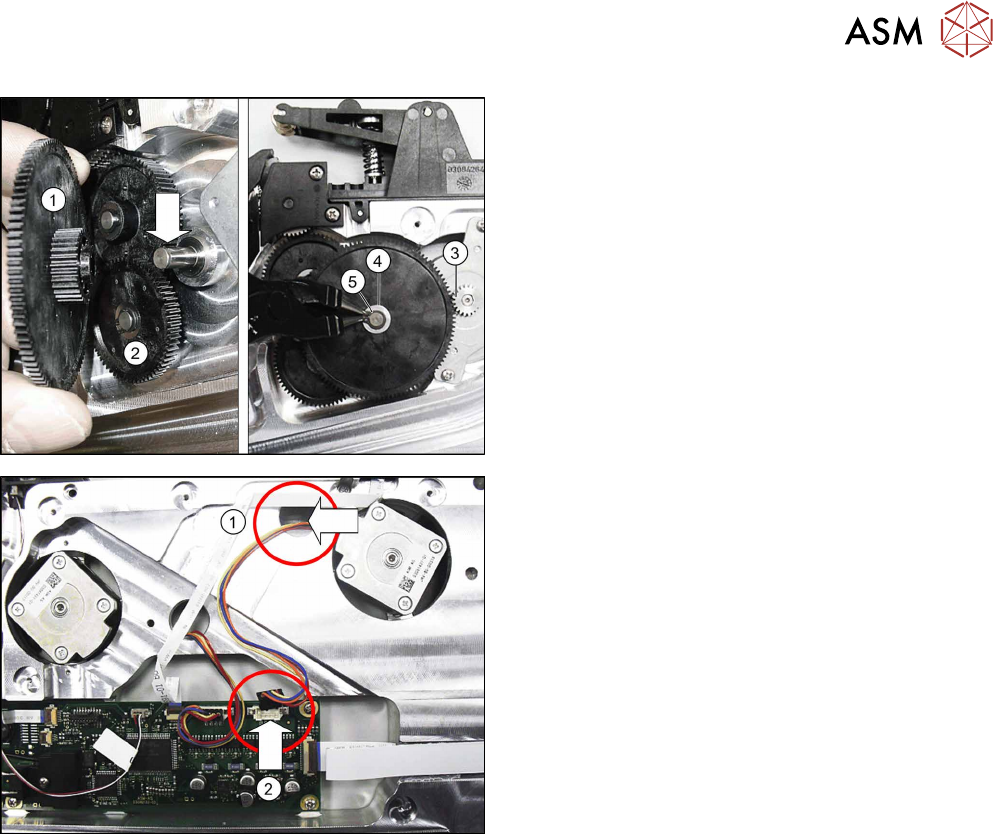
► Fit gear stage1(1) with the smaller toothed
wheel pointing downwards, onto the axle.
Make sure that the smaller toothed wheel en-
gages below in gear stage2(2).
The large toothed wheel for the gear stage will
engage above with the pinion of the foil disposal
drive. (3)
► Fit the washer into place.(4)
► Secure gear stage 1 with a new circlip. (5)
► Guide the foil disposal drive cable through the
marked openingto the other side of the feeder
module.(1)
Make sure that the cable is on the right side of
the feeder module in the cable duct.
► Carefully place the feeder module on its right
side.
► Plug the connector for the foil disposal drive
cable into the marked connection on the control
board.(2)
► Fasten the left and the right side covers (see
9.3.2 "Fitting the Left Side Cover" [}184], 9.3.4
"Fitting the Right Side Cover" [}185]).