Vakuumtooling Neology HF3.pdf - 第26页
Installation instructions Vacuum Tooling Neology (00166109-01) SIPLACE HF3 02/2005 Edition 26 2.2 Safety inst ructions W A RNING The safet y instruc tions f rom the “Op erati onal safet y” chap ter of the us er manua l a…
Installation instructions Vacuum Tooling Neology (00166109-01) SIPLACE HF3
02/2005 Edition
25
2 Retrofit instructions: Vacuum Tool-
ing Neology (00166109-01), SIPLACE
HF3
2.1 Requirements
Hardware: SIPLACE HF3 2
Software: 2
– Special design conveyor firmware T0610515.HEX must be loaded
– Activation of the "VDO Regensburg" special design on the conveyor control via HyperTerminal.
2.1.1 Activating the option
The option is activated with X34, X35 plugged in and suitable conveyor firmware selected. The
"VDO Regensburg" program is also activated on the conveyor control. 2
2.1.2 Restrictions
Vacuum suction is intended only for use with the carrier PCB provided for testing purposes. If an-
other product is to be produced on this machine or if service tools are used, then the machine must
be refitted with the standard conveyor once more (see 1.8.). The automatic width adjustment must
be deactivated at the station since there is a risk of crashing with the tooling when the conveyor
side walls move together automatically. 2
For maintenance, the stop valve on the maintenance unit must be closed separately, since the
compressed air is still present even after switching off at the main switch. 2
If the air pressure drops (note: temporary air pressure drop), the fixing of the foil to the vacuum
plate should be checked. Process reliability cannot be guaranteed after a drop in the compressed
air pressure. 2
2
2
2
2
2

Installation instructions Vacuum Tooling Neology (00166109-01) SIPLACE HF3
02/2005 Edition
26
2.2 Safety instructions
WARNING
The safety instructions from the “Operational safety” chapter of the user manual and servicing in-
structions take precedence over these instructions. 2
The SIPLACE placement machines are supplied with mains voltage.
Consequently parts of these systems carry dangerous voltages! This voltage is present at certain
modules inside the machine base, even when the machine is switched off at the main power
switch.
Incorrect handling of the placement machine or touching live parts of the machine can result in
death or severe injury, and considerable damage to equipment.
BEFORE starting any work, shut down the operating system correctly, then switch the machine
OFF at the main power switch and disconnect from the main power supply. In addition, the com-
pressed air supply must be switched off at the compressed air unit's main valve in the machine
base and vented by actuating the needle valve on the compressed air unit.
There is DANGER for heart pacemaker wearers in the vicinity of the linear motors, as described
in detail in the "Special safety instructions for working in the vicinity of strong magnetic fields"
section of the user manual and service manual.
Always follow the accident prevention regulations, DIN or other standards and special safety
rules applicable in your country.
Pay attention to the information concerning residual voltages in the Operational Safety chapter.
Follow the ESD regulations as described in the operational safety section of the operating
instructions.
During the retrofit, always secure the machine to prevent access by other people and to prevent
it being switched on again. The procedure is described in the “Locking the machine…” section of
the user manual.
Working with the SITEST program further increases the risk of accident.
The SITEST program must only be used by authorized and trained personnel.
2
2.2.1 Definitions
2
Please note 2
2
Installation instructions Vacuum Tooling Neology (00166109-01) SIPLACE HF3
02/2005 Edition
27
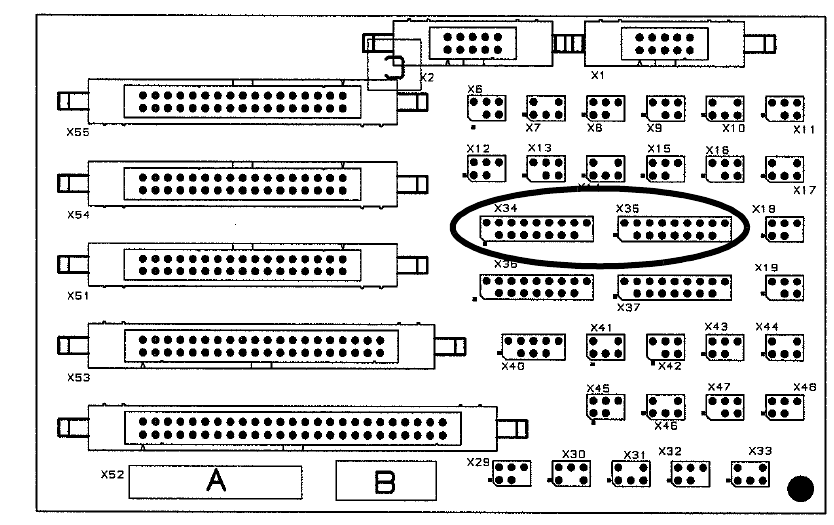
2.3 Working principle with circuit diagrams
If connectors X34 (PA 1) and X35 (PA 2) are plugged in on the conversion board (00359425-xx),
then the option is activated and the signal lines can be evaluated accordingly. 2
2
Fig. 2.3 - 1 Conversion board HS-60; HF (part no. 00359425-xx)
2
2
2
2
2
2
2
2
2
2
2
2