X3_X4_Series machine - 第125页
User manual SIPLAC E X-Series 3 Technical data Software Vers ion SR.601.xx 11/ 2005 US Ed ition 3.7 Placem ent heads 125 T o dete ct the set-do wn heigh t, a "Z axis down " senso r is attached at the placemen t…
3 Technical data User manual SIPLACE X-Series
3.7 Placement heads Software Version SR.601.xx 11/2005 US Edition
124
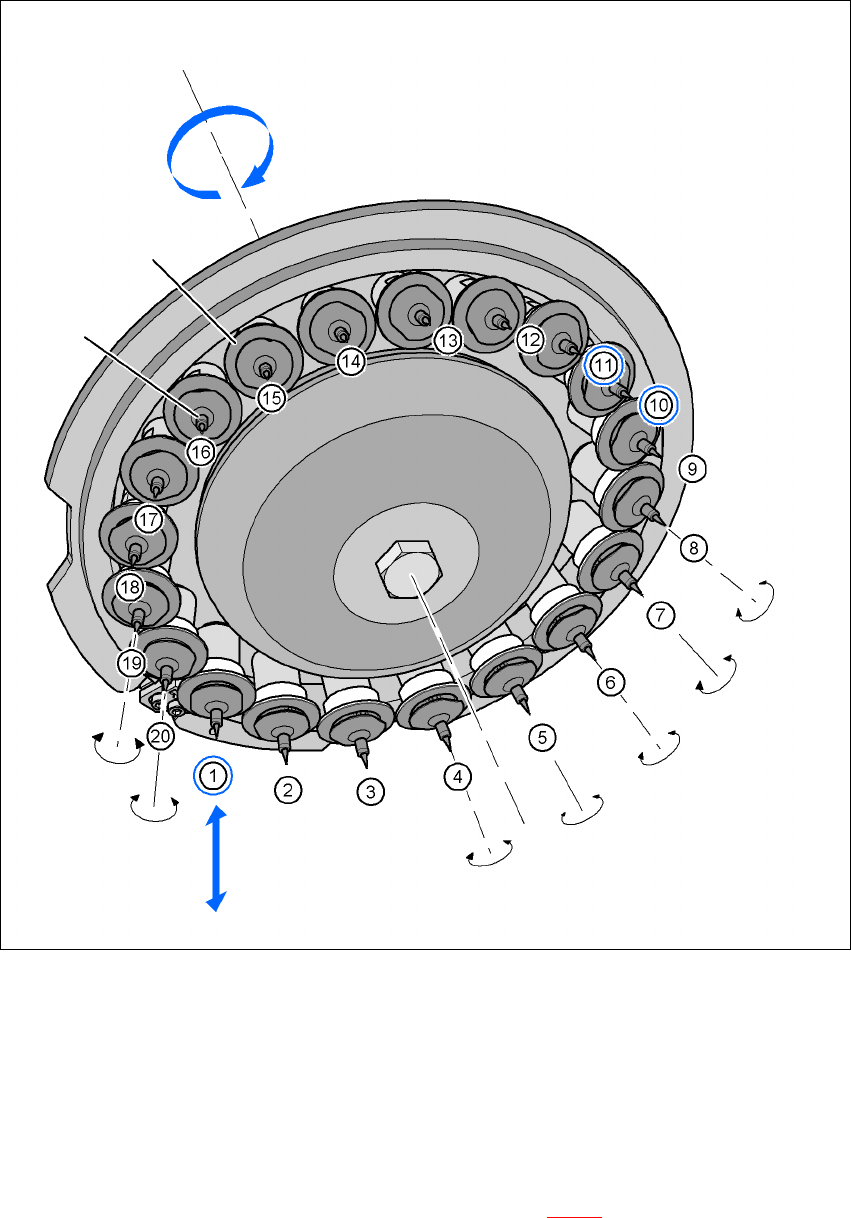
Fig. 3.7 - 6 Description of the functions
(1) Component pick-up position, placement position, reject position, component check with
component sensor
(10) Vacuum check of the nozzle in the holding circuit, with or without component
(11) Position for optical centering of the components
Every DP drive that is in the bottom star position (item 1 in Fig. 3.7 - 6
) is raised or lowered by this
axis, thus picking up the components from the feeder modules and setting them down on the PCB.
Star rotation
Star axis
DP drive (segment)
Nozzle
Z axis
Check pick up, place or
reject
component with compo-
nent sensor
DP axis
Each sleeve can be
rotated individually.
Component
camera for optical
centering
Nozzle vacuum
check in the
holding circuit

User manual SIPLACE X-Series 3 Technical data
Software Version SR.601.xx 11/2005 US Edition 3.7 Placement heads
125
To detect the set-down height, a "Z axis down" sensor is attached at the placement position. This
detects a relative movement between nozzle and segment. When the Z axis springs into position,
this returns a signal - the sensor stop signal - to the axis card that the precontrol uses to correct
the position control. A pneumatic return system was implemented to avoid the risk of a head crash
when the power is switched off due to the segment being lowered with the sleeve. This keeps the
segment securely in the top position when the power is off. Regardless of this pneumatic return
system (item 5 in Fig. 3.7 - 4
), the control for the Z axis is designed so that, in the event of a power
failure, the placement machine still has sufficient residual energy stored in the servo amplifier to
raise the Z axis into the top position. A "Powerfail" signal in the machine activates the axis card
and the servo amplifier to move the Z axis into the top position.
The Z axis is an "intelligent axis". It "notes" the pick-up height of each feeder module track and the
placement height for each component. The placement process can thus be speeded up, while re-
taining the programmed set-down force.
DP axis (item 1 in Fig. 3.7 - 4) 3
The DP axis turns the component into the desired placement position before centering (item 11 in
Fig. 3.7 - 6
). While the component camera is recording the image, the component must be abso-
lutely stationary, i.e. there must be no control movements of the DP drive. Once the correction
values have been determined, the DP drive turns the component into the definitive placement po-
sition.
Every DP drive has its own DP motor, i.e. the nozzles can be rotated independently of one an-
other.
The DP motor is position-controlled. Position encoders determine the actual values for the axis
motions at the axis card. The actual values are analyzed on the axis card. The position control on
the axis card provides the current and voltage setpoint values for the servo amplifier used to op-
erate the DP motors.
Vacuum system 3
The vacuum system consists of two vacuum circuits - the pick-up/placement circuit and the hold-
ing circuit. The two circuits are coupled together at the "Pick-up, place, eject" star position (item 1
in Fig. 3.7 - 6
).
The vacuum for the pick-up/placement circuit is generated by a vacuum nozzle. The values for the
current pressure and vacuum statuses are sent to the control circuit by an integral pressure/vac-
uum sensor. This control circuit allows the circuit to switch quickly and smoothly between vacuum
and air kiss. Rapid evacuation of the circuit, in turn, leads to reliable component suction, and thus
increases pick-up reliability. Rapid build-up of an air pulse for setting down the component on the
PCB, in turn, increases the placement speed.
In the holding circuit, each segment is supplied with a vacuum by a separate vacuum nozzle. The
segments are disconnected from one another, and so cannot affect one another. Even if the wrong

3 Technical data User manual SIPLACE X-Series
3.7 Placement heads Software Version SR.601.xx 11/2005 US Edition
126
air is taken in at one or more nozzle, the segments will not be affected and can continue place-
ment.
At the "Vacuum check" star position (item 10 in Fig. 3.7 - 6
), the current vacuum value of a seg-
ment can be measured in the holding circuit with or without component.
Component sensor (item 5 in Fig. 3.7 - 5) 3
The component sensor is positioned so that components can be measured at the pick-up/place-
ment position (item 1 in Fig. 3.7 - 6
). Measurements at the tip of the nozzle can thus be carried
out during every Z axis movement. Differential measurements can be used to identify components
missing from the nozzles. The component height can also be detected.
Component camera (item 1 in Fig. 3.7 - 5) 3
The component camera is mounted on the placement head at star position 11 (item 11 in Fig. 3.7
- 6). It uses a digital interface (hotlink) to exchange data with the vision processor in the axis unit.
The camera is designed to capture the component from underneath. If a component drops onto
the camera, it is removed from the camera field via a removal ramp.
Adapter board (item 2 in Fig. 3.7 - 5) 3
The adapter board is the interface between placement head and placement machine. The vacuum
sensor for the holding circuit is mounted on the star housing.
The following functions are implemented on the adapter board:
– Display the operating voltages at the head
– Display the sensor statuses
– Test access to the CAN bus for the placement head
– Test connector for the signals from the incremental encoder
– Test pins for the analog signals
– Control of the power supply for the incremental encoders for the star and Z drives
– SPI bus interface for the component sensor, the vacuum unit, the "Holding circuit" vac-
uum sensor and the EEPROM
– Signal processing for the output signal from the "Holding circuit" vacuum sensor
– Signal processing for the component sensor signal
– Signal processing for the "Z axis down" sensor
– Signal processing for the CAN bus for the placement head and the machine
– Activation of the return cylinder for the Z axis