NPM-D3维修手册.pdf - 第195页
NPM-D3 Service Manual 5.6 2D Inspection Head EJM6D3-MB-05SM-00( 編集中 ).DOC Page 5-67 5.6 2D Inspection Head 2D 検 査ヘッド 2D 检查头 5.6.1 Removing the 2D Inspection Head 2D 検査ヘッド取り外し 卸下 2D 检查头 Long bit: N510046662AA ロングビット 长钻头 2…
NPM-D3
Service Manual
5.5 Light Weight 16-Nozzle Head
Page 5-66 EJM6D3-MB-05SM-00(
編集中
).DOC
5.5.7 Secondary Filter Replacement
2
次フィルタ交換
2
次过滤器的更换
Unit No.
N610096433AA
5.1.1 Head Unit Detaching and
Attaching
ヘッドユニット取り外し
/
取り付け
头装置的拆卸和安装
5.5.7 Secondary Filter
Replacement
2
次フィルタ交換
2
次过滤器的更换
5.1.1 Head Unit Detaching and
Attaching
ヘッドユニット取り外し
/
取り付け
头装置的拆卸和安装
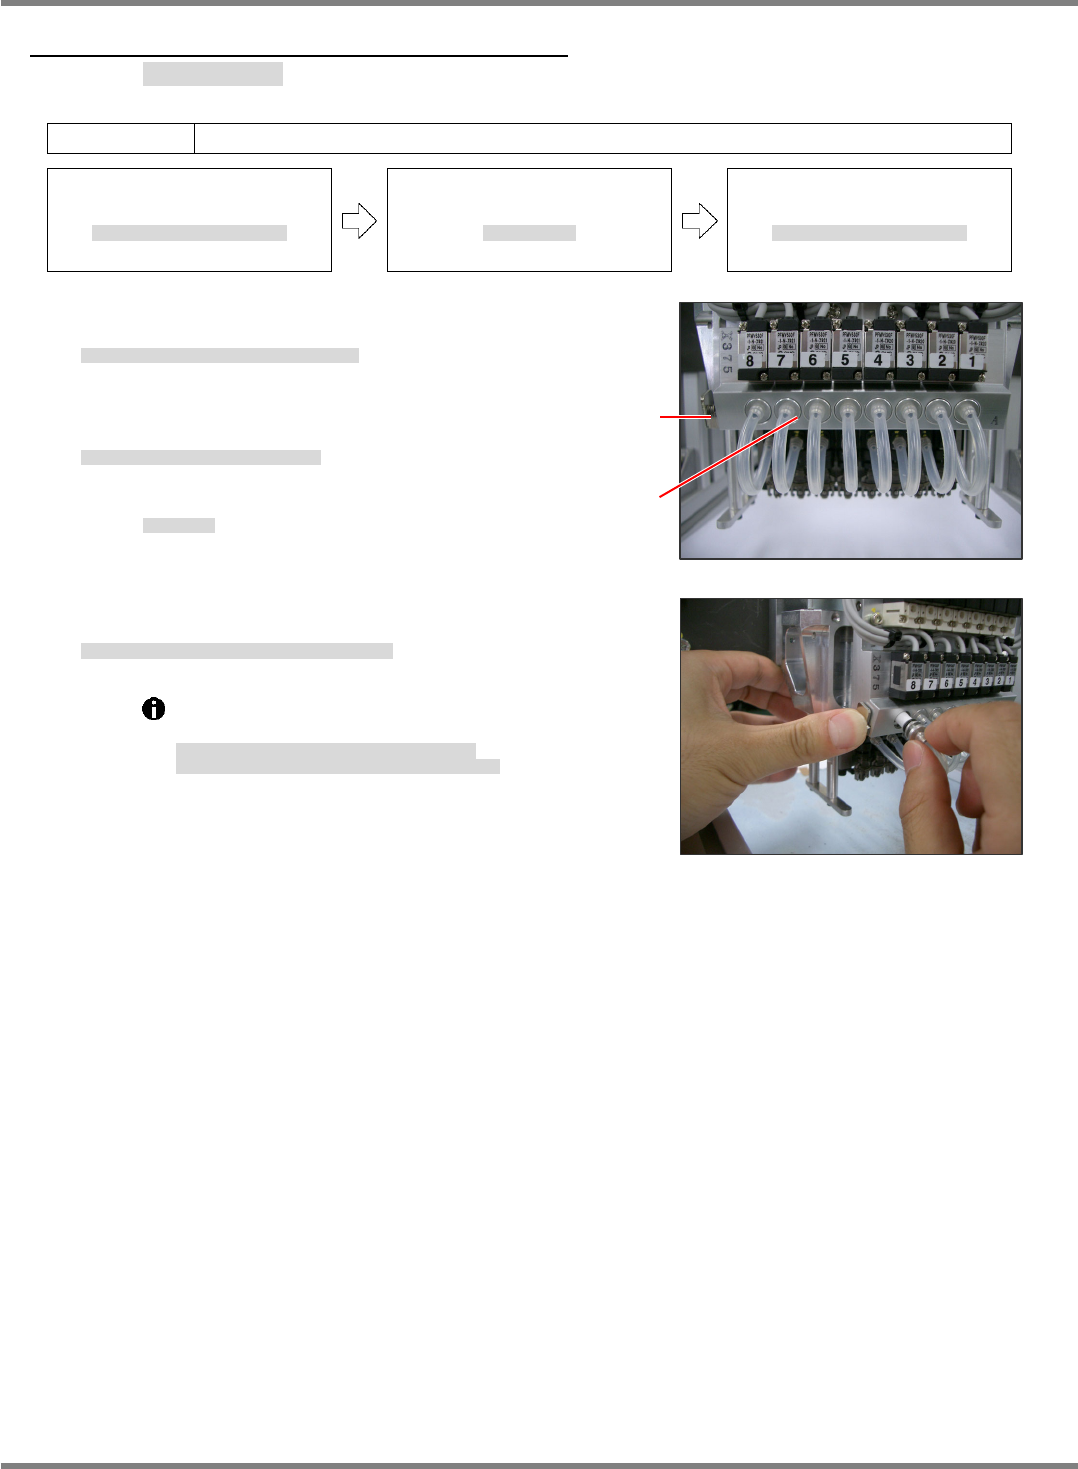
28.
1. Press the button shown in the right photo and remove
the holders. (Fig. 2)
取り外しボタンを押してホルダを引き抜く。
(Fig. 2)
按下拆卸按钮、拔出支架。
(Fig. 2)
2. Replace the filters from the removed holders.
取り出したホルダからフィルタを交換する。
对拆下的支架更换过滤器。
Filter No.:
N510054846AA
フィルタ品番
过滤器的部件编号
3. After replacing, set the holders back into place while holding down
the button.
交換後、取り外しボタンを押しながらホルダを元に戻す。
更换后,一边按下拆卸按钮一边将支架装回原处。
Detach the head before replacing the filters.
Do not pull the air hose when pulling the holders.
フィルタ交換時はヘッドを取り外して行ってください。
ホルダを引き抜く時は、エアーホースを引っ張らないこと。
要更换过滤器时,请将贴装头卸下后实施。
拔下支架时,不可拉拽气管。
Fig. 2
Fig. 1
Removal
button
Holde
r
(Filter)
NPM-D3
Service Manual
5.6 2D Inspection Head
EJM6D3-MB-05SM-00(
編集中
).DOC Page 5-67
5.6 2D Inspection Head
2D 検査ヘッド
2D 检查头
5.6.1 Removing the 2D Inspection Head
2D 検査ヘッド取り外し
卸下 2D 检查头
Long bit:
N510046662AA
ロングビット
长钻头
29.
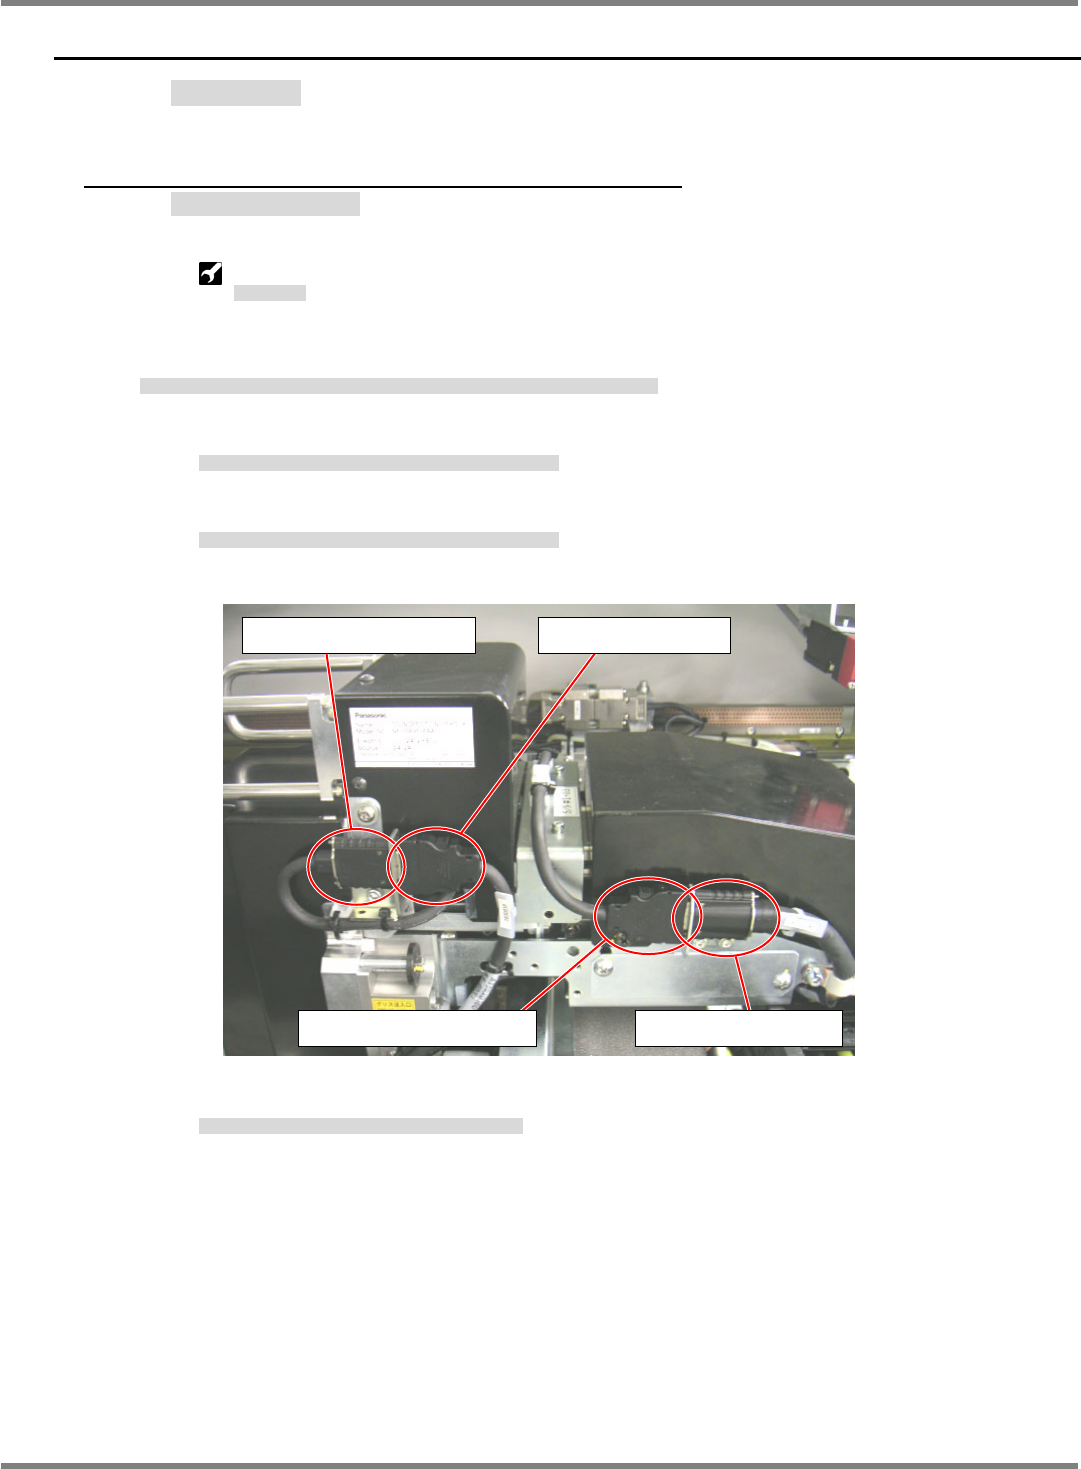
1. Disconnect the cables (camera link and head camera) connected to the 2D inspection head.
2D 検査ヘッドユニットとの接続ケーブル (カメラリンク・ヘッドカメラケーブル) を取り外す。
拆下与 2D 检查头装置相连接的电缆 (照相机连接线・头照相机电缆)。
1. Disconnect the head camera cable from the head camera connector.
ヘッドカメラ接続コネクタからヘッドカメラケーブルを取り外す。
从头照相机连接器上拆下头照相机电缆。
2. Disconnect the camera link output cable from the cableveyor connector.
ケーブルベアコネクタからカメラリンク出力ケーブルを取り外す。
从电缆链套的连接器上拆下照相机连接输出电缆。
3. Connect the head camera cable to the cableveyor connector.
ケーブルベアコネクタとヘッドカメラケーブルを接続する。
将头照相机电缆和电缆链套的连接器相连接。
Head camera connector Head camera cable
Camera link output cable Cableveyor connector
NPM-D3
Service Manual
5.6 2D Inspection Head
Page 5-68 EJM6D3-MB-05SM-00(
編集中
).DOC
2. Loosen the bolts (3-M6x20) in the order of (1) lower right, (2) upper left, and (3) upper right until threaded
portions of these bolts are completely disengaged. (Fig. 1)
2D 検査ヘッドユニット取り付けボルト(3M620)を右下、左上、右上の順に緩め、ボルトのネジ部を全て抜きます。(Fig. 1)
按照右下、左上、右上的顺序松开 2D 检查头装置的安装螺栓(3M620),将螺栓的螺丝部分全部拔出。(Fig. 1)
The threaded portion of the upper right bolt cannot be disengaged completely if the mounting
surfaces are flush against each other.
Slide the 2D inspection head unit to the far side and make sure the threaded portion of the
bolt has been completely disengaged.
右上のボルトは、取り付け面が密着しているとボルトのネジ部が全て抜けません。
2D 検査ヘッドユニットを奥側にスライドさせ、ボルトのネジ部が完全に抜けたことを確認してください。
右上方的螺栓在安装面贴紧的状态下,螺栓的螺丝部分不能完全拔出。
请将 2D 检查头装置滑动到内侧,并确认螺栓的螺丝部分已经完全被拔出。
3. Hold the handles on the 2D inspection head unit. While
raising the unit, remove it toward you. (Fig. 2)
2D 検査ヘッドユニット上部の取手を持ち、上部に持ち上げながら手前に 2D 検査ヘッドユニットを取
り外します。(Fig. 2)
用手拿住 2D 检查头装置上部的把手,一面向上提一面将 2D 检查头装置向跟前侧取出。(Fig. 2)
Head type
ヘッド種類
头种类
Weight
重量
重量
2D inspection
2D
検査ヘッド
2D
检查头
5.7 k
g
4. Store the removed 2D inspection head unit in the dedicated case A. (Fig. 3)
取り外した 2D 検査ヘッドユニットは、専用ケース A に収納します。(Fig. 3)
请将卸下的 2D 检查头装置收纳到专用的盒中。(Fig. 3)
When setting the unit aside temporarily, place it on a flat surface with the drawer connector
facing down. (Fig. 4)
2D 検査ヘッドユニットを仮置きする場合は、平らな所にドロアコネクタが下になるようにして、置いてください。(Fig. 4)
要暂时放置 2D 检查头装置时,请在平整的地方将抽屉式连接器朝下放置。(Fig. 4)
Fig. 2
Fig. 3
Dedicated case A
2D inspection head
Fig. 1
Lower
right
Upper
left
Upper
right
Fig. 4