MEC-CP842-1.0E.pdf - 第219页
Setup >> Connecting the Air Supply MEC-CP842-1.0E 9-3 9.2 Connecting the Air Supply Point Connect the air hose to the m achine, and adjust the regulator to the prescribed air pressure. Procedure 1 Connect the air h…
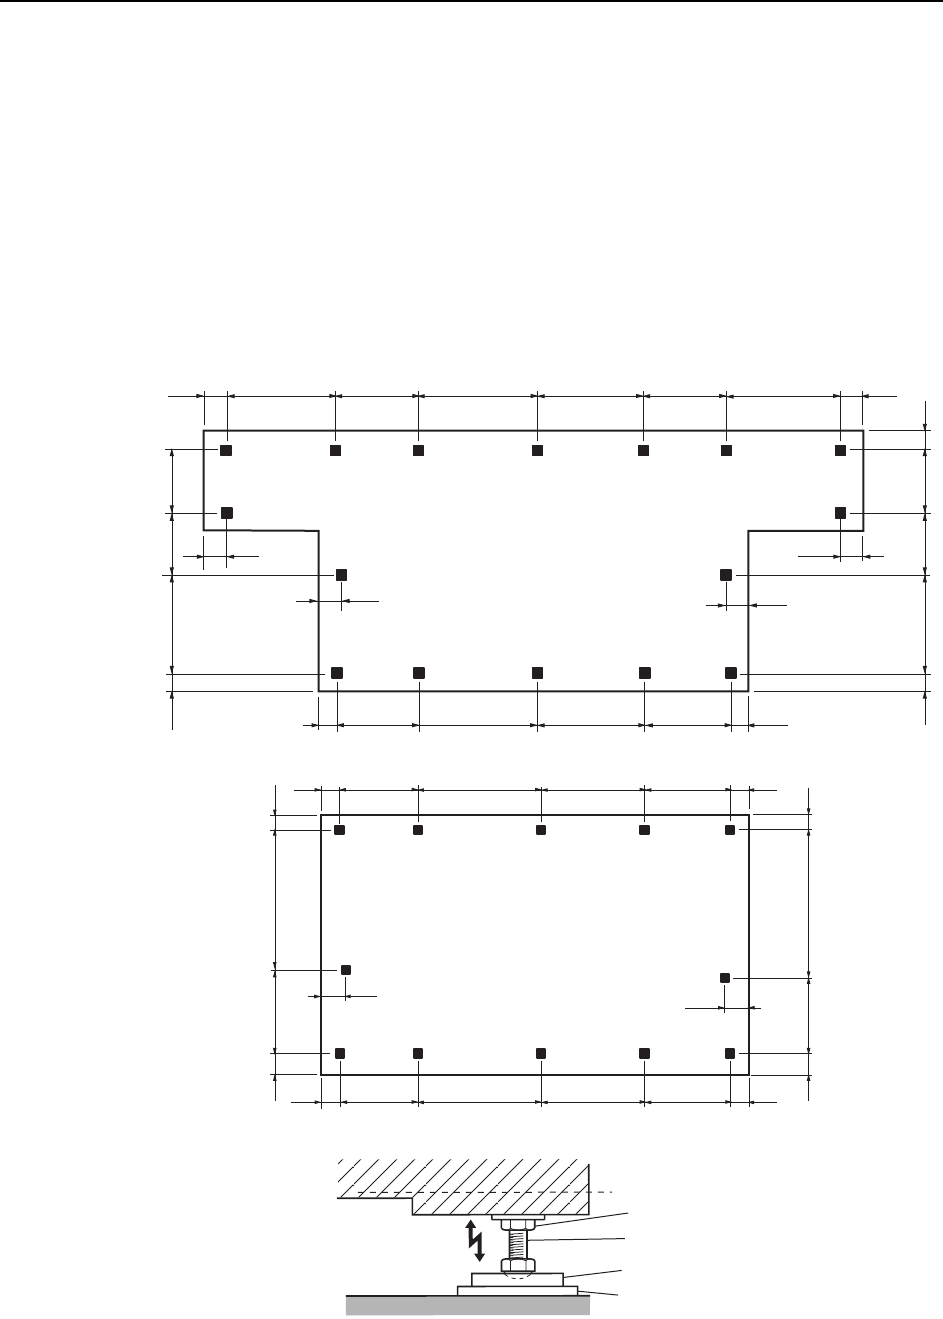
Setup >> Leveling the Machine
9-2 MEC-CP842-1.0E
Procedure
1 Position the leveling sheets or the leveling blocks as shown in the figure below.
2 Set spirit levels on a base surface of the machine (laterally and vertically).
3 Use the leveling bolts to adjust the height.
4 After verifying that the panel conveyance height and the leveling accuracy are
correct, tighten the lock nuts on the leveling bolts. Level will change when the
lock nuts are tightened, so double-check the level after tightening.
Note: If the lock nuts are not tightened sufficiently, vibration may result in a drop in placement accu-
racy.
C746M6002
125
125
125
125
(mm)
538696778
518
125
730 518 778 696 538 730
125
150
150
100 549 510 455 100
100 593 466
455
<CP-842ME>
<CP-842E>
125
125
(mm)
538696778
518
125
125538696778518
150
150
549 965 100
100
593 921 100
100
Lock nut
Leveling bolt
Leveling sheet
Anti-vibration pad
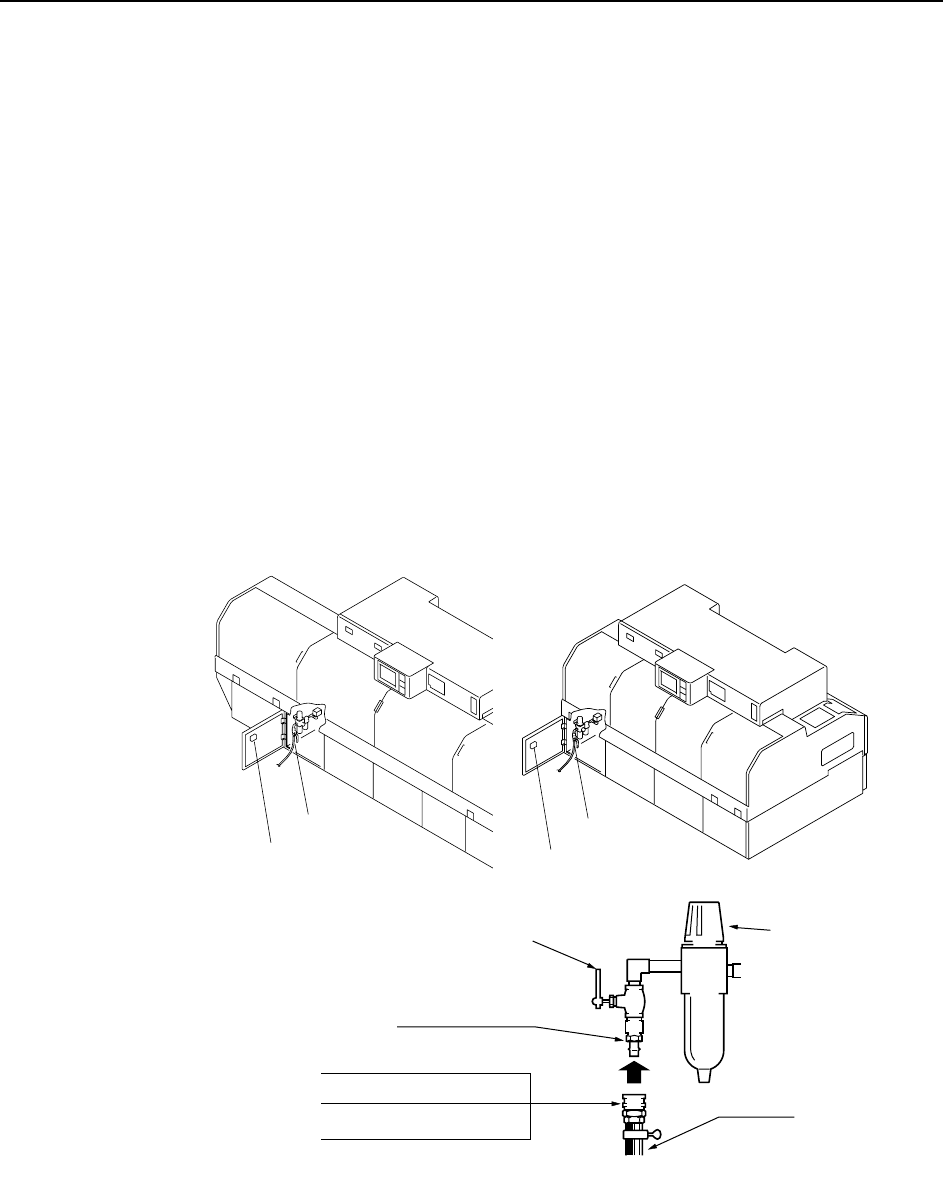
Setup >> Connecting the Air Supply
MEC-CP842-1.0E 9-3
9.2 Connecting the Air Supply
Point
Connect the air hose to the machine, and adjust the regulator to the prescribed air
pressure.
Procedure
1 Connect the air hose to the machine’s air inlet located on the front of the
machine.
2 Raise the filter regulator knob to release the lock.
3 Turn the handle to adjust the air pressure until the gauge reads 0.5 MPa (5kgf/
cm2).
Note: A digital pressure gauge is attached to the rear cover.
4 Press the filter regulator knob down to engage the lock.
Note: The air hose is not supplied with the machine.
<CP-842E>
0.5MPa (5kgf/cm )
2
C746M6003
<CP-842ME>
Air inlet
Digital pressure gauge
Air inlet
Digital pressure gauge
30SH ( for 3/8" hose)
20SH ( for 1/4" hose)
40SH ( for 1/2" hose)
Socket
Hose
20PM Plug
Handle
Knob

Setup >> Electrical Power Supply & Transformer Wiring
9-4 MEC-CP842-1.0E
9.3 Electrical Power Supply & Transformer Wiring
Point
Wire the transformer so that its voltage matches the power supply voltage.
Procedure
Connecting the Power Supply
The power capacities are indicated below. Be sure to connect the machine to a power
supply which exceeds this capacity.
•CP-842E :9.5KVA •CP-842ME :9.0KVA
1 Open the main breaker box, then remove the terminal cover.
2 Feed the power cable into the main breaker box from the power cable inlet
located at the top of the main breaker box.
3 Connect the ground cable to the dedicated ground terminal.
4 Connect the 3-phase cable to the main breaker and tighten to the prescribed
torque.
Terminal screw tightening torque: 5.8 N⋅m (58 kgf⋅cm)
Note: Terminal screws should be tightened periodically.
DANGER
Verify that the external power supply is off before performing this
procedure.