2500_Users_Manual - 第189页
Preventi ve Mai nten ance ProM aster 25 00 User Manua l 5-35 Adjusting t he ADC Optic on the T hermal Printer The ADC optic detects th e leading edge of the la bel on the liner. When using Auto ADC), the software calcula…

Preventive Maintenance
5-34 ProMaster 2500 User Manual
•
Test 25
—Lift the main plate.
•
VAC
—Press
V
to toggle the vacuum generator on and off. When the
vacuum generator is on, place your finger over the end of the chuck
to seal the opening and the VAC value should be greater than or
equal to 140.
Adjusting the ADC (Label
Detecting) Optic on the Dot
Matrix Printer
You may need to adjust the ADC optic if you have trouble with label
calibration, label position, or location of printed text, especially if you
have just changed labels.
To adjust the ADC value, select OPTIC TEST from the DIAGNOSTIC
MENU and load labels. Locate the ADC optic (see Figure 5-13) and
ensure that a label is blocking the optic’s beam to ensure the maximum
ADC optic value.
The 2500 should display:
If a label is not blocking the ADC optic, slowly turn the label advance
knob counterclockwise to advance the liner. The value on the display
fluctuates until the label blocks the optic and the highest value appears.
Do not begin the adjustment procedure until you are certain that a label is
blocking the optic.
If the ADC value does not reach 200, from the Optics diagnostics menu
press
LOWER CASE
+
A
, and then press
↑
or
↓
until the displayed value
reaches 200.
Turn the label advance knob until the ADC optic reads only the liner.
This should read between 120 to 170 if the liner is translucent. The liner
reading is variable, so there is no adjustment for it.
Return to the Main Menu by pressing
RESET
. Press
CAL
to have the 2500
run a label calibration to adjust to the new setting.
OPTIC TEST - ADC = 200 - VAC = 23
11100000001111101111111100 ENC = 13107
| | | | | U15 REV 1.00
5 10 15 20 25 U43 REV 1.00
Preventive Maintenance
ProMaster 2500 User Manual 5-35
Adjusting the ADC Optic
on the Thermal Printer
The ADC optic detects the leading edge of the label on the liner. When
using Auto ADC), the software calculates an ADC value and no manual
adjustment is required for variations in batches of labels. Auto ADC
turns on the ADC optic and reads the amount of light passing through
the label and liner to establish a reference level of light. When the ADC
optic detects a light level above that reference value, the 2500 assumes
that it is detecting a gap between labels where only the liner is blocking
the optic’s light beam.
You can manually check and adjust the ADC value using the 2500’s
Diagnostic tests. You may need to manually adjust the ADC optic if you
have trouble with label calibration, label position on the device, or
location of printed text on the label.
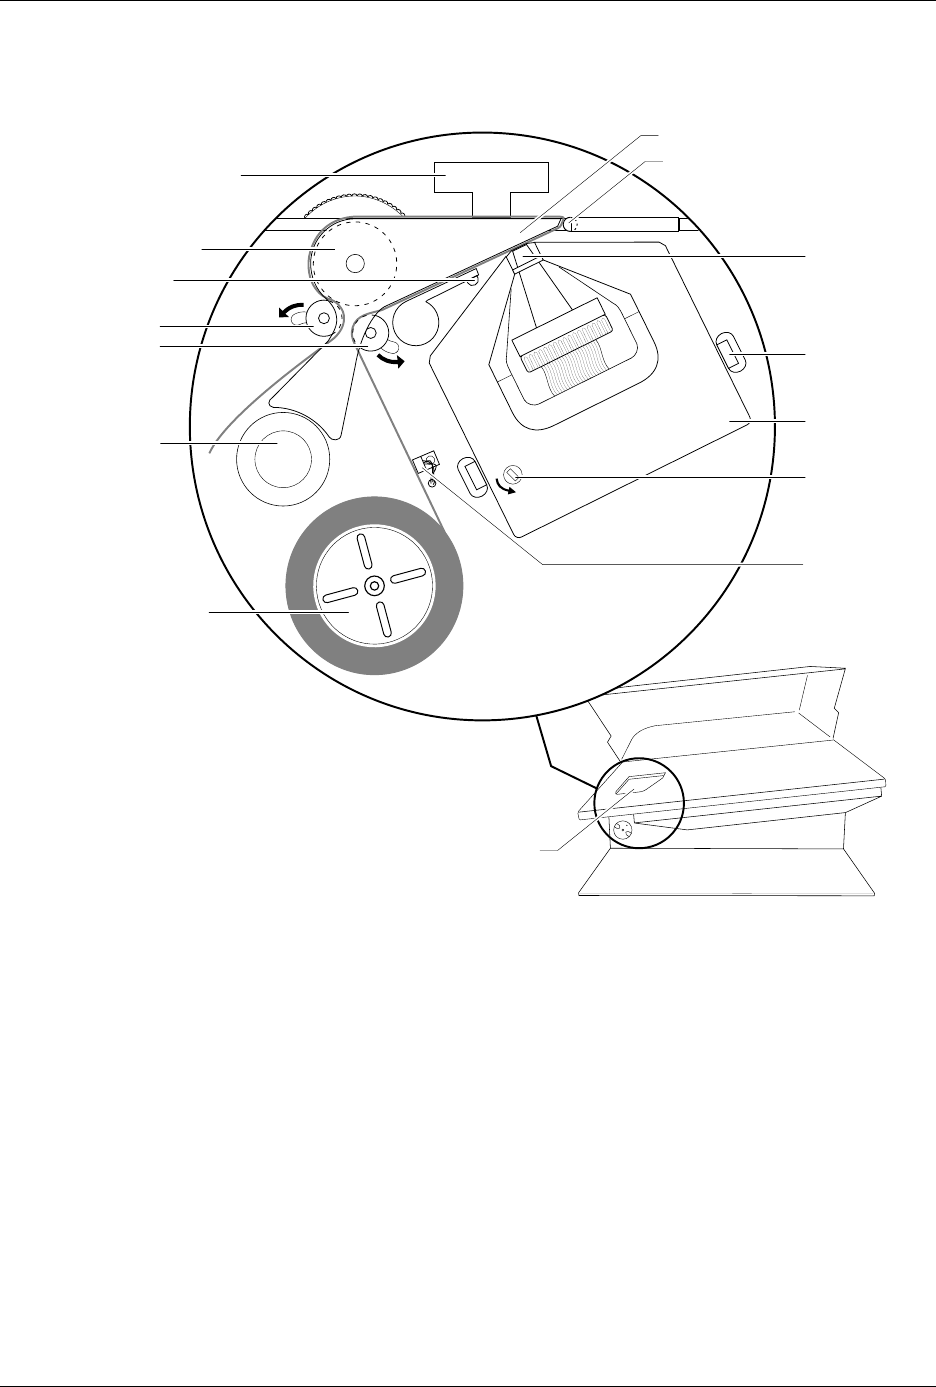
Figure 5-13
Adjusting the Dot Matrix Printer ADC Optic During Calibration
1770-2
LABELING STATION
PRINT HEAD
SPRING CLIP
(1 of 2)
RIBBON
ADVANCE
KNOB
RIBBON
CASSETTE
PRESS BEARINGS
PLATEN
APPLICATION PLATE (Raised)
LABEL DRIVER ROLLER
PINCH ROLLER 2
PINCH ROLLER 1
LABEL ADVANCE
KNOB
LABEL REEL COVER
LABEL
SENSING
OPTIC
ADC OPTIC (1 of 2)

Preventive Maintenance
5-36 ProMaster 2500 User Manual
Always calibrate the labels (refer to the procedure on page 5-25) after
performing either one of the following operations:
• Installing a new roll of labels
• Changing the ribbon
• Adjusting the ADC reference value
• Manually moving the labels
To check and manually adjust the ADC value, follow the steps below:
1. Put the 2500 in local mode.
2. Select OPTIC TEST from the DIAGNOSTIC MENU and load labels.
3. Locate the ADC optic and ensure that a label is blocking the optic’s
beam to obtain the highest ADC optic value. The 2500 should
display:
4. If a label is not blocking the ADC optic, slowly turn the label advance
knob in the counterclockwise direction to advance the liner. The
value on the display fluctuates until the label blocks the optic and the
highest value appears. Do not begin the adjustment procedure until
you are certain that a label is blocking the optic.
If the ADC value is not in the range of 190 to 200, press
LOWER CASE
+
A
while in the Optic diagnostics menu. Press
↑
or
↓
until the displayed value reaches 200.
5. Turn the label advance knob until the ADC optic is reading only the
liner (it should read between 120 and 170, if the liner is opaque). The
liner reading is not adjustable because the range is variable.
Return to the Main Menu by pressing
RESET
. Press
CAL
to have the 2500
run a label calibration to adjust to the new setting.
Note: Adjust the ADC reference value for the label material you are using. If
you are using both Kapton and thermal poly label material, adjust the
ADC reference value for Kapton. If you are using thermal poly label
material exclusively, you may need to make only minor adjustments.
OPTIC TEST - ADC = 200 - VAC = 23
11100000001111101111111100 ENC = 13107
| | | | | U15 REV 1.00
5 10 15 20 25 U43 REV 1.00