2500_Users_Manual - 第211页
Preventi ve Mai nten ance ProM aster 25 00 User Manua l 5-57 Programming Module Remove the programmin g module from the 25 00, and blow com pressed air into the programming module before the star t of every Task or after…

Preventive Maintenance
5-56 ProMaster 2500 User Manual
Daily Procedures
System Self-check
The 2500 performs a self-check and system performance verification each
time you turn it on. The software sets specific output levels for the power
supplies and then reads these values to confirm that they are within
internal the correct operation ranges. We recommend that you cycle the
system power once every 3 months so that these self-checks are
performed.
Cleaning the Tracks
Adjust the tracks so they are at their widest setting (open as far as
possible). Wipe the tracks with a clean cloth dampened with a mild
solvent. Blow compressed air along the top of the tracks.
Cleaning DIP and
SOIC Modules
Clean the sides and ends of all the contacts using a lint-free cloth,
dampened with a mild solvent that has been approved for use in your
company.
Periodic Cleaning
Chuck Tips
If you are having problems getting the chuck to consistently release
devices, or if the chuck tip is sticky, you may need to clean the chuck tip.
Follow the procedure below to remove and clean the chuck tip. If this
does not solve the problem, replace the chuck tip.
Dirt that accumulates on the black, rubber chuck tip can hinder the
creation of an adequate vacuum seal. You can prevent this problem by
regularly cleaning the chuck tip in the following manner:
1. Slide the beam over one of the two device recess areas.
2. Gently slide the black rubber chuck tip off the end of the chuck.
3. Clean the chuck tip in soapy water.
4. Thoroughly dry the chuck tip, using a clean, dry cloth and
compressed air, and gently slide the chuck tip back onto the end of
the chuck.
5. Apply a chalk stick to the chuck tip to prevent sticking when the
beam releases a device. Do not get chalk on the SPA pins.
Optic Holes
The 2500 has both covered and uncovered optic holes, depending on the
location and function they serve. Clean the uncovered optic holes by
blowing compressed air into them or by running a thin wire through each
hole.
The ADC optic hole is covered with a clear mylar dust guard. Clean the
dust guards by wiping them with a dry, cotton swab. Check the label
optic value occasionally to ensure that it is reading 200 when a label is
blocking the optic.
2500 Exterior
Clean the exterior of the 2500 with a clean cloth, dampened with water
and a mild detergent. Never use caustic cleaning agents; they might
damage the surface. Disconnect the power cord before cleaning.
Squirt Pin Array (SPA)
Pins
The SPA pins are visible in the programming station when the
programming module is removed. Use compressed air (introduced at an
angle, not straight down) to blow dust or lint off the SPA block.

Preventive Maintenance
ProMaster 2500 User Manual 5-57
Programming Module
Remove the programming module from the 2500, and blow compressed
air into the programming module before the start of every Task or after
every 1,000 devices, whichever occurs first.
Dot Matrix Printer Label
Path
To ensure continued proper functioning of the dot matrix printer, you
must keep the label path clean. An accumulation of dirt and debris along
the label path can lead to jams at the print head and a decline in print
quality. You can prevent this problem by regularly cleaning the label
path.
Clean the dot matrix printer’s label path, including the application plate,
platen, press bearings, rubber rollers, and optic dust guards.
Application Plate
Wipe both the top and underside of the application plate and the press
bearings with a clean, dry cloth. If there is a substantial build-up of label
debris, you may want to dampen the cloth with Isopropyl alcohol.
Rubber Pinch Rollers
Wipe the rollers with a clean cloth dampened with a mild cleaning
solvent. Ink and adhesives from the label backing collect on the roller and
may cause the label stock passing through the rollers to slip, resulting in
poor print quality.
Thermal Printer Label Path
Each time you change labels in the thermal printer, clean the label path
(including the application plate, press bearing, and rubber rollers) with a
mild cleaning solvent.
Ribbon Path
Wipe the rubber rollers in the ribbon path with a clean cloth dampened
with a mild cleaning solvent.
Application Plate
Wipe both the top and underside of the application plate and the press
bearings (see Figure 5-14) with a clean cloth dampened with a mild
cleaning agent.
Rubber Pinch Rollers
Wipe the rollers with a clean cloth dampened with a mild cleaning
solvent.
Thermal Print Head
Use a cotton swab dampened with a mild cleaning solvent to gently clean
the print head. Clean the print head after printing 25,000 labels, or more
frequently if the print quality becomes less distinct.
CAUTION: Do not use any sharp or abrasive objects near the print head
to avoid accidentally damaging components on the head.
Replacing the Dot
Matrix Printer
Ribbon Cassette
When the print becomes too light (after approximately 50,000 labels),
change the labeler ribbon cassette by following the procedure below.
1. Grasp the cassette on both sides and gently pull it off both spring
clips and past the print head (see Figure 5-23).
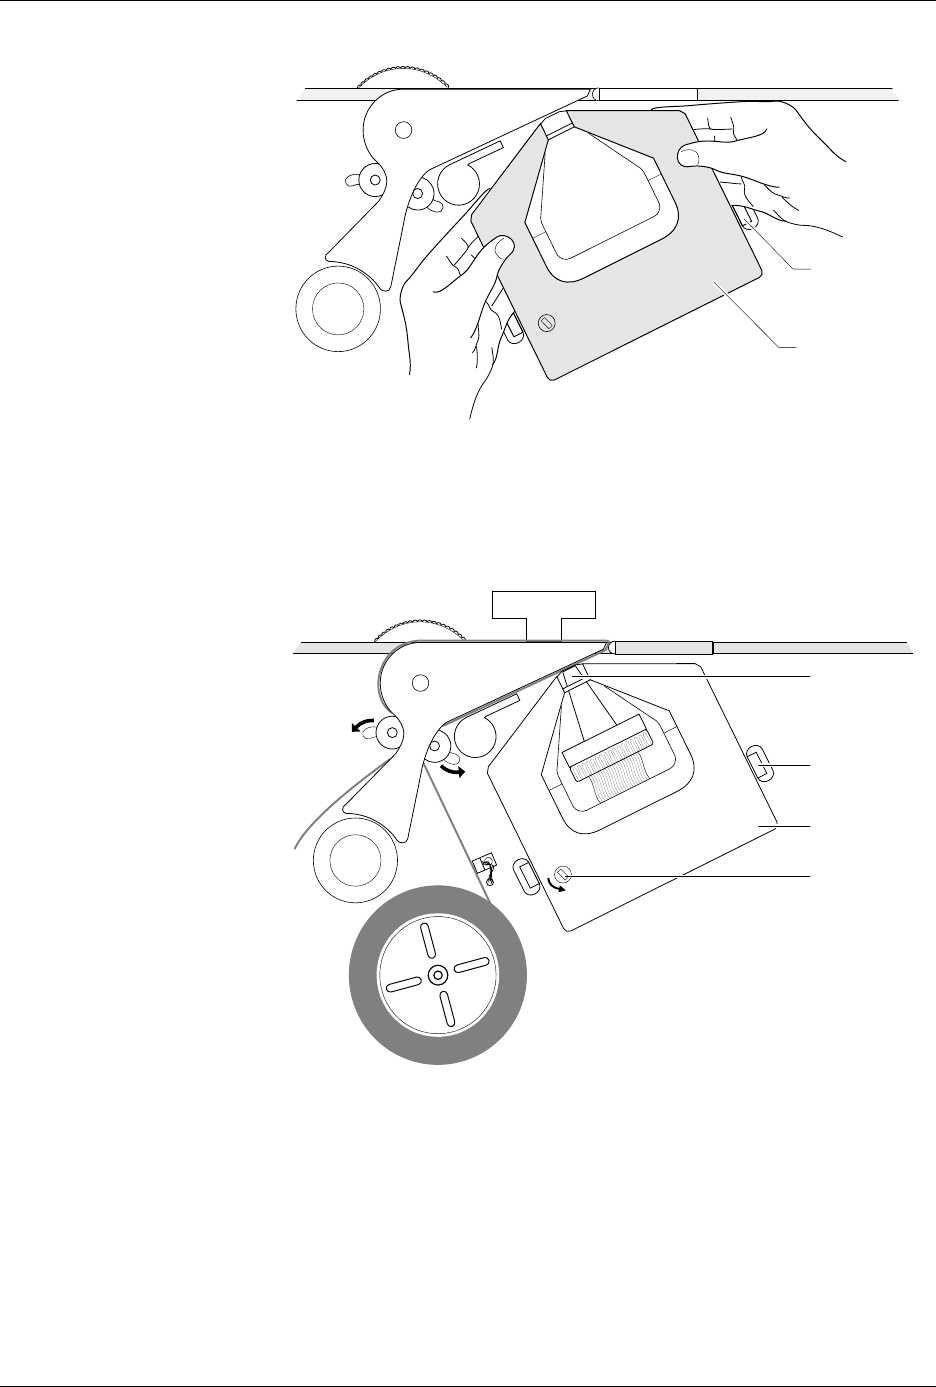
Preventive Maintenance
5-58 ProMaster 2500 User Manual
2. Rotate the knob on the new cassette in the direction indicated by the
arrow (counterclockwise) to pull the ribbon taut.
3. Guide the new cassette so the ribbon fits between the print head and
the platen.
4. With the ribbon partially in place over the print head, slowly turn the
ribbon advance knob while applying gentle pressure on the cassette
until it aligns with the ribbon spline drive and drops into place.
5. Calibrate the labels as described on page 4-19.
Figure 5-23
Removing the Ribbon Cassette
Figure 5-24
Installing a New Dot Matrix
Printer Ribbon Cassette
2296-1
SPRING CLIP
(1 of 2)
RIBBON
CASSETTE
1852-2
PRINT HEAD
SPRING CLIP
(1 of 2)
RIBBON
ADVANCE
KNOB
RIBBON
CASSETTE