Utah-94-721002-System-Manual.pdf - 第62页
mä~ëã~ä~Ä = póëíÉã=NMM= lñÑçêÇ=fåëíêìãÉåíë=mä~ëã~=qÉÅÜåçäçÖó= System Manual 4) Transport the rotary vane pump to the grey area and mount it in the required position in accordance with the pump manufacturer’s instructions…

System Manual= lñÑçêÇ=fåëíêìãÉåíë=mä~ëã~=qÉÅÜåçäçÖó= mä~ëã~ä~Ä
=
póëíÉã=NMM
QKOKO= mçëáíáçåáåÖ=íÜÉ=ëóëíÉã=ÅçãéçåÉåíë=
WARNING
LIFTING HEAVY OBJECTS INCORRECTLY CAN CAUSE SEVERE INJURY
When handling heavy system components such as the system unit or
vacuum pumps, ensure that the appropriate lifting equipment,
operated by fully trained personnel, is used.
When heavy rack-mounted components are handled, ensure that the
weight is safely distributed between sufficient personnel.
WARNING
TOPPLING (TIPOVER) HAZARD - SOME SYSTEM COMPONENTS, E.G.
ROBOTIC HANDLERS AND AUTOMATIC LOAD LOCKS / TRANSFER
CHAMBERS (ESPECIALLY IF FITTED WITH CASSETTE LOAD LOCKS) CAN
TOPPLE CAUSING SEVERE INJURY.
When transporting or manoeuvring the system frames, robotic
handlers etc., ensure that they remain vertical at all times and use the
appropriate lifting / handling equipment.
Ensure that any support frames, supplied with the system, are
correctly fitted whenever the system is transported / manoeuvred or
dismantled for service / maintenance.
It is entirely the user’s responsibility to ensure that all components are
supported safely before and during any transporting, manoeuvring or
maintenance operations. Support frames provided by Oxford
Instruments Plasma Technology are not necessarily adequate for any
such operations. The absence of a support frame must not be taken as
an indication that no further precautions need to be made before such
operations are undertaken.
1) Transport the system frames to the clean room, then position them in the required
location. Level the system frames (ensuring that the wafer transfer path is aligned
from frame to frame) using the adjustable feet, then lock the feet.
OIPT recommends that at least 600mm service access space is allowed
between any obstacle (e.g. walls, partitions, etc.) and serviceable items,
e.g. the power distribution unit.
2) Transport the system PC to the clean room and position it in the required location.
3) Transport the gas pod to the grey area and mount it in the required position.
IMPORTANT OIPT gas pods typically weigh >40kg. If you intend fixing
your gas pod to a wall, ensure the wall and gas pod fixings
are sturdy enough to bear at least four times the weight of
the gas pod. Periodically, e.g. annually, check the gas pod
and its fixings are secure.
Installation and Commissioning
Printed: 16 March 2006 11:59 Page 4-3 of 8 Issue 4: March 05

mä~ëã~ä~Ä
=
póëíÉã=NMM= lñÑçêÇ=fåëíêìãÉåíë=mä~ëã~=qÉÅÜåçäçÖó= System Manual
4) Transport the rotary vane pump to the grey area and mount it in the required
position in accordance with the pump manufacturer’s instructions. Refer to the
manufacturer’s literature in Volume 3 of this manual.
QKOKP= `çååÉÅíáåÖ=íÜÉ=ëÉêîáÅÉë=
(A) BEFORE CONNECTING ANY OF THE SERVICES, ENSURE THAT
THEY ARE TURNED OFF. E.G. COMPRESSED AIR AND GAS
SUPPLY VALVES SET TO THEIR OFF POSITIONS AND ELECTRICAL
SUPPLIES SWITCHED OFF AND LOCKED OUT.
(B) DO NOT RESTRICT ACCESS TO THE EMERGENCY OFF SWITCH
(EMO CONTROL) BY LOCATING CABLES AND OTHER
OBSTACLES IN FRONT OF THE SYSTEM.
IMPORTANT
NOTES
(C) DO NOT LOCATE CABLES WHERE PERSONNEL ARE LIABLE TO
WALK. OIPT RECOMMENDS THAT CABLES ARE LOCATED IN
CABLE TRUNKING / TRENCHES.
1) Connect the extraction collars on the process chamber(s) (e.g. ICP process chambers)
and the gas pod to the appropriate extraction systems.
2) Connect the rotary vane pump exhaust line.
3) Connect the Nitrogen purge lines to the system services panel(s) and the rotary vane
pump.
4) Connect the compressed air supply to the system services panel(s) and to the gas
pod.
5) Connect the gas supplies to the gas pod (all gas supply valves closed).
6) Connect the gas outlet line, control cable and earth cable (see Fig 4.1) from the gas
pod to the system console.
7) Connect the cooling circuits to the system console.
8) At the system PC, connect the monitor, keyboard and mouse, then connect the
control cable(s) from the PC to the system console.
9) Connect the electrical supply from the safety isolation box to the system console. If it
is necessary to connect the 3-phase electrical supply cable to the power box, refer to
sub-section 4.2.3.1.
10) Connect the electrical supply to the PC.
11) Ensure that all covers and panels are fitted and attach notices to the system
indicating that the system is not ready for service.
Installation is now complete and the system is ready for commissioning by OIPT.
Note that customers who have arranged to commission the system themselves can
ignore the remainder of this Section.
12) Complete and sign the ‘System Readiness’ form QCF 89 (shipped with the system),
then fax it to OIPT who will arrange for the system to be commissioned.
Installation and Commissioning
Issue 4: March 05 Page 4-4 of 8 Printed: 16 March 2006 11:59
System Manual= lñÑçêÇ=fåëíêìãÉåíë=mä~ëã~=qÉÅÜåçäçÖó= mä~ëã~ä~Ä
=
póëíÉã=NMM
QKOKPKN= `çååÉÅíáåÖ=íÜÉ=PJéÜ~ëÉ=ëìééäó=Å~ÄäÉ=íç=íÜÉ=éçïÉê=Äçñ=
If it is necessary to connect the 3-phase supply cable to the power box, use the following
steps.
1) Ensure that the supply cable is not connected to the safety isolation box.
2) Remove the power box cover.
3) Inside the power box, remove the clear plastic safety cover from the power box
(secured to the right-hand side of the power box by four screws).
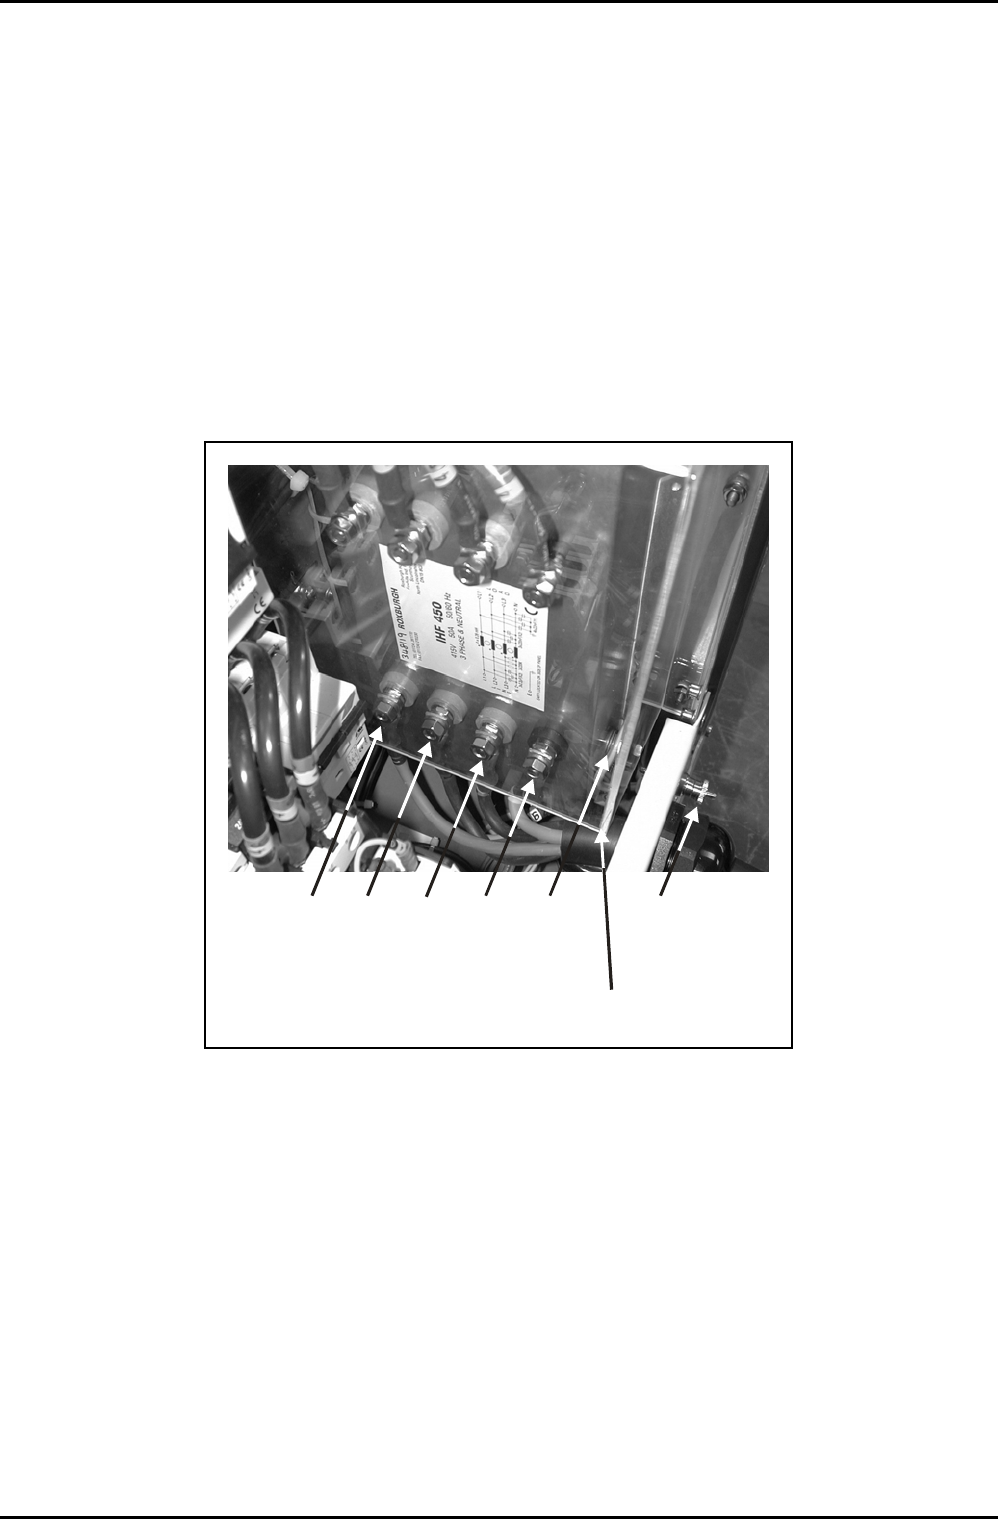
4) Connect the 3-phase supply cable wires as shown in Fig 4.1.
5) Re-fit the clear plastic safety cover and then the power box cover.
L1 L2 L3 Neutral Protective
Earth (at
side of
panel)
Connection
Terminal for
Earth cable to
Gas Pod
3-phase connections
Clear plastic
safety cover
Fig 4.1: 3-phase supply cable connections at the power box
Installation and Commissioning
Printed: 16 March 2006 11:59 Page 4-5 of 8 Issue 4: March 05