Utah-94-721002-System-Manual.pdf - 第90页
mä~ëã~ä~Ä póëíÉãNMM lñÑçêÇ =fåëíêìã Éåíë= mä~ëã~ =qÉÅÜåçäçÖó == System Manual RKS= mêçÅÉëë=a~í~äçÖ= All processes are automatically data-logged. The interval between logging events is set in the Recipe screen. The Proces…

System Manual lñÑçêÇ=fåëíêìãÉåíë=mä~ëã~=qÉÅÜåçäçÖó== mä~ëã~ä~ÄpóëíÉãNMM
Repeat Step
Repeats all subsequent steps until a Loop Step is reached. This group of
steps can be repeated any number of times. (When you select this option,
you are prompted to enter the number of times the group of steps is to be
repeated.)
Loop Step
Terminates a Repeat Step group.
Insert Step
Creates a 'gap' above the selected step to allow another step to be dragged
into the list.
Delete Step
Deletes the selected step from the list.
Cancel Closes the Step Commands pop-up menu.
_rfia=^=ob`fmb=
To build a recipe, use the following procedure:
1) In the Recipe panel, select the NEW button.
2) Click on a recipe step in the Step Library list, hold the left mouse button down then
drag the mouse pointer to the Step Name field next to the asterisk (*) then release
the mouse button. The step name is displayed in the Step Name field.
3) Repeat 2) as required to add further steps to the recipe. Note that once you have
filled the Step Name field, the recipe step list becomes scrollable, enabling you to
add a maximum total of 1000 steps.
4) To remove a step from the list, click on it to highlight it then select the Delete step
button from the Step Commands pop-up menu. Any further steps will move up the
list by one place.
5) To add a step before an existing step, click on the existing step then select the Insert
step button from Step Commands pop-up menu. The selected step and all those
following it will move down the list by one place. You can then drag another step
from the Step Library list into the now vacant field.
6) When all steps have been added, enter a time into the Data Log Interval field,
then enter a name for the recipe in the Recipe Name field. Finally, select the SAVE
button.
bafq=^=ob`fmb=
To edit a recipe, use the following procedure:
1) Select the LOAD button, then select the recipe to be edited.
2) In the Step Commands pop-up menu, click on the Edit Step button, then edit the
process parameters as required. Note that editing a recipe step will not affect the
associated step, i.e. a step having the same filename, in the Library of Available
Steps.
3) To remove a step from the list, click on it to highlight it then select the DELETE STEP
button from the Step Commands pop-up menu. Any further steps will move up the
list by one place.
4) To add a step before an existing step, click on the existing step then select the
INSERT STEP button. The selected step and all those following it will move down
the list by one place. You can then drag another step from the Step Library list into
the now vacant field.
Operating Instructions
Printed: 22-Mar-06, 10:42 Page 5-23 of 52 UC Davis 94-721001 Issue 1: March 06
mä~ëã~ä~ÄpóëíÉãNMM lñÑçêÇ=fåëíêìãÉåíë=mä~ëã~=qÉÅÜåçäçÖó== System Manual
RKS= mêçÅÉëë=a~í~äçÖ=
All processes are automatically data-logged. The interval between logging events is set in the
Recipe screen.
The Process Datalog facility allows you to view process data runs and associated comments.
The facility comprises three pages:
a) SELECT LOG page – allows you to select the process data to view.
b) RUN LOG page – lists the selected process data, for all runs except Leak detection
runs and MFC calibration runs, with respect to time.
c) Leak detection and MFC calibration log page – displays the Leak detection runs and
MFC calibration runs in text and graphical formats.
These pages are described in the following text.
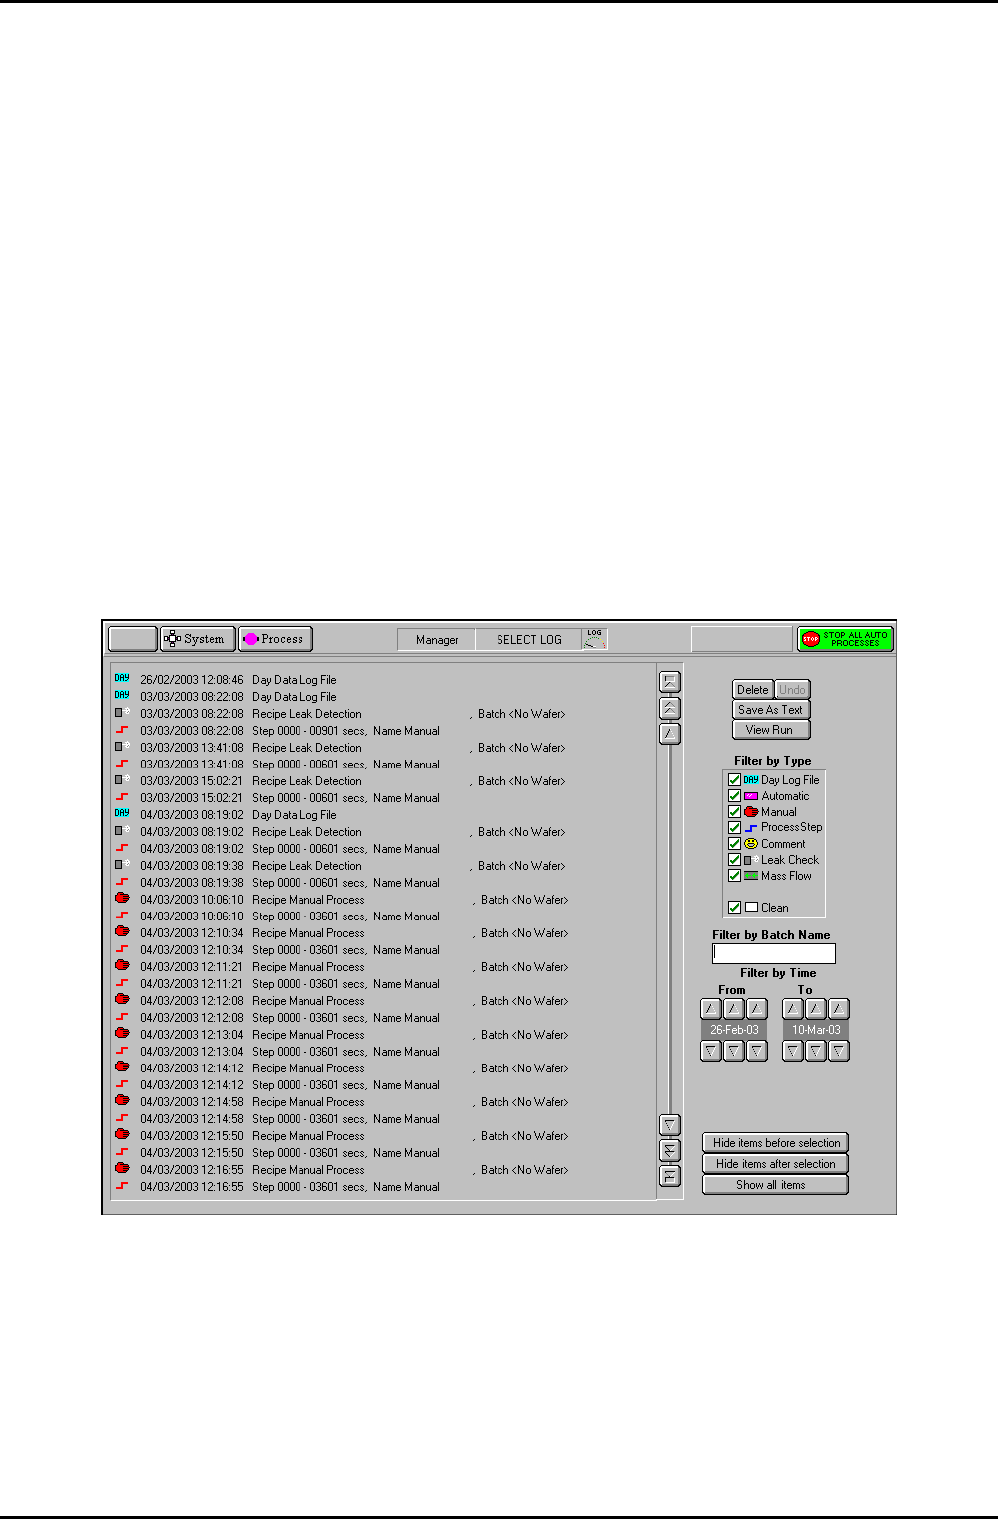
RKSKN= pÉäÉÅí=içÖ=é~ÖÉ=
The Select Log page is displayed by selecting the Process button, then the Log View option.
Fig 5.5: Select Log page
The page comprises a list of logged events, which can be filtered by type, batch name and
time. When the required events have been selected, they can be viewed on a Log View page.
Operating Instructions
UC Davis 94-721001 Issue 1: March 06 Page 5-24 of 52 Printed: 22-Mar-06, 10:42

System Manual lñÑçêÇ=fåëíêìãÉåíë=mä~ëã~=qÉÅÜåçäçÖó== mä~ëã~ä~ÄpóëíÉãNMM
The facilities provided on the page are as follows:
List of logged
events
Displays a list of logged events in a date/time sequence. Each event is
identified by an icon, date, time, title, duration, name and comments (if
present). An event is selected (highlighted) by clicking on it.
Delete button
Deletes the selected event
Undo button
Undo the last action
Save As Text
button
Save the selected event as a text file for use in spreadsheets etc.
View Run
button
Opens either the Run Log page (see sub-section 5.6.2, page 5-28) or, if
either a Leak detection run (
) or MFC calibration run ( ) is selected,
the Leak Detect and MFC calibration log page (see sub-section 5.6.3,
page 5-29) with the selected log data displayed.
Filter by Type
list
A list of event types with associated checkboxes. Use this panel to select
the events to display in the Event list. A checkbox showing an ‘x’
indicates that the associated event type will not be displayed. A
checkbox showing a ‘9’ indicates that the associated event type will be
displayed.
Filter by
Batch Name
field
Enter a batch name to list only logged events associated with that
batch.
Filter by time
fields and
buttons
Use these controls to select events occurring in a time range to be
displayed.
Hide items
before
selection
button
Displays all events after and including the highlighted event.
Hide items
after
selection
button
Displays all events before and including the highlighted event.
Show all
items button
Displays all previously hidden events.
RKSKNKN= p~îáåÖ=~=äçÖ=ÑáäÉ=~ë=íÉñí=Ñçê=ìëÉ=áå=jáÅêçëçÑí=bñÅÉä»=
NOTE: OIPT now supplies customers with comprehensive software to view/analyse
PC 2000 log files. The software, LogViewer, is provided on the system PC.
For full details of LogViewer, refer to its Manual by following the shortcut
on the desktop of your system PC.
Any logged process run can be saved at text and then opened in Excel for viewing, analysing,
etc. To do this, use the following steps:
1) On the Select Log page, select the required process run (any multiple steps will be
automatically highlighted).
Operating Instructions
Printed: 22-Mar-06, 10:42 Page 5-25 of 52 UC Davis 94-721001 Issue 1: March 06