DECAN_S2_Operation(ENG_Ver4.1).pdf - 第7页
O v er v iew Advanced Chip Shooter DE CAN S2 O pe rat ion H an db ook 7 O v er v iew Operation Process Th e overall pr oce ss to op erat e the D ECAN S erie s mach ine is as follows: 8. Ins tall relate d devi ces an d or…

DECAN S2 Operation Handbook
Table of Contents
Chapter 1
Machine Overview
Name of Each Part .....................................................1-1
Name of the Operation Panel ................................... 1-2
Configuration of MMI............................................... 1-3
Overview ...................................................................... 8
Chapter 2
Supplying Power and Warming up
Procedure Preparing for Production .......................... 2-1
Chapter 3
Production
Preparation For Operation Ⅰ .................................... 3-1
Preparation For Operation Ⅱ .................................. 3-10
Production ...............................................................3-22
Chapter 4
Items to be inspected during production
Items to be inspected during production ................. 4-1
Take measures of instantaneous stop ....................... 4-3
Temporary stop .........................................................4-9
Emergency Stop ......................................................4-13
Advanced Chip Shooter
DECAN S2 Operation Handbook
Chapter 5
Finish production and change work
Finishing Production .................................................. 5-1
SMT In-Line Process ..................................................5-4
Changing Jobs ..........................................................5-5
Chapter 6
Check others and replace exhausted parts
Checking Feeder ....................................................... 6-1
Arranging Backup Pins .............................................6-11
Replace exhausted parts .........................................6-14
Overview
Advanced Chip Shooter
DECAN S2 Operation Handbook
7
Overview
Operation Process
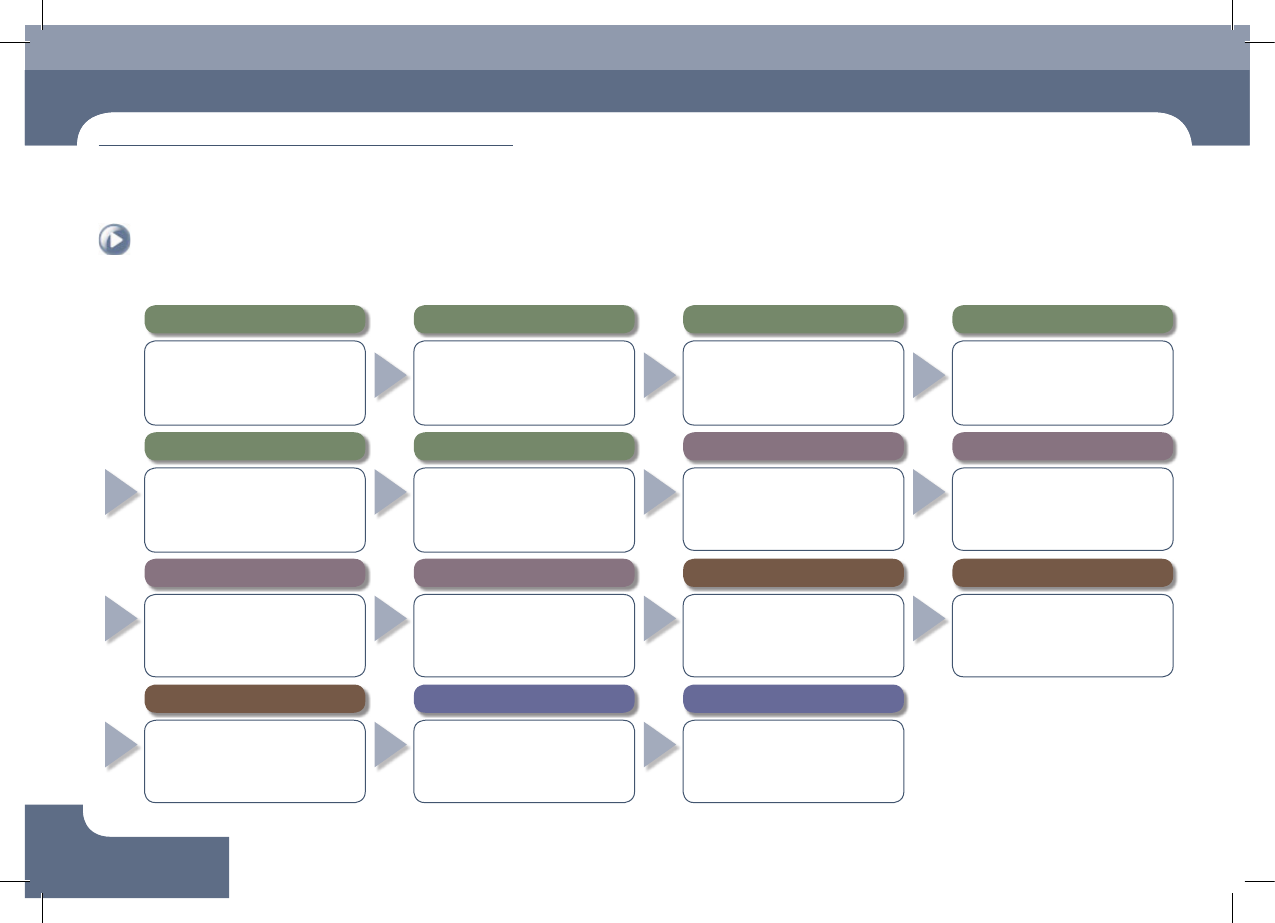
The overall process to operate the DECAN Series machine is as follows:
8. Install related devices and order parts in advance
● Install the feeder and nozzle for the PCB
to be worked on.
● Check the remaining quantity of parts
in the feeder and order parts in advance
that are expected to be exhausted.
7. Preparation for production
● Open the file for the PCB to be worked
on and download it.
● After checking the state of previous
work before commencing new work,
check the production goal.
6. Warming-Up
● Warm the machine up for
approximately 10 minutes before
starting part placement in order to
increase placement accuracy.
5.
Perform homing of the machine
● Press the 'Home' button in the teaching
box or MMI to perform homing of the
machine..
1.
Checking Machine Before Operation
● Pneumatic pressure ● Rated voltage
● Feeding device ● Safety Cover
● Check safety conditions around the
machine.
4. Supply power to the machine's motor
● Press the 'READY' button so that the
machine can be operated.
3. MMI Initialization
● If the MMI is executed, the program
is initialized automatically and each
module of the machine is checked.
2. Turn the main switch on
● Turn the main switch located on the
front of the machine clockwise to
supply power to the machine.
9. Set up the conveyor and backup pins
● Adjust the conveyor width and set the
PCB fixing method.
● Arrange backup pins at the proper
positions to support the PCB at its
bottom.
10. Check and teach positions
● Check PCB origin.
● Check PCB fiducial mark position.
● Check pickup point.
● Check placement point.
11. Produce PCBs
● Select the 'Product' Menu of the MMI
● Enter the production goal in the <Production
Plan> column.
● Select the submenu of the 'Start' menu of
the MMI.
● Press the 'START' button on the operation panel
12. Items to be checked during production
●
Check the remaining part quantity in the feeder.
● Check conformity of the parts (at 2 hour
intervals).
● Remove vinyl from the feeder/Clean it.
● Monitor feeders with a defective pickup.
13. Measures to be taken during production against
● Defective pickup.
● Stuck vinyl.
● Stuck PCB.
● Part exhaustion.
14.
Finish production and change work
●
Once the production has finished, select the
'Finish' submenu to finish the production.
● In order to produce other PCBs,
perform preparation for work change.
15.
Turn off the power supply and clean the work area
● Click the 'RESET' button.
● Click the 'Exit' icon.
●
Turn off the main switch (counterclockwise)
● Clean the work area.
Machine Overview
Chapter 1
This chapter describes the name of each part, teaching box and the
configuration of MMI(Man-Machine Interface).
Machine Overview
Advanced Chip Shooter
DECAN S2 Operation Handbook
1-1
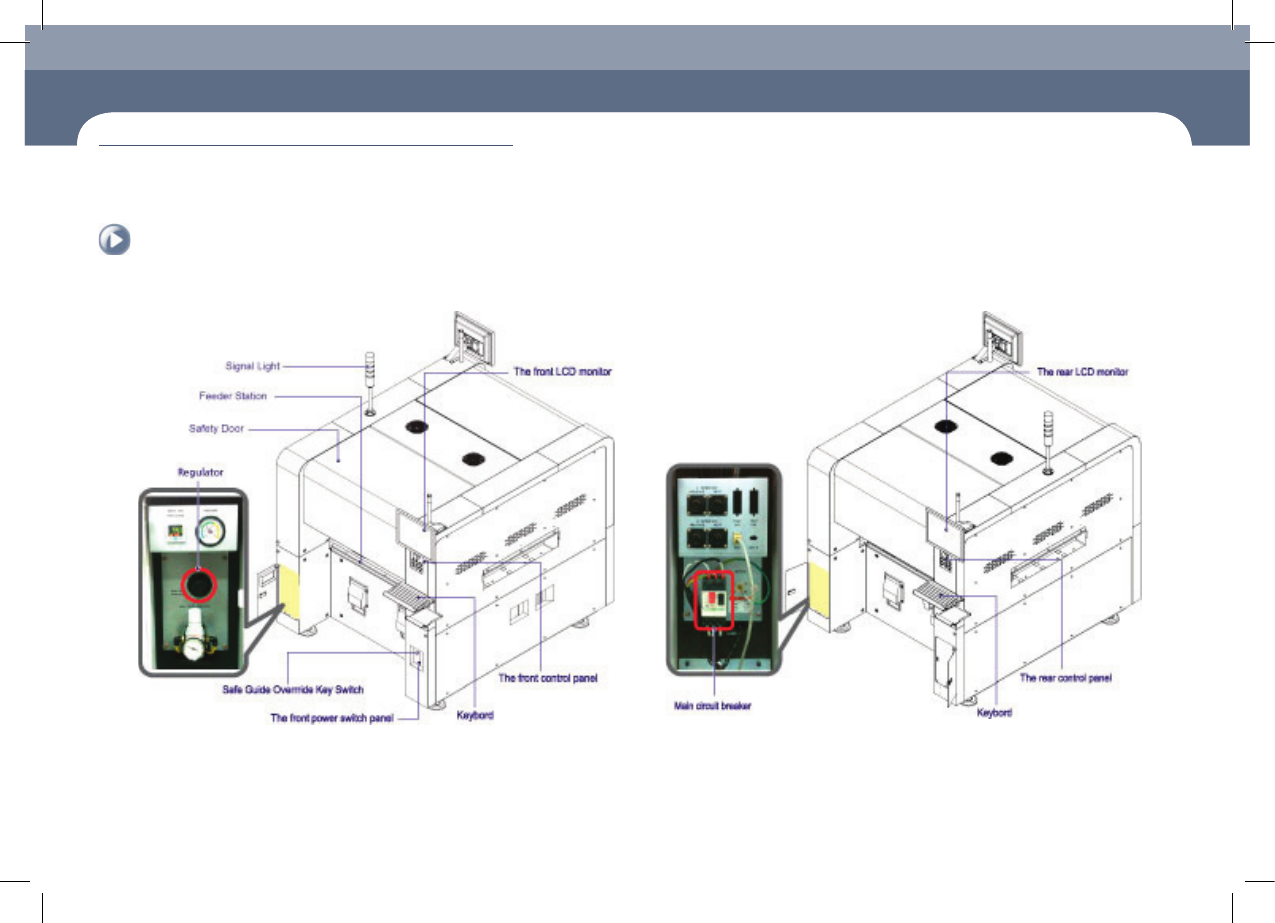
Name of Each Part > Front view of the machine
Name of Each Part
1. Front view of the machine
Chapter 1
Machine Overview
This chapter describes the name of each part, teaching box and the configuration of MMI(Man-Machine Interface).
2. Rear View of the Machine
Name of Each Part