Nordson_EFD_GV_Series_Operating_Manual - 第34页
GV Series Automated Dispensing Systems 34 www.nordsonefd.com info@nordsonefd.com +1-401-431-7000 Sales and service of Nordson EFD dispensing systems are available worldwide. Secondary V iew Screen in Path V iew Path View…
GV Series Automated Dispensing Systems
33www.nordsonefd.com info@nordsonefd.com +1-401-431-7000 Sales and service of Nordson EFD dispensing systems are available worldwide.
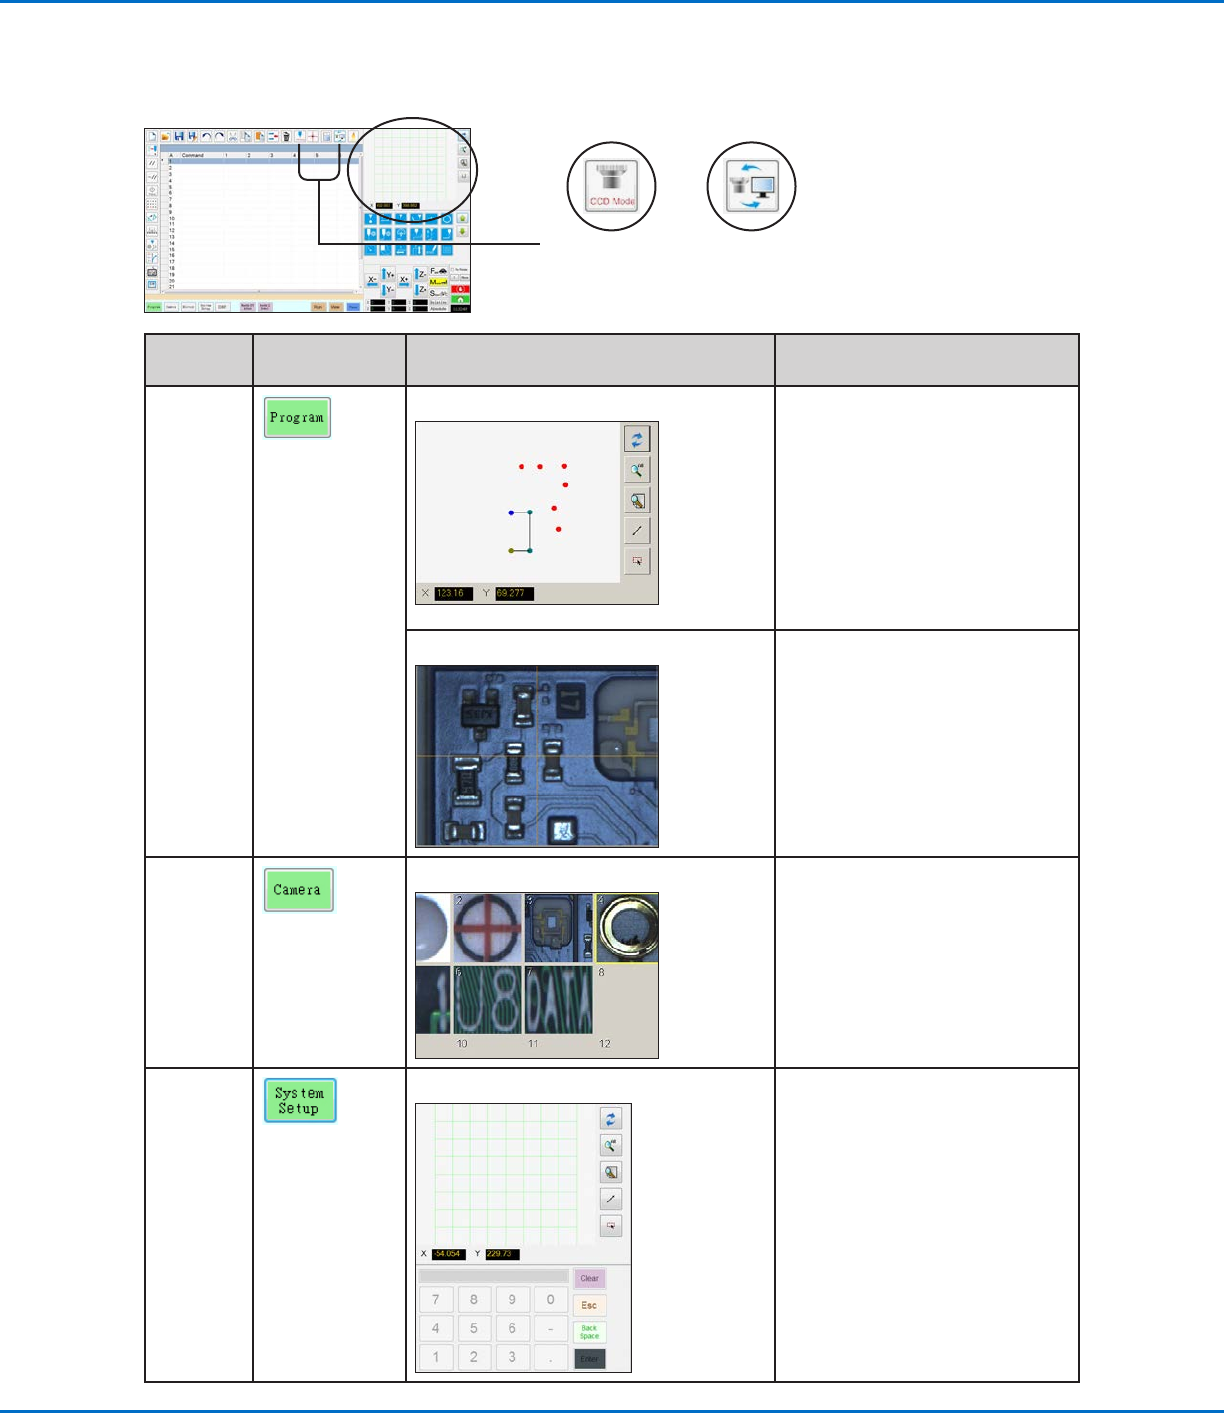
Secondary View Screen
The Secondary View screen changes depending on the selected tabs and icons.
Selected
Tab
Tab Color
When Selected
Secondary Screen Display Function
Program
When the Path icon is toggled ON: When the Path icon is toggled ON,
shows a visual representation of
the programmed pattern and the
Path mode icons:
• Refer to “Horizontal and Vertical
Toolbar Icons” on page35 for
an explanation of the icons.
• Refer to “Secondary View Screen
in Path View” on page34 for
additional path view functionality.
When the Path icon is toggled OFF:
When the Path icon is toggled OFF,
shows an actual view of the fixture
plate or workpiece surface as seen
by the camera.
Camera
Mark Library: Stores up to 240 mark files.
System
Setup
Path view and keypad: The keypad is used to enter
numeric values. Refer to “Keypad”
on page43.
Path iconMode icon (toggles
between Tip mode
and CCD mode)
GV Series Automated Dispensing Systems
34 www.nordsonefd.com info@nordsonefd.com +1-401-431-7000 Sales and service of Nordson EFD dispensing systems are available worldwide.
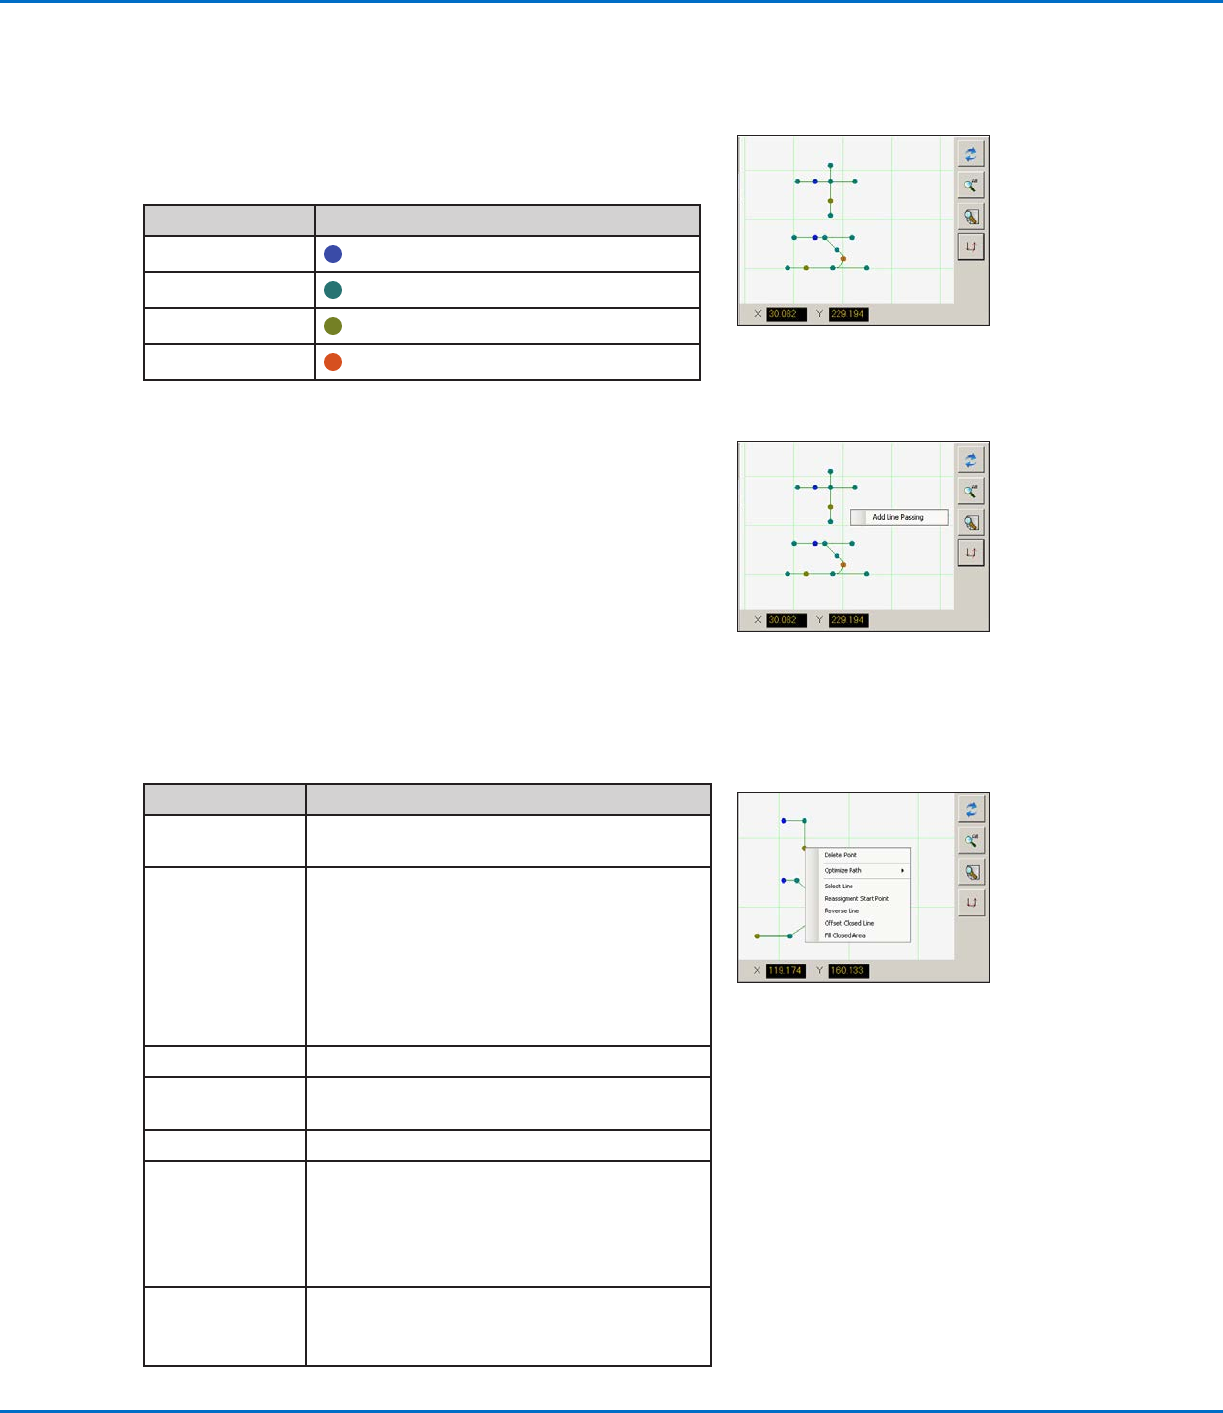
Secondary View Screen in Path View
Path View Point Colors
When the Secondary View screen is in the Path view (Path icon
toggled ON), it shows a visual representation of the programmed
pattern. The point colors represent the programmed point commands.
Point Command Color on Path View Screen
Line Start
Blue
Line Passing
Green
Line End
Olive
Arc Point
Orange
Path View Right Click Functions
On the Path view screen, right-click on any point (command) to open
a right-click menu. The functions shown below are available for the
selected point.
Path view line and point colors
Right-click on any point to open
the right-click menu
Item Function
Delete Point Deletes the selected point and connects the
previous command with the next command.
Optimize Path Opens a path for editing:
• Select Line Path Start and Line Path End to
edit the Line Start and Line End points of the
pattern.
• Select Arc Path Start and Arc Path End to
edit the beginning and end points of an Arc
point.
Select Line Selects entire pattern.
Reassignment
Start Point
Reassigns the Line Start point to the selected
point (the path must be closed).
Reverse Line Reverses the pattern.
Offset Closed
Line
Closes the pattern by adding a line from Line
Start to Line End and then reassigning Line
Start and Line End to be the same location.
• Offset Length (mm) enlarges the pattern
relative to the original pattern.
Fill Closed Area Fills an area of the pattern.
• Brush Width (mm): The distance between
each fill area spiral.
Add Line Passing
Right-click anywhere on the Path view grid (but not on a point) to
stitch a Line Passing point (command) to an existing point. Only
horizontal or vertical lines can be added.
Right-click to stitch a Line Passing
point onto an existing point
GV Series Automated Dispensing Systems
35www.nordsonefd.com info@nordsonefd.com +1-401-431-7000 Sales and service of Nordson EFD dispensing systems are available worldwide.
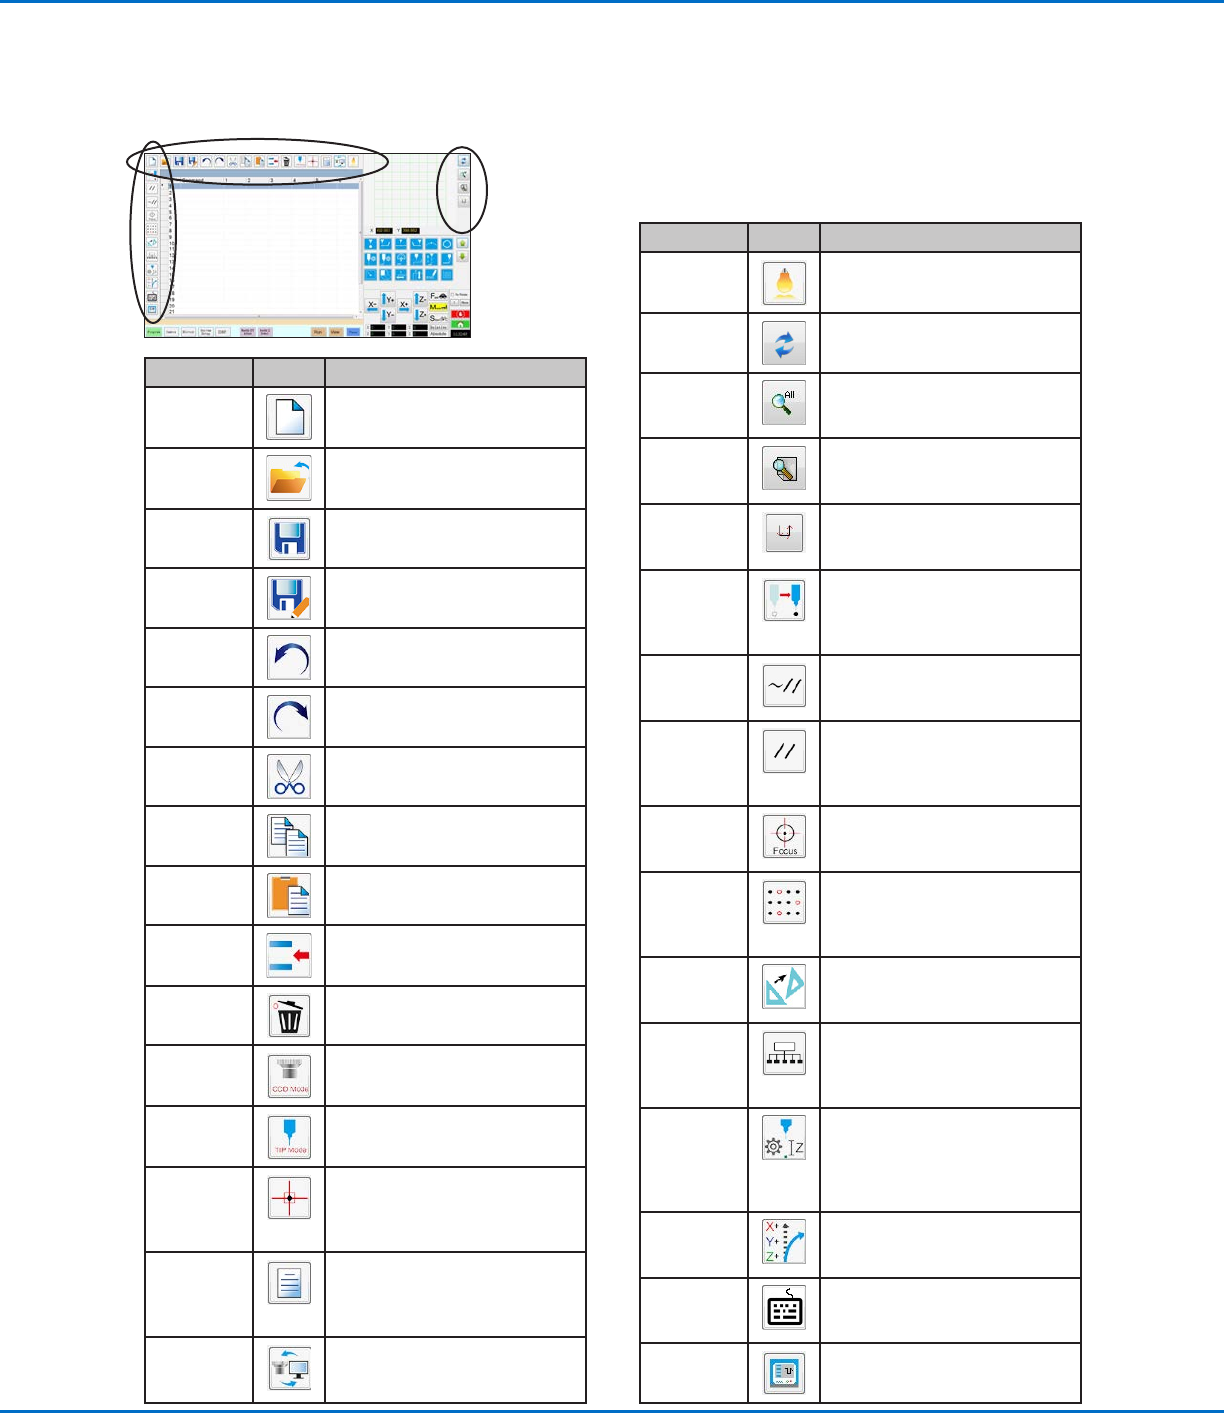
Horizontal and Vertical Toolbar Icons
Use the icons located on the horizontal and vertical toolbars to manage files, insert certain commands, and perform
other functions as described below.
Icon Name Icon Function
A New File
Creates a new file
Open a File
Opens a file
Save Saves the open file
Save As
Saves the open file as a new file
name
Undo
Undoes the last command
Redo
Restores the last Undo action
Cut
Cuts a selection
Copy
Copies a selection
Paste Pastes a selection
Insert
Inserts a memory address
Delete Deletes the current memory
address
CCD Mode
Toggles the system between
camera mode and tip mode
Tip Mode
Toggles the system between
camera mode and Tip Mode
Match
Centers the camera on a mark
selected in the Mark Library
(camera must be near the mark
on the workpiece)
Example
Provides sample programs
that contain examples of the
commands you can use to create
programs
Path
Switches the Secondary view
screen from the Camera view to
the Grid view (Path mode)
Icon Name Icon Function
Light
(If present) Allows temporary
override of the Light settings
Refresh
(Path mode only) Refreshes the
Secondary View screen
See All
(Path mode only) Shows all
the programed points on the
Secondary View screen
Magnify
(Path mode only) Magnifies
an area of the Secondary View
screen
Path
Direction
(Path mode only) Provides an
arrow to show the direction in
which the robot arm will move
Move
Moves the tip or camera to
the XYZ location of a selected
address (if the address has a
location value)
Enable
Address
Re-enables an address that was
previously disabled using Disable
Address
Disable
Address
Disables a command in the
program (re-enable the command
by clicking Enable Address while
in the selected address)
Focus
Automatically moves the Z
position to the focus position
based on the initial setup
Step &
Repeat
Block
For a Step & Repeat command,
disables dispensing onto
workpieces at selected locations
in an array
Transform
Aligns the program points of an
uploaded DXF drawing with their
actual locations on a workpiece
Extend Step
& Repeat
Expands all the commands in a
Step & Repeat command (can
only be undone using the Undo
icon)
Change Z
Value
Changes the Z value in a
command or in a list of selected
commands in a program (mainly
used to fine-tune and adjust the
dispensing gap)
Point Offset
Changes or moves all program
points if the placement of a
workpiece was changed
Joystick
If connected, toggles an optional
control method (such as a
joystick) on or off
Pico Touch
Opens the Pico Touch Remote
Control window