Nordson_EFD_GV_Series_Operating_Manual - 第52页
GV Series Automated Dispensing Systems 52 www.nordsonefd.com info@nordsonefd.com +1-401-431-7000 Sales and service of Nordson EFD dispensing systems are available worldwide. Setting Up the System Using the Robot Initial …
GV Series Automated Dispensing Systems
51www.nordsonefd.com info@nordsonefd.com +1-401-431-7000 Sales and service of Nordson EFD dispensing systems are available worldwide.
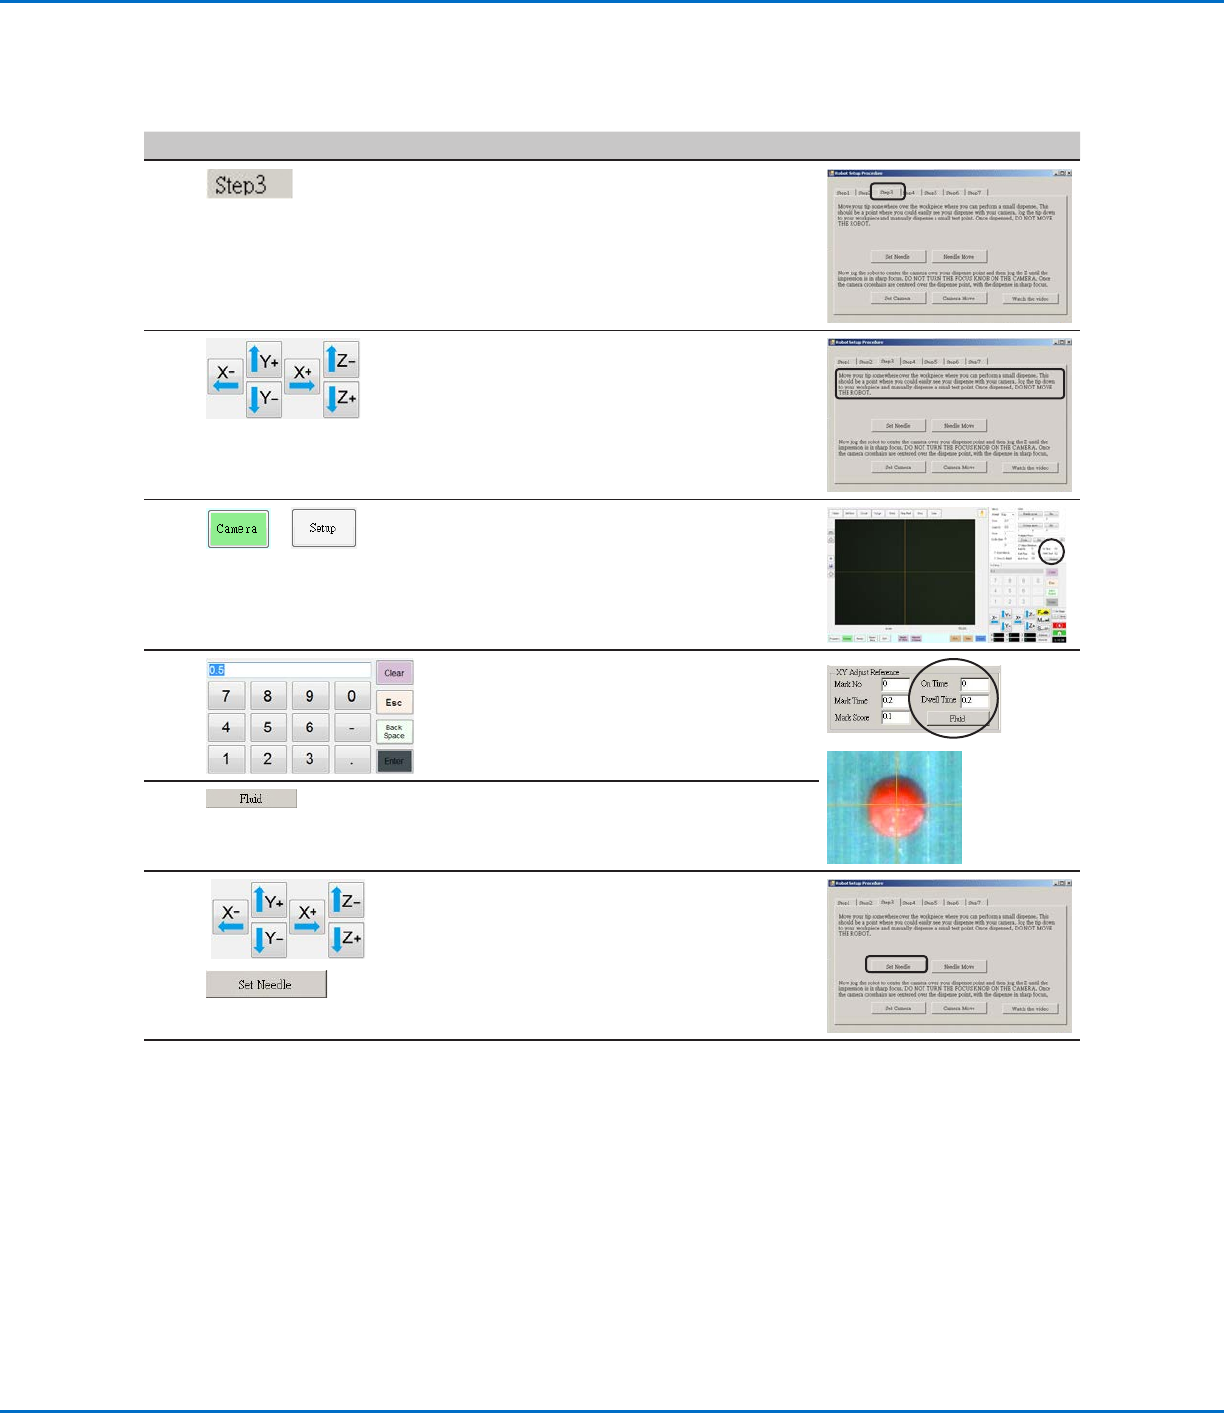
Robot Initial Setup (Step3 Tab): Setting the Camera-to-Tip Offset
# Click Step Reference Image
1
• Click the STEP3 tab.
2
• Jog the tip to a good location on the work
surface to deposit a test dot of fluid.
3
>
• Click the CAMERA tab and then click SETUP
at the top of the Camera screen.
You will use the fields under XY Adjust
Reference to deposit a test dot of fluid.
4
• Use the keypad to enter the following
recommended dispense dot parameters:
- ON TIME: 0.5
- DWELL TIME: 0.2
5
• Click FLUID to dispense a dot of fluid.
6
>
• Jog the tip until it is positioned about 2mm
above the dispense dot.
• Click SET NEEDLE.
Continued on next page
Setting Up the System Using the Robot Initial Setup Wizard (continued)
GV Series Automated Dispensing Systems
52 www.nordsonefd.com info@nordsonefd.com +1-401-431-7000 Sales and service of Nordson EFD dispensing systems are available worldwide.
Setting Up the System Using the Robot Initial Setup Wizard (continued)
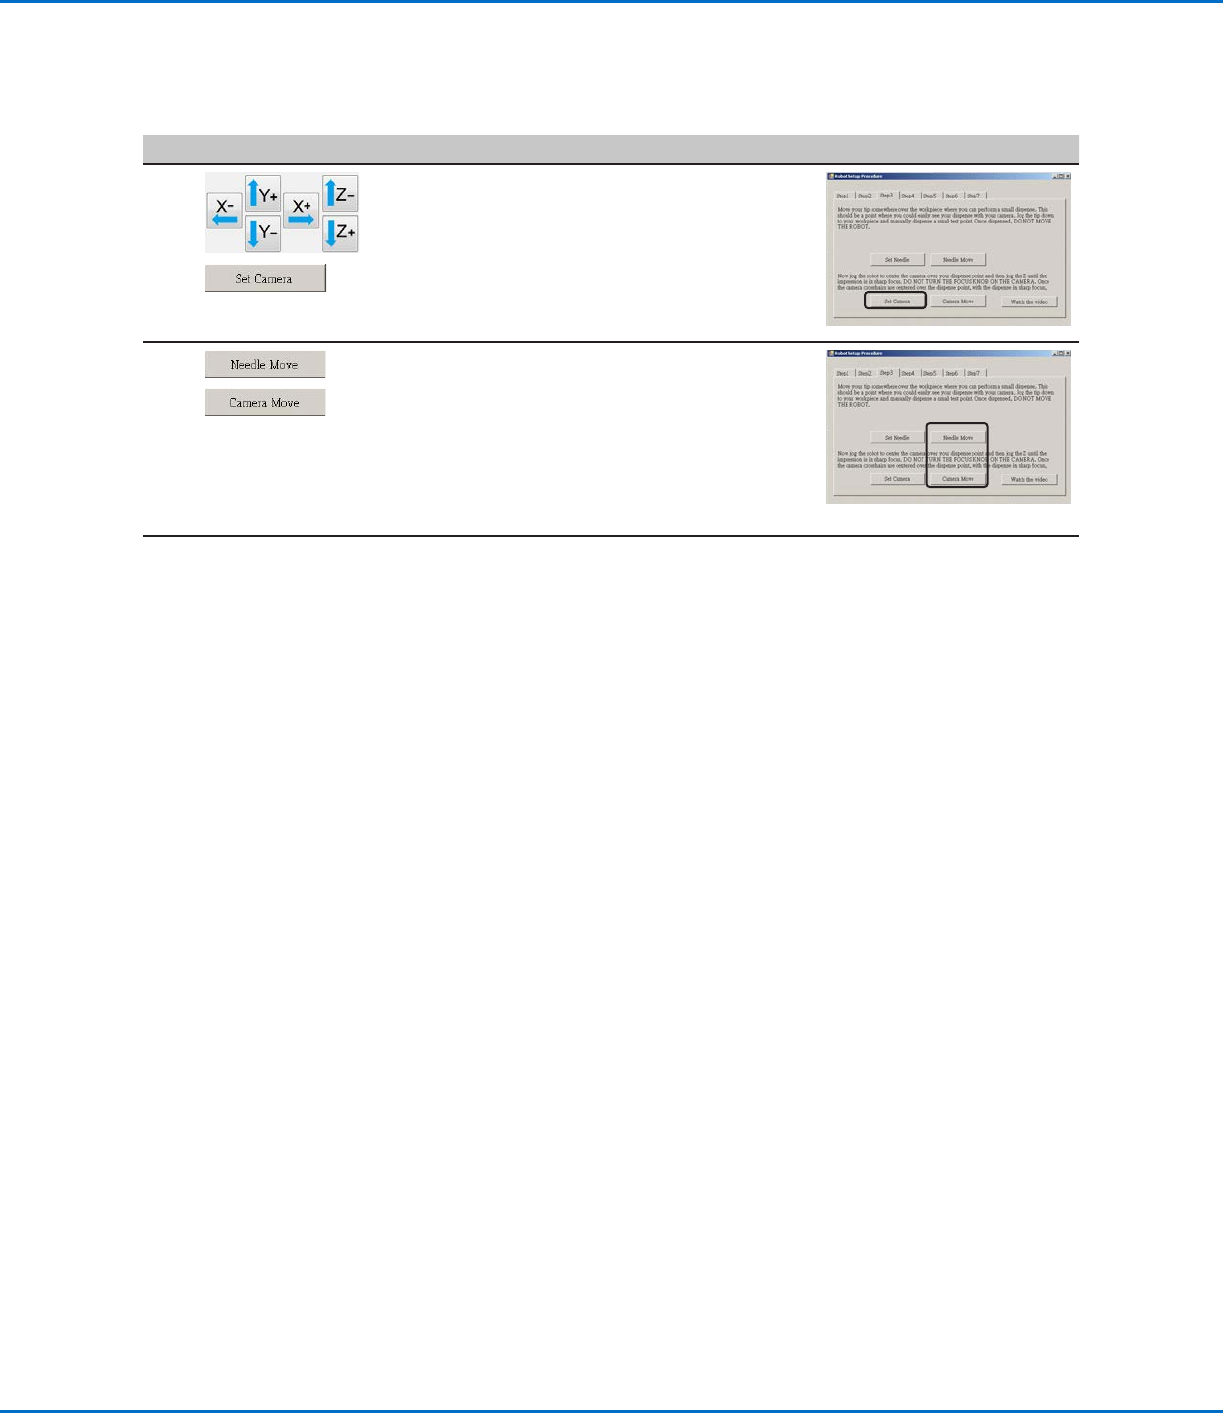
Robot Initial Setup (Step3 Tab): Setting the Camera-to-Tip Offset (continued)
# Click Step Reference Image
7
>
• Jog the camera until the camera crosshairs
are centered over the dispense dot.
• Focus the camera until the image of the
dispense dot is clear. Refer to “Camera” on
page18 as needed for instructions on
focusing the camera.
• Click SET CAMERA.
8
>
• Click NEEDLE MOVE to test the setup.
The system should center the tip over the
test dot dispensed in step 5.
• Click CAMERA MOVE to further test the
setup.
The camera should center its crosshairs over
the test dot dispensed in step 5.
9
• Continue to “Robot Initial Setup (Step4
Tab): Setting a Mark” on page53.
GV Series Automated Dispensing Systems
53www.nordsonefd.com info@nordsonefd.com +1-401-431-7000 Sales and service of Nordson EFD dispensing systems are available worldwide.
Setting Up the System Using the Robot Initial Setup Wizard (continued)
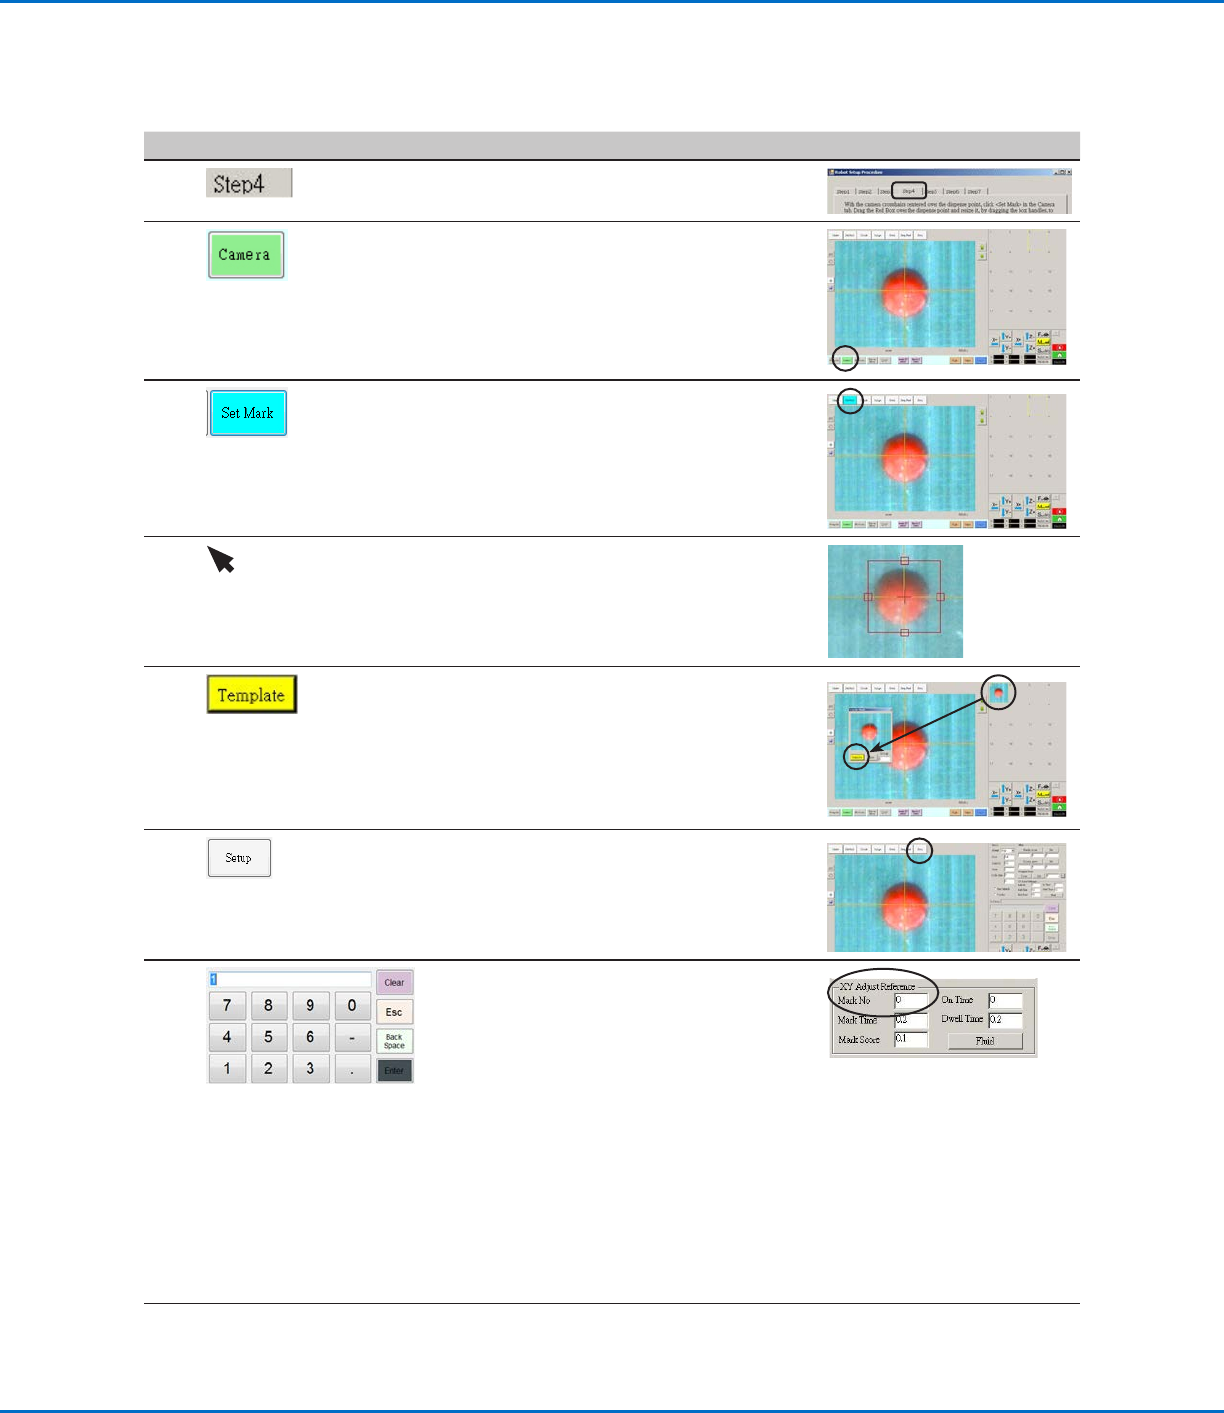
Robot Initial Setup (Step4 Tab): Setting a Mark
# Click Step Reference Image
1
• Click the STEP4 tab.
2
• Click the CAMERA tab.
The actual camera view appears in the
Primary View screen and the Mark Library
appears in the Secondary View screen.
3
• Click SET MARK.
A red box appears.
4 • Click and hold the center of the red box,
drag it over the dispense dot, and then click
and drag the four box handles such that
they outline the dot.
5
• Click a socket in the Mark Library to save the
mark as a Mark No., then click TEMPLATE
when the Template Match window appears.
The system saves the image in the Mark
Library.
NOTE: Be sure to remember the Mark No.
6
• Click SETUP to go back to the Camera
window Offset fields.
7
• Use the keypad to enter the Mark number
in the Mark No field under XY Adjust
Reference.
NOTES:
- Make sure you click ENTER on the keypad
to enter the Mark number.
- Mark Time sets the time allowed for the
system to find the mark.
- Mark Score specifies how accurately the
camera finds a mark based on a value
from 0.1 to 1. A higher value results in
more precise matching. A lower value
results in less precise matching.
8
• Continue to “Robot Initial Setup (Step5
Tab): Setting the Camera Scale” on
page54.