Nordson_EFD_GV_Series_Operating_Manual - 第59页
GV Series Automated Dispensing Systems 59 www.nordsonefd.com info@nordsonefd.com +1-401-431-7000 Sales and service of Nordson EFD dispensing systems are available worldwide. Item Function Absent Specifies how the system r…
GV Series Automated Dispensing Systems
58 www.nordsonefd.com info@nordsonefd.com +1-401-431-7000 Sales and service of Nordson EFD dispensing systems are available worldwide.
Setting Up Inputs / Outputs
If you connected inputs / outputs, follow this procedure to test input / output connections.
NOTE: All automated dispensing systems provide 8 standard inputs and 8 standard outputs. A kit to expand to
16inputs and 16 outputs is available. Refer to “Accessories” on page89.
PREREQUISITES
The system is properly installed and set up. Refer to “Installation” on page19 and “Setup” on page44.
Input / output wiring is properly connected. Refer to “I/O Port” on page95 for wiring diagrams.
#
Click Step
1
>
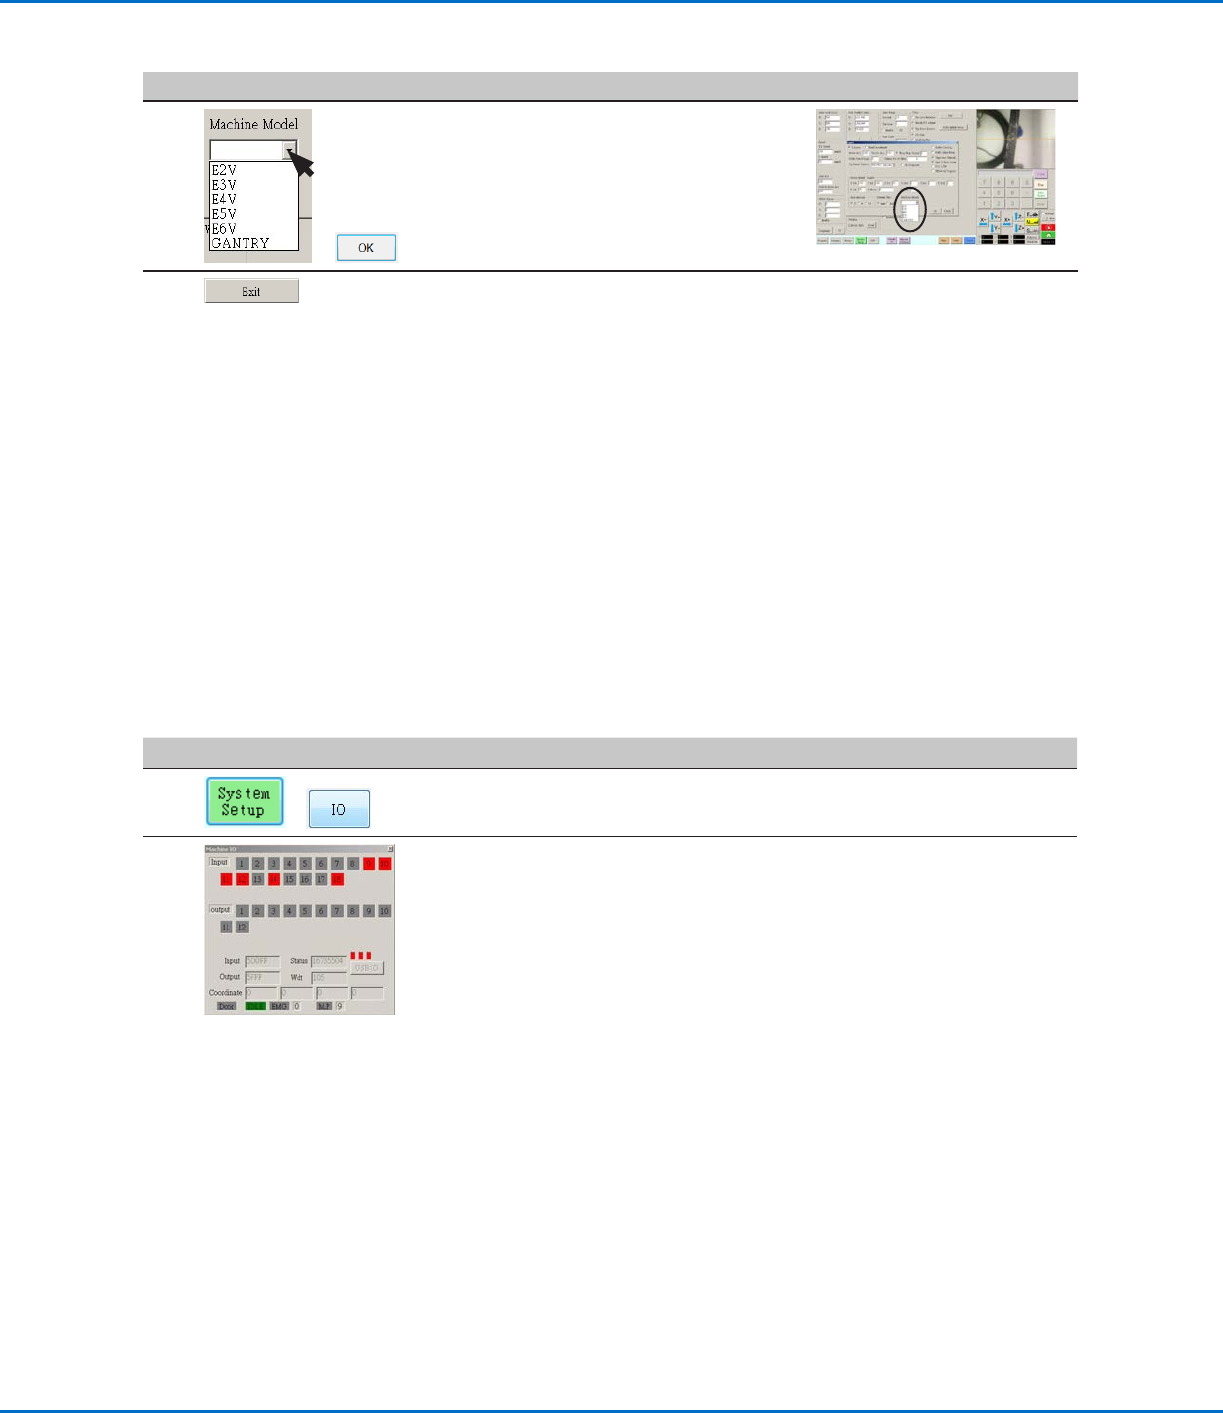
• Click SYSTEM SETUP > IO.
2
• Click the outputs you want turn ON or OFF, then click the X to close the
window.
NOTES:
• Inputs flash red when they are turned ON.
• Use only inputs / outputs 1 through 8. The remaining I/Os are reserved for the
system.
Configuring Input / Outputs for a Special Purpose
The IO Pin Function feature provides a set of user-configurable conditions that affect the operation of the robot.
Refer to “AppendixG, I/O Pin Function Setup” on page146.
Changing the Robot Model Selection (continued)
# Click Step Reference Image
4
>
• Select the correct robot model from
the Machine Model drop-down menu.
• Click OK to save.
5
• Click EXIT to close the software.
• Switch off the robot.
• Re-open the DispenseMotion
software and switch on the robot for
the change to take effect.
GV Series Automated Dispensing Systems
59www.nordsonefd.com info@nordsonefd.com +1-401-431-7000 Sales and service of Nordson EFD dispensing systems are available worldwide.
Item Function
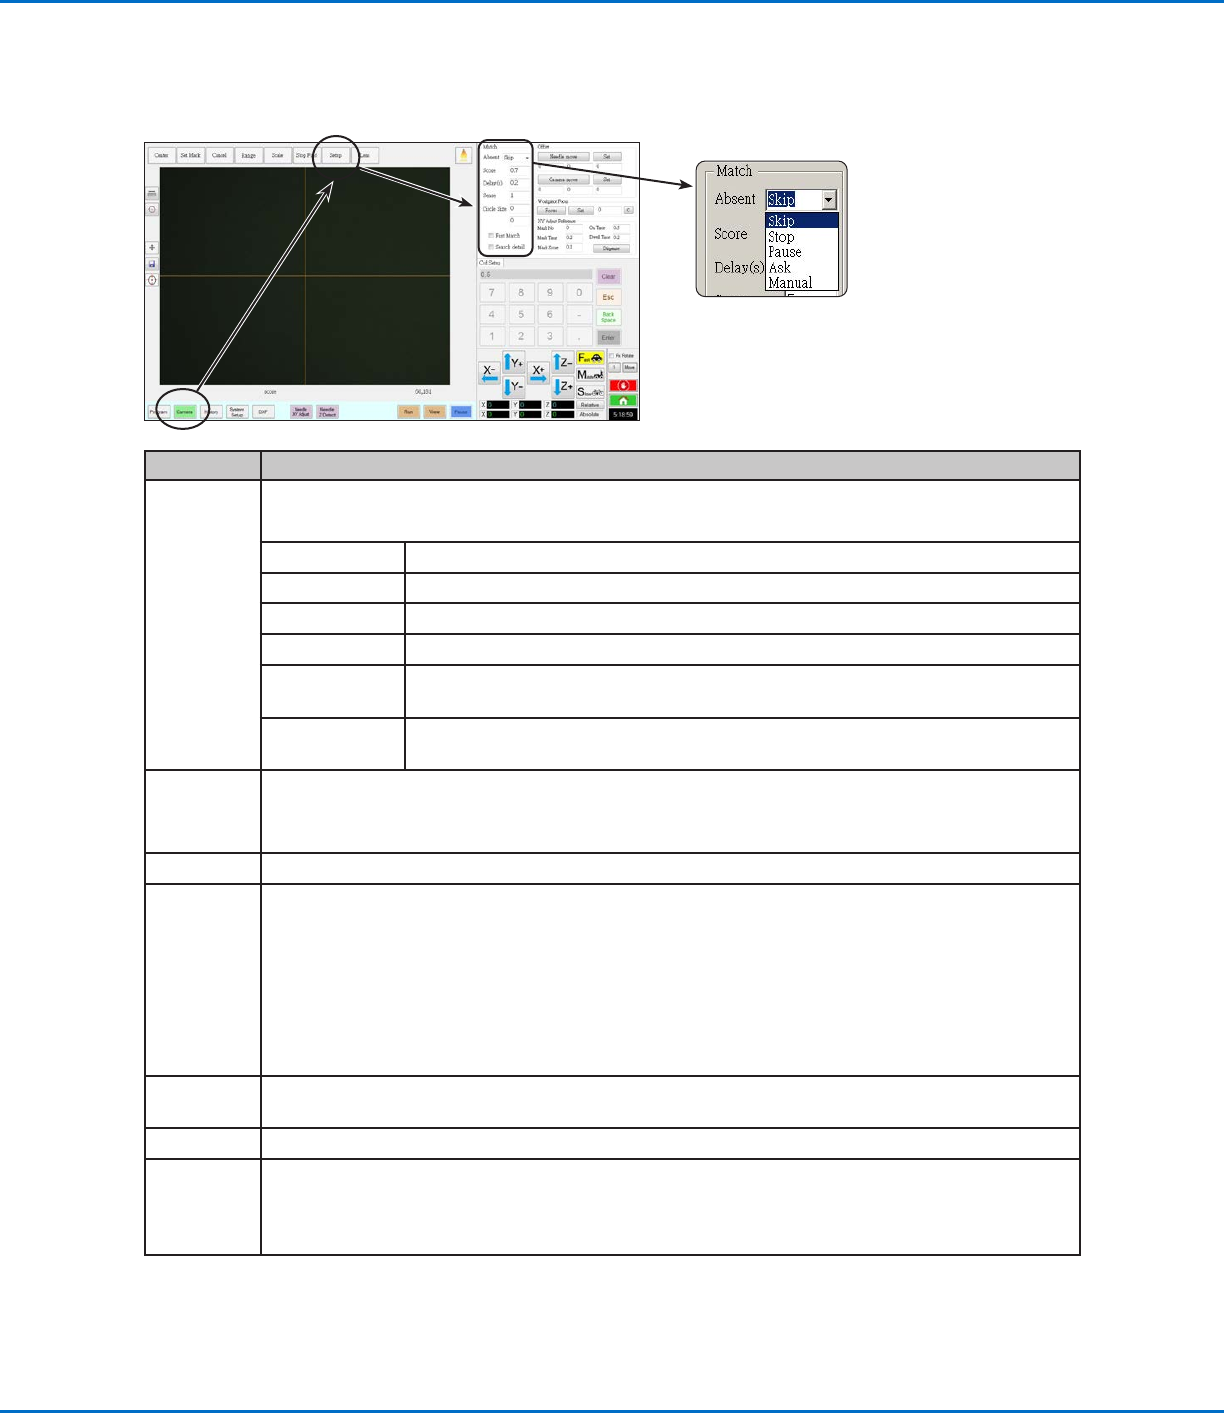
Absent Specifies how the system responds when it is unable to recognize a mark.
NOTE: You can assign a specific Absent selection to any saved image in the Mark Library.
Parameter Description
Skip The robot skips to the next program address.
Stop The robot stops.
Pause The robot pauses.
Ask The system asks if you want to: Find Again, Find Next, Stop Find, or use the
Manual mode.
Manual The system asks you to jog the camera to the center of the mark yourself, then to
select CONTINUE to continue the program.
Score Specifies how accurately the camera finds a mark based on a value from 0.1 to 1. A higher value
results in more precise matching. A lower value results in less precise matching.
NOTE: You can assign a specific Score value to any saved image in the Mark Library.
Delay(s) Sets how the long system delays (in seconds) searching for a mark when it reaches the mark area.
Sense Specifies how accurately the camera aligns with the pixels of a mark based on a value from 1 to
200. When the Sense value is low, the camera is slower to align with the mark because it repeatedly
checks the position of the mark to achieve high accuracy. When the Sense value is higher, the
camera aligns with the mark faster, but with less accuracy. For example, a Sense value of 1 means
the deviation cannot be more than one pixel. When the Sense value is 200, the deviation can be up
to 200 pixels.
NOTE: For a slower find speed but better accuracy, enter higher Score and lower Sense values; for
a faster find speed but less accuracy, enter lower Score and higher Sense values.
Circle Size Sets the size of the yellow and green circles on the Camera screen. A higher value results in a
larger circle.
Fast Match If this box is checked, the camera searches for mark more quickly but with less accuracy.
Search
Detail
Sets the area within which the camera searches for a mark. If Search Detail is NOT checked, the
camera looks only within the specified range (set under Range). If Search Detail is checked, the
camera overrides the range settings and performs a full-screen search for the mark. This increases
the chances of finding the mark, but is slower.
Setting How the System Finds Marks (Optional)
Use the fields under CAMERA > SETUP > MATCH to adjust how the system functions when it searches for marks.
GV Series Automated Dispensing Systems
60 www.nordsonefd.com info@nordsonefd.com +1-401-431-7000 Sales and service of Nordson EFD dispensing systems are available worldwide.
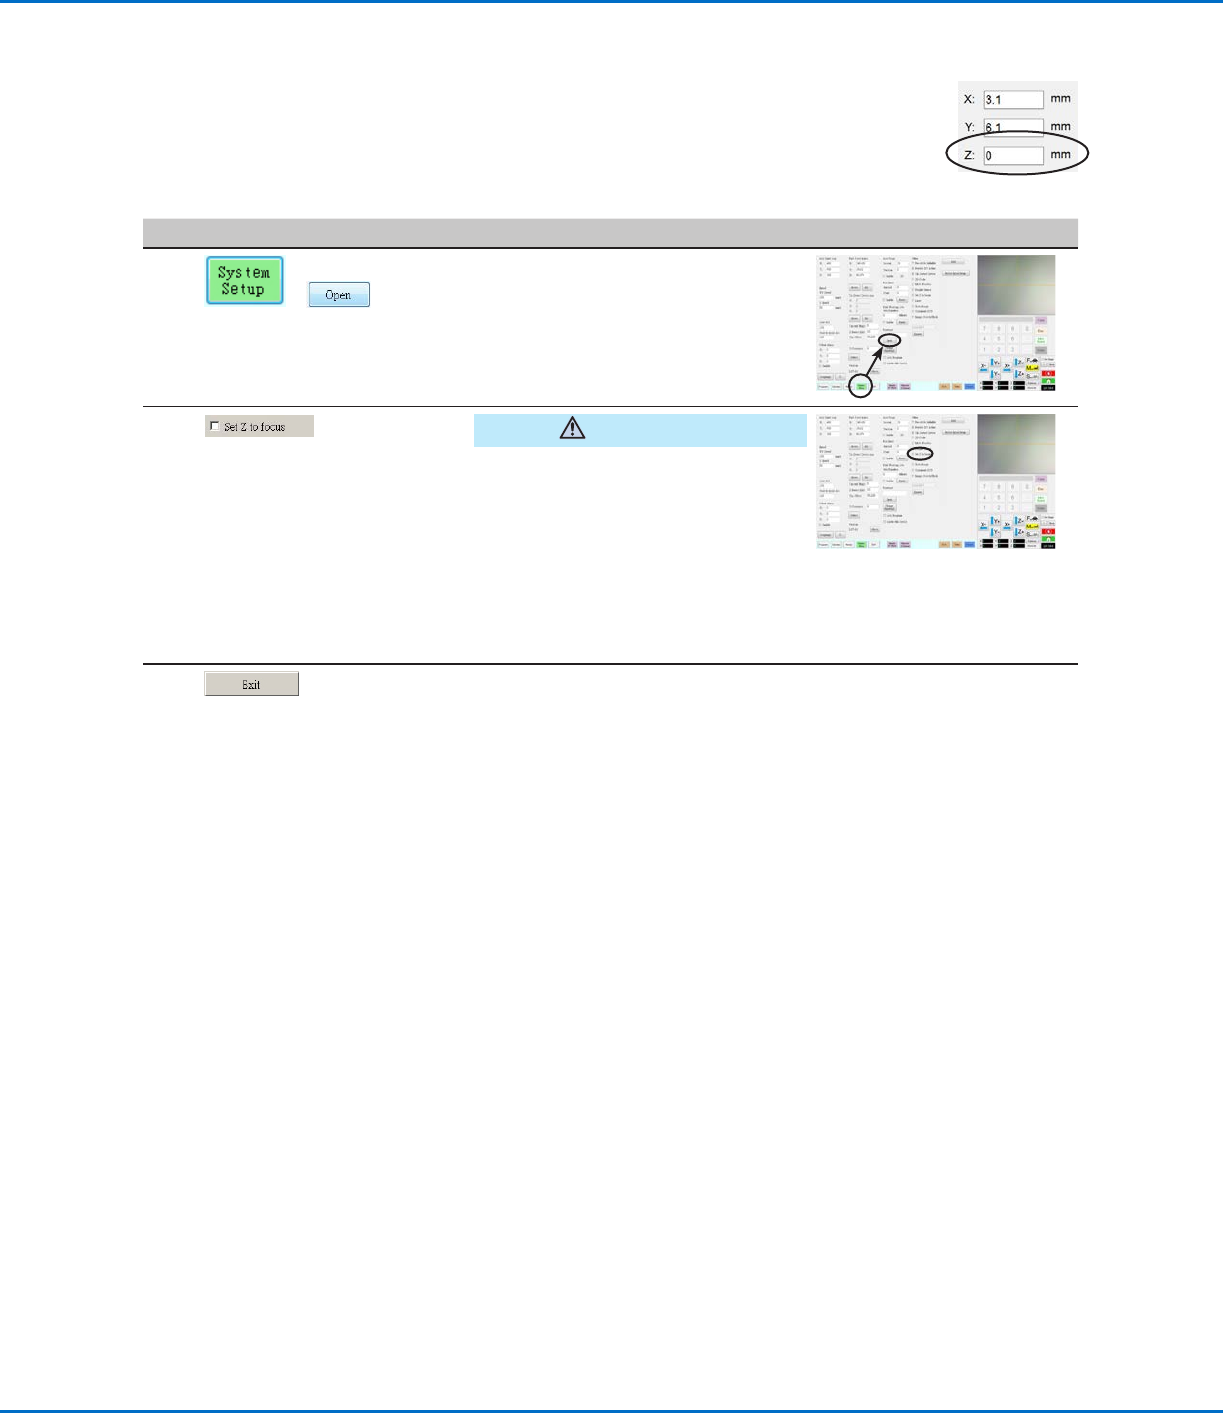
Setting How the System Captures Z Height Values (Optional)
By default, the system does not capture the Z-height value as you move the camera over the work
surface. This is a safeguard to prevent the dispensing tip from being damaged when a workpiece
surface is uneven.
Use the Set Z to Focus checkbox in the Expert window to set the system to automatically capture
Z-height values.
# Click Step Reference Image
1
>
• Click SYSTEM SETUP > OPEN.
2
CAUTION
When SET Z TO FOCUS is NOT
checked, the tip can collide with
obstacles on uneven workpieces,
causing damage.
• Select or deselect the SET Z TO
FOCUS checkbox.
When SET Z TO FOCUS is checked,
the system captures Z-height values.
3
• Click EXIT to close, then reopen the
DispenseMotion software for the
change to take effect.