WPC an:on SIPLACE SX1:SX2 Montageanleitung : Assembly Instructions.pdf - 第68页
4 Operator Tasks 68 Mo nt ag ea nl ei tu ng / A ss em bl y In st ru ct io ns W PC a n/ on S IP LA CE S X1 /S X2 - 0 3/ 20 25

4 Operator Tasks
Montageanleitung / Assembly Instructions WPC an/on SIPLACE SX1/SX2 - 03/2025 67
4.3 Undocking the WPC5/WPC6
Preparatory steps
► Go to Manual operations => Entire machine functions and perform a Overall reference run.
► Perform a WPC reference run. To do this, select Manual operations => Subsystems => WPC
and click on Reference run.
► Use the software to move the lifting axis of the WPC5/WPC6 into the transport position. To do
this, select the Move into transport position button. The WPC5/WPC6 will be moved to a
defined position, from which it can be safely transported.
► Disconnect the WPC5/WPC6 from the power supply and the data supply.
Removing the WPC5/WPC6
► Open the machine covers on the relevant changeover table.
► Move the changeover table out of the machine.
► Fasten the hexagonal shaft (crank handle) to the lifting mechanism of the WPC and turn in a
clockwise direction as long as there is enough free space to lift the WPC5/WPC6.
NOTICE!
Do not turn further than necessary to pull the WPC5/WPC6 away! The feed mechanism must not
get caught!
.
► Remove the WPC5/WPC6.
Transportation of the WPC5
► When the lifting axis is in its lowermost position (transport position), the WPC5/WPC6 can be
moved on a level floor.
CAUTION
Transport on a pallet truck – always turn the chassis all the way up!
► Always rotate the chassis all the way up! Otherwise, the WPC weight will press down on the
chassis' lifting spindle, causing the spindle to bend!

4 Operator Tasks
68 Montageanleitung / Assembly Instructions WPC an/on SIPLACE SX1/SX2 - 03/2025
5 Appendix
Montageanleitung / Assembly Instructions WPC an/on SIPLACE SX1/SX2 - 03/2025 69
5 Appendix
5.1 Excerpts from the Service Manual
The following chapters are excerpts from the service manual. For more information, refer to the full
service manual for your machine.
5.1.1 Downholder
Overview downholder (new design) - for COTi60 [03294435-xx]
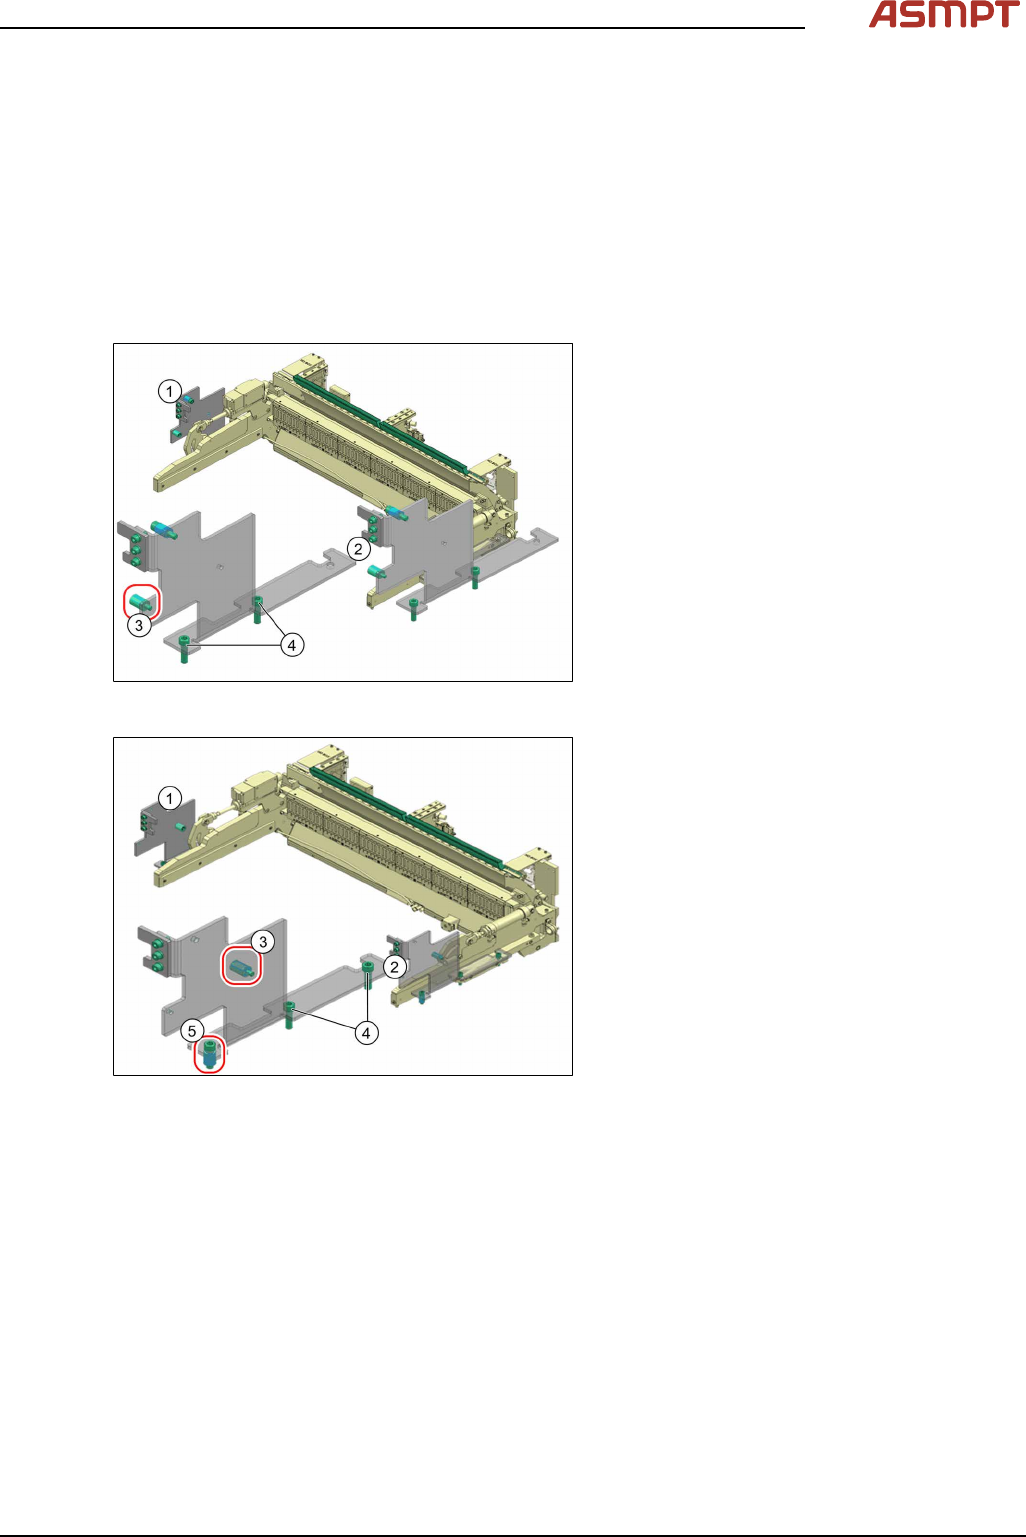
Fig.22: Downholder – outside position
Outside position:
1. Downholder left [03296161-xx]
2. Downholder right [03296153-xx]
3. ISO4762 M6x22 [03043127‑xx]
Downholder-Pin [03094146‑xx]
4. ISO4762 M8x30 [03042587‑xx]
Fig.23: Downholder – inside position
Inside position
1. Downholder left [03296161-xx]
2. Downholder right [03296153-xx]
3. ISO4762 M6x22 [03043127‑xx]
Downholder-Pin [03094146‑xx]
4. ISO4762 M8x30 [03042587‑xx]
5. Spacer [03307707‑xx]
ISO4762 M8x30 [03042587‑xx]