YSP10_Mainte_E.pdf - 第50页
2. Monthly maintenance 3-3 Chapter 3 Periodic maintenance items 6 Attach matrix plates (front and rear) b y tighte ning t he mount ing b olts. n NOTE Matrix plates have a bolt at the position which is written "F(FRO…
2. Monthly maintenance
3-2
Chapter 3 Periodic maintenance items
2. Monthly maintenance
Make periodic inspection and maintenance monthly, in addition to the daily inspection. It is also
recommended to shorten the inspection interval depending on the operating time or the environment of
the machine.
2.1 Cleaning matrix plate
The matrix plate should be cleaned periodically as the solder or foreign objects may adhere on its surface.
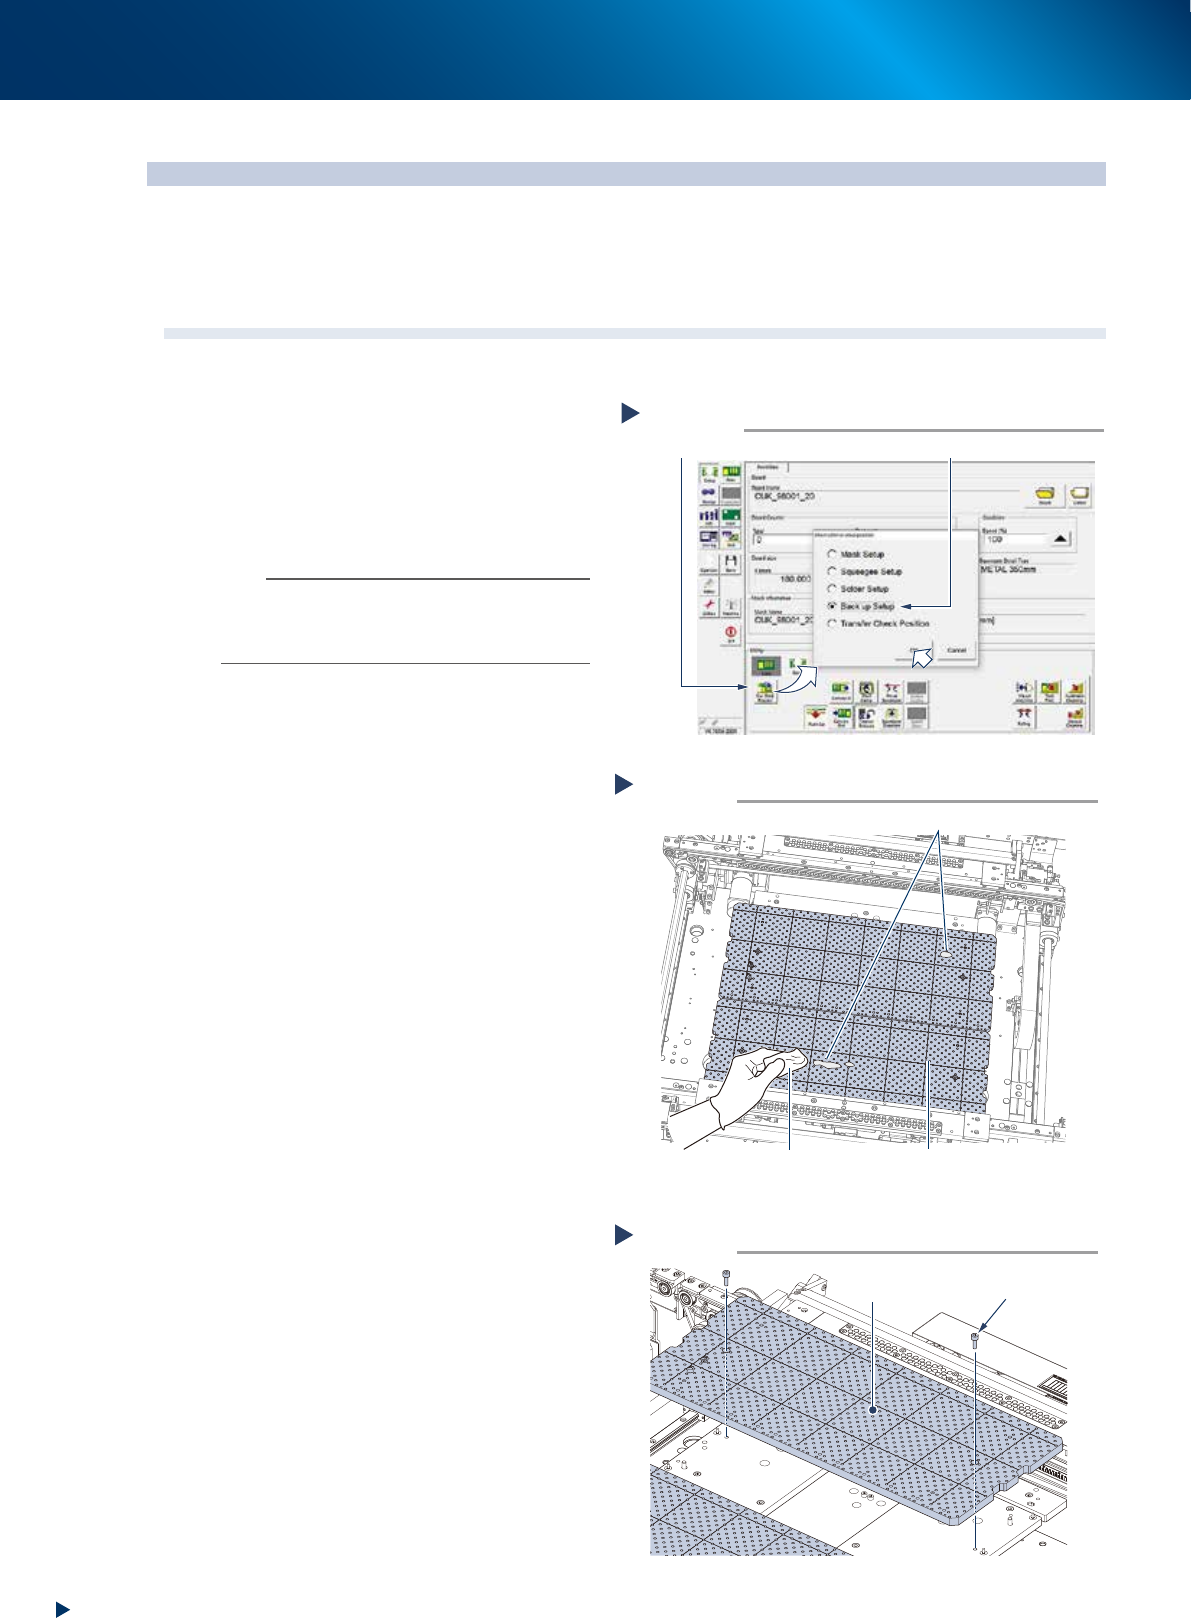
1
Raise the PU-axis.
1. Read any board data.
2. Press the [Sw. Prod. Position] button on
[Setup] - [Setup] screen.
3. Select "Back up Setup", then press the [OK]
button.
n
NOTE
When selecting "Back up Setup", the conveyor width
becomes to its maximum width, and then the pushup plate
(PU-axis) raises. Also, the squeegee unit and cleaning unit
moves to machine rear side.
2
Check the matrix plate condition.
1. Press the emergency stop button and open
the machine safety cover and lower door,
and lift up the maintenance door.
2. Check if there is no solder or foreign object
adheres on the matrix plate.
3
Clean matrix plate using a lint-free
cloth applied of a few drops of ethanol
when some solder etc. adheres.
When it is extremely dirty, detach and
clean the matrix plate by the procedure
of Step 4 and later.
4
Detach matrix plate.
1. Remove mounting bolts of matrix plate (2
bolts per 1 plate) using a hexagon wrench
(4mm).
2. Detach matrix plate (front and rear, 2pcs.)
5
Clean detached matrix plate using a
lint-free cloth applied of a few drops of
ethanol to wipe off such as solder.
Cleaning matrix plate
Step 3
Matrix plateLint-free cloth applied with
a few drops of ethanol
Solder adherence
533A1-KMJ-00
Detaching matrix plate
Step 4
Matrix plate
Mounting bolt
53399-KMJ-00
Raising PU-axis
Step 1
Select “Backup Setup”
[Sw. Prod. Position] button
54331-KMJ-00
2. Monthly maintenance
3-3
Chapter 3 Periodic maintenance items
6
Attach matrix plates (front and rear) by
tightening the mounting bolts.
n
NOTE
Matrix plates have a bolt at the position which is written
"F(FRONT)/R(REAR)" to prevent the misplacement.
7
Attach the machine safety cover,
maintenance door and lower door to
their original positions, then cancel the
emergency stop.
2.2 Motion check of edge clamp
The edge clamp clutches a board from side upon fixing a board. The motion error of edge clamp may cause
the printing offset. The periodic check of edge clamp motion is recommended to prevent the error.
e
1
Prepare before work by pressing the
emergency stop button and opening
machine safety cover.
2
Check the motion of edge clamp.
1. Move the edge clamp by pressing the [Edge
Clamp] button of [Unit] - [Conveyor] screen.
2. When the edge clamp does not move
smoothly, check if there is dirt, such as
solder, around it.
When some dirt is found, wipe off with a
lint-free cloth applied of a few drops of
ethanol.
n
NOTE
When the edge clamp motion does not improve after
cleaning, contact your sales representative.
3
Close machine safety cover and cancel
the emergency stop.
Attaching matrix plate
Step 6
Matrix plate
Mounting bolt
Plate/front side
Plate/rear side
Misplacement prevention bolt
533A0-KMJ-00
Motion check of edge clamp
Step 2
[Edge Clamp] button
Edge plate
Edge plate
Operating
condition
Pre-operating
condition
54347-KMJ-00
2. Monthly maintenance
3-4
Chapter 3 Periodic maintenance items
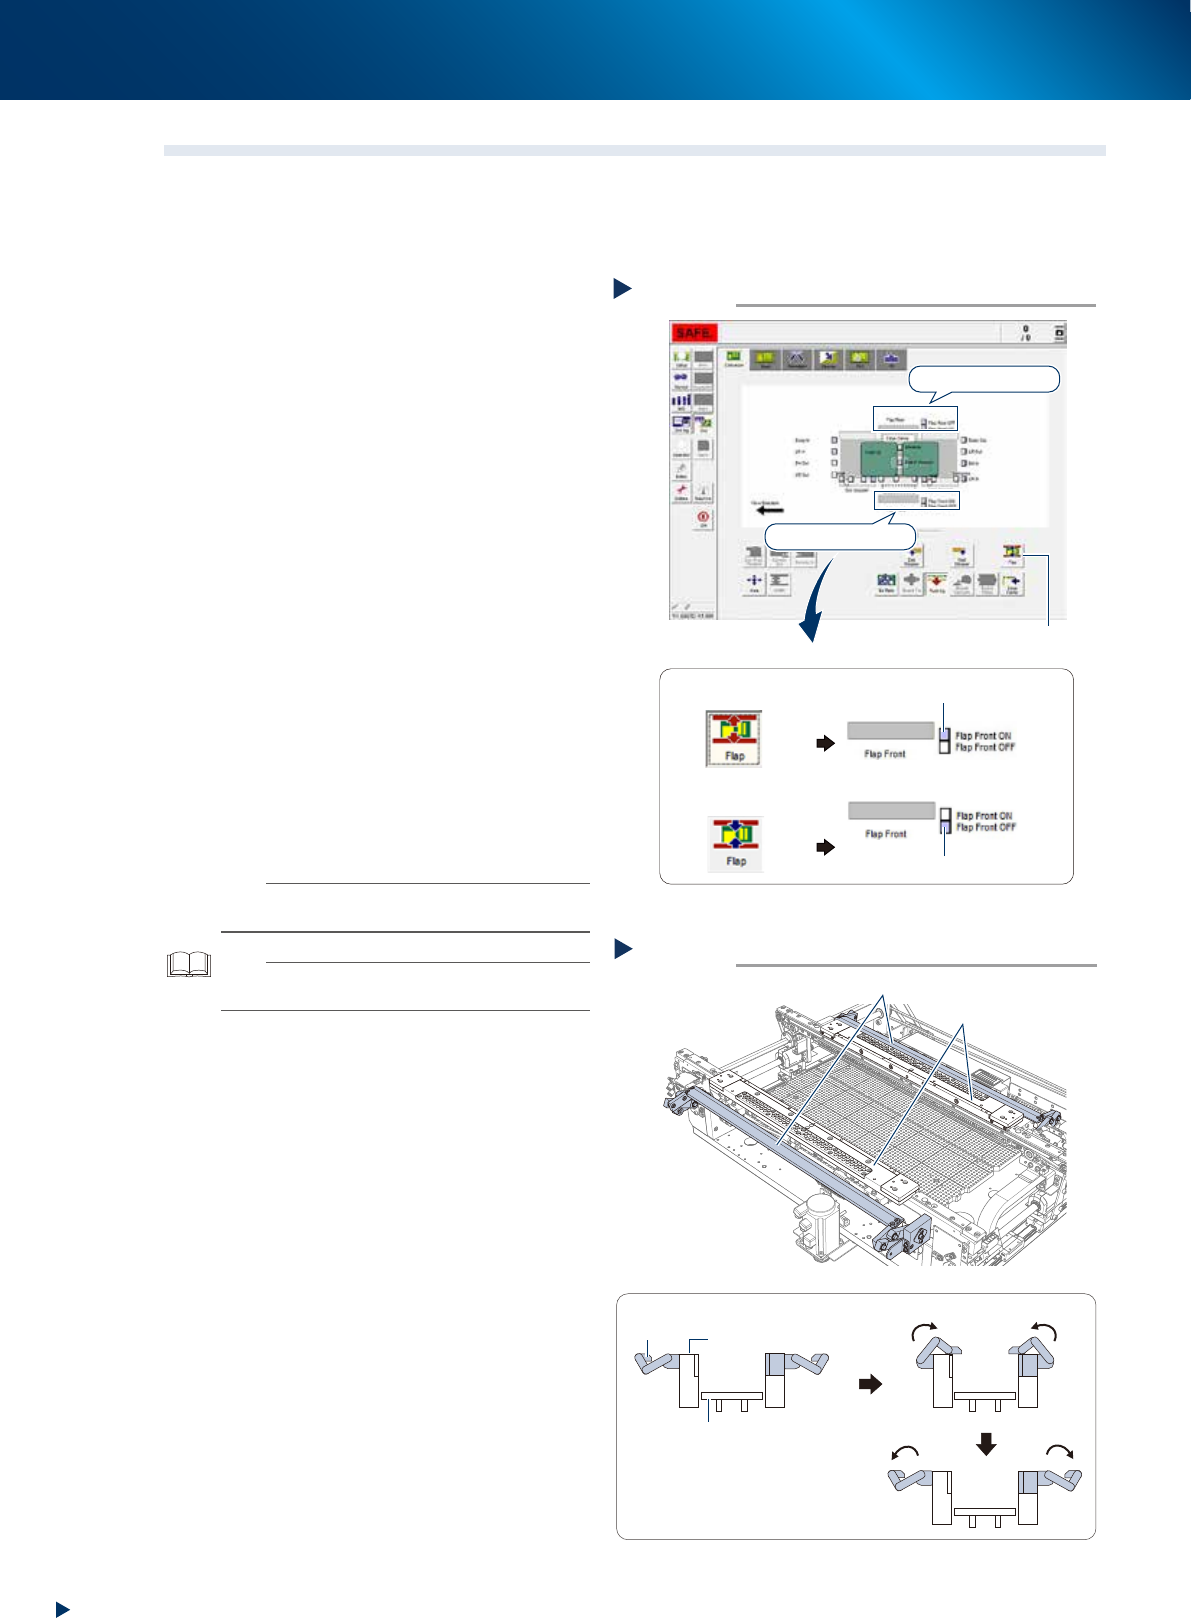
2.3 Motion check of board flap
The board flap (hereinafter referred to as flap) presses the board along its Y-direction edges to flatten the
upward warp. As the motion error of flap causes printing offset, the flap should be checked periodically if it
operates correctly, and if the flap detection sensor actuates normally.
1
e
Prepare before work by pressing the
emergency stop button and opening
machine safety cover.
2
Check the motion of ap detection
sensor.
1. Press the [Flap] button on [Unit] - [Conveyor]
screen, and confirm that the sensors, "Flap
front actuated" and "Flap rear actuated",
are turned ON.
2. Press the [Flap] button again, and confirm
that the sensors, "Flap front cancelled" and
"Flap rear cancelled", are turned ON.
3
Check the ap motion.
1. Actuate the flap by pressing the [Flap]
button on [Unit] - [Conveyor] screen, and
confirm its smooth motion.
2. When the flap does not actuate smoothly,
check if the dirt such as solder adheres on
the flap mechanism.
When the flap is dirty, wipe off using a
lint-free cloth applied of a few drops of
ethanol.
The solder may adhere on underside of flap,
wipe off it carefully.
n
NOTE
When the flap motion does not improve after cleaning,
contact your sales representative.
TIP
See Ch.2 "2.5 Mask vacuum unit, board flap and edge
clamp plate" for the flap cleaning procedure.
4
Close machine safety cover and cancel
the emergency stop.
Motion check of flap
Step 3
Flap
Viewed from side of printing table
■ The smooth operation of flaps
Flap
Pushup plate
Mask plate
Mask plate
533A3-KMJ-00
Condition check of flap detection sensor
Step 2
The [Flap] button is
pressed
The [Flap] button is
not pressed
[Flap] button
Sensor on flap rear
Sensor on flap front
■ Example of sensor on flap front
“Flap Front OFF” sensor ON
“Flap Front ON” sensor ON
54350-KMJ-00