YSP10_Mainte_E.pdf - 第64页
2. Monthly maintenance 3-17 Chapter 3 Periodic maintenance items 2.7 Base unit and others T his section describes the procedures for cleaning and replacing the fan filters installed at front and rear side of machine, and…
2. Monthly maintenance
3-16
Chapter 3 Periodic maintenance items
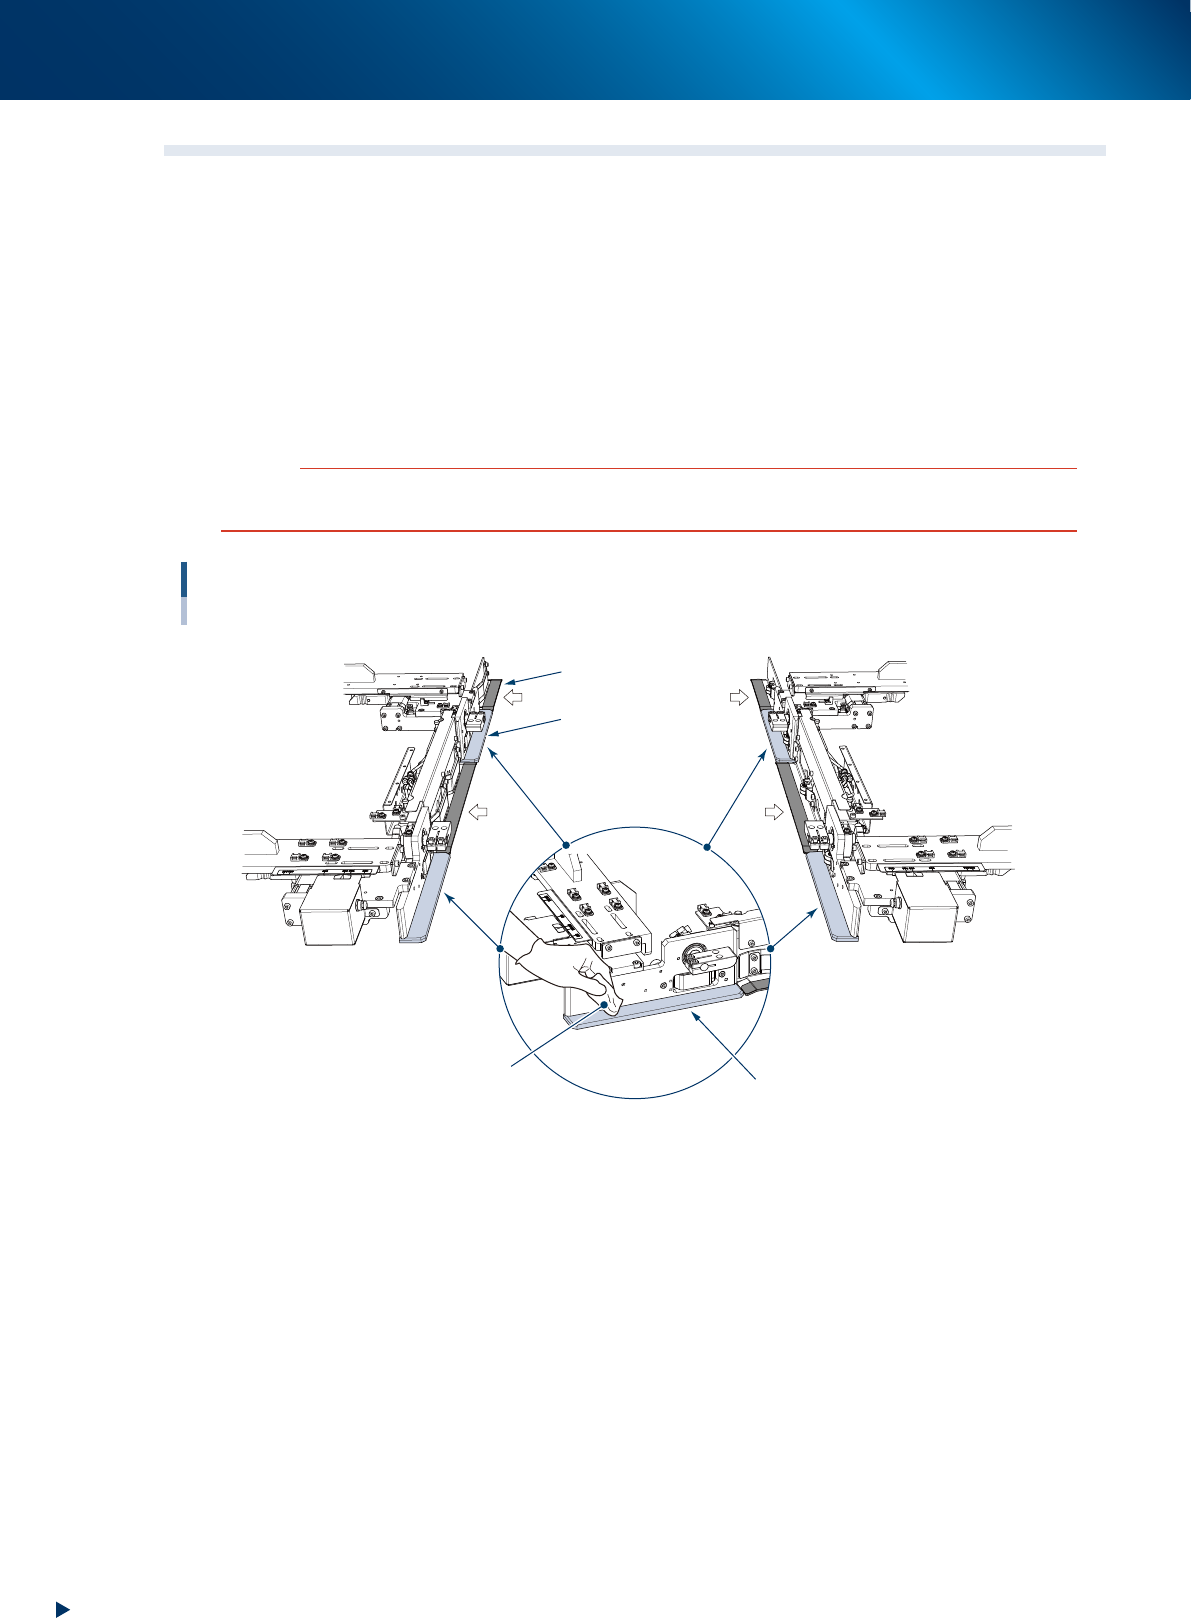
2.6 Mask holder
This section describes the cleaning procedure for the part to set a mask for mask holder (mask holder plate).
2.6.1 Inspection and cleaning of mask holder plate
►
Inspection items
Check that there is no dirt as such solder, flux etc., or greasy touch on the surface of four mask holder
plate illustrated below.
►
Cleaning procedure
When any dirt or greasy touch is found, wipe away it using a lint-free cloth applied a few drops of
ethanol.
c
CAUTION
Do not use ethanol for the parts pasted with anti-wear resin tape pointed by white arrow in the figure below to prevent
the adhesibility decrease. Wipe with dry cloth upon cleaning.
Mask holder
Inspection and cleaning of mask holder plate
Lint-free cloth
applied of ethanol
Anti-wear resin tape
Mask holder plate
Mask holder plate
53325-KMJ-00
2. Monthly maintenance
3-17
Chapter 3 Periodic maintenance items
2.7 Base unit and others
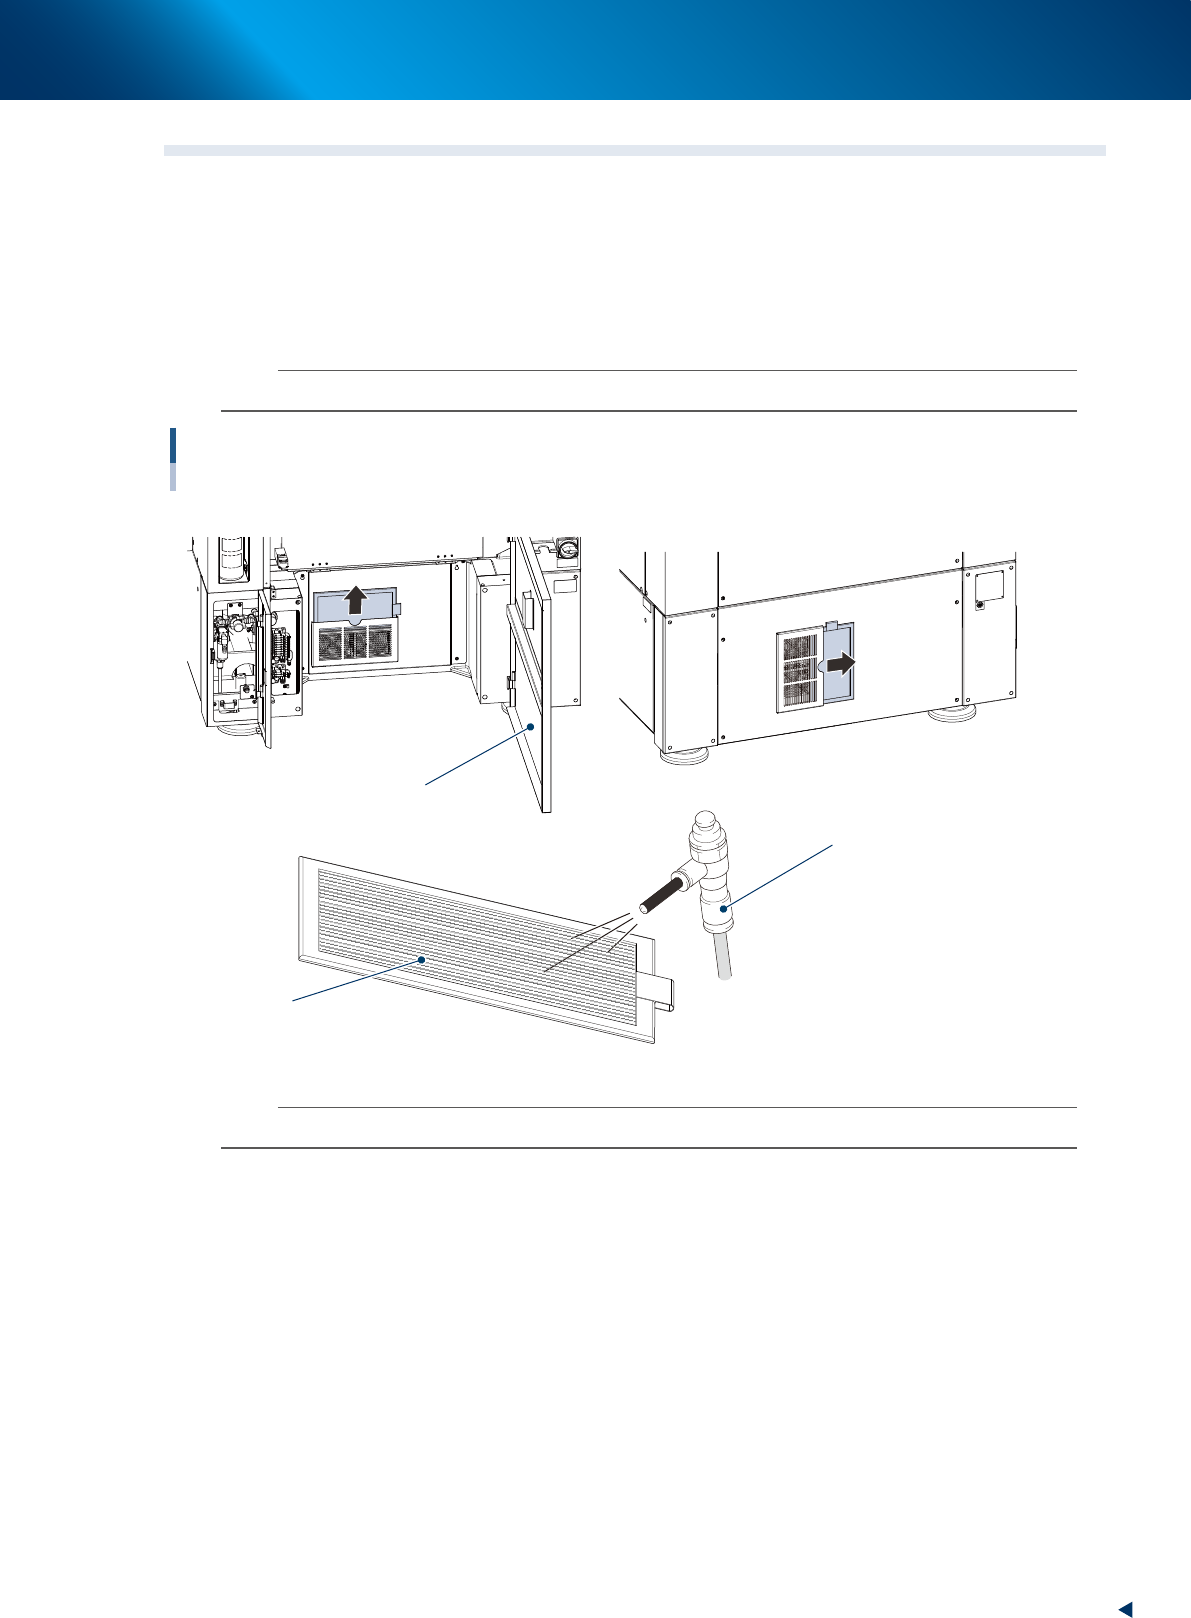
This section describes the procedures for cleaning and replacing the fan filters installed at front and rear
side of machine, and the air/oil filters.
2.7.1 Inspecting and cleaning the fan filters.
Detach the fan filters installed at front and rear side of machine, illustrated below, to check them for soiling
and wearing status. If the filter is not clean, remove the dirt with the air blow tool (optional) etc,.
n
NOTE
Turn the machine power OFF for this work as the dust caught by filter may invade into machine.
Fan filter
Air blow tool
(Optional)
Filter
Lower door
Front side of machine Rear side of machine
53322-KMJ-00
n
NOTE
If the filter has worn out cannot be cleaned, replace the filter with a new one (KLV-M1319-00X).
2. Monthly maintenance
3-18
Chapter 3 Periodic maintenance items
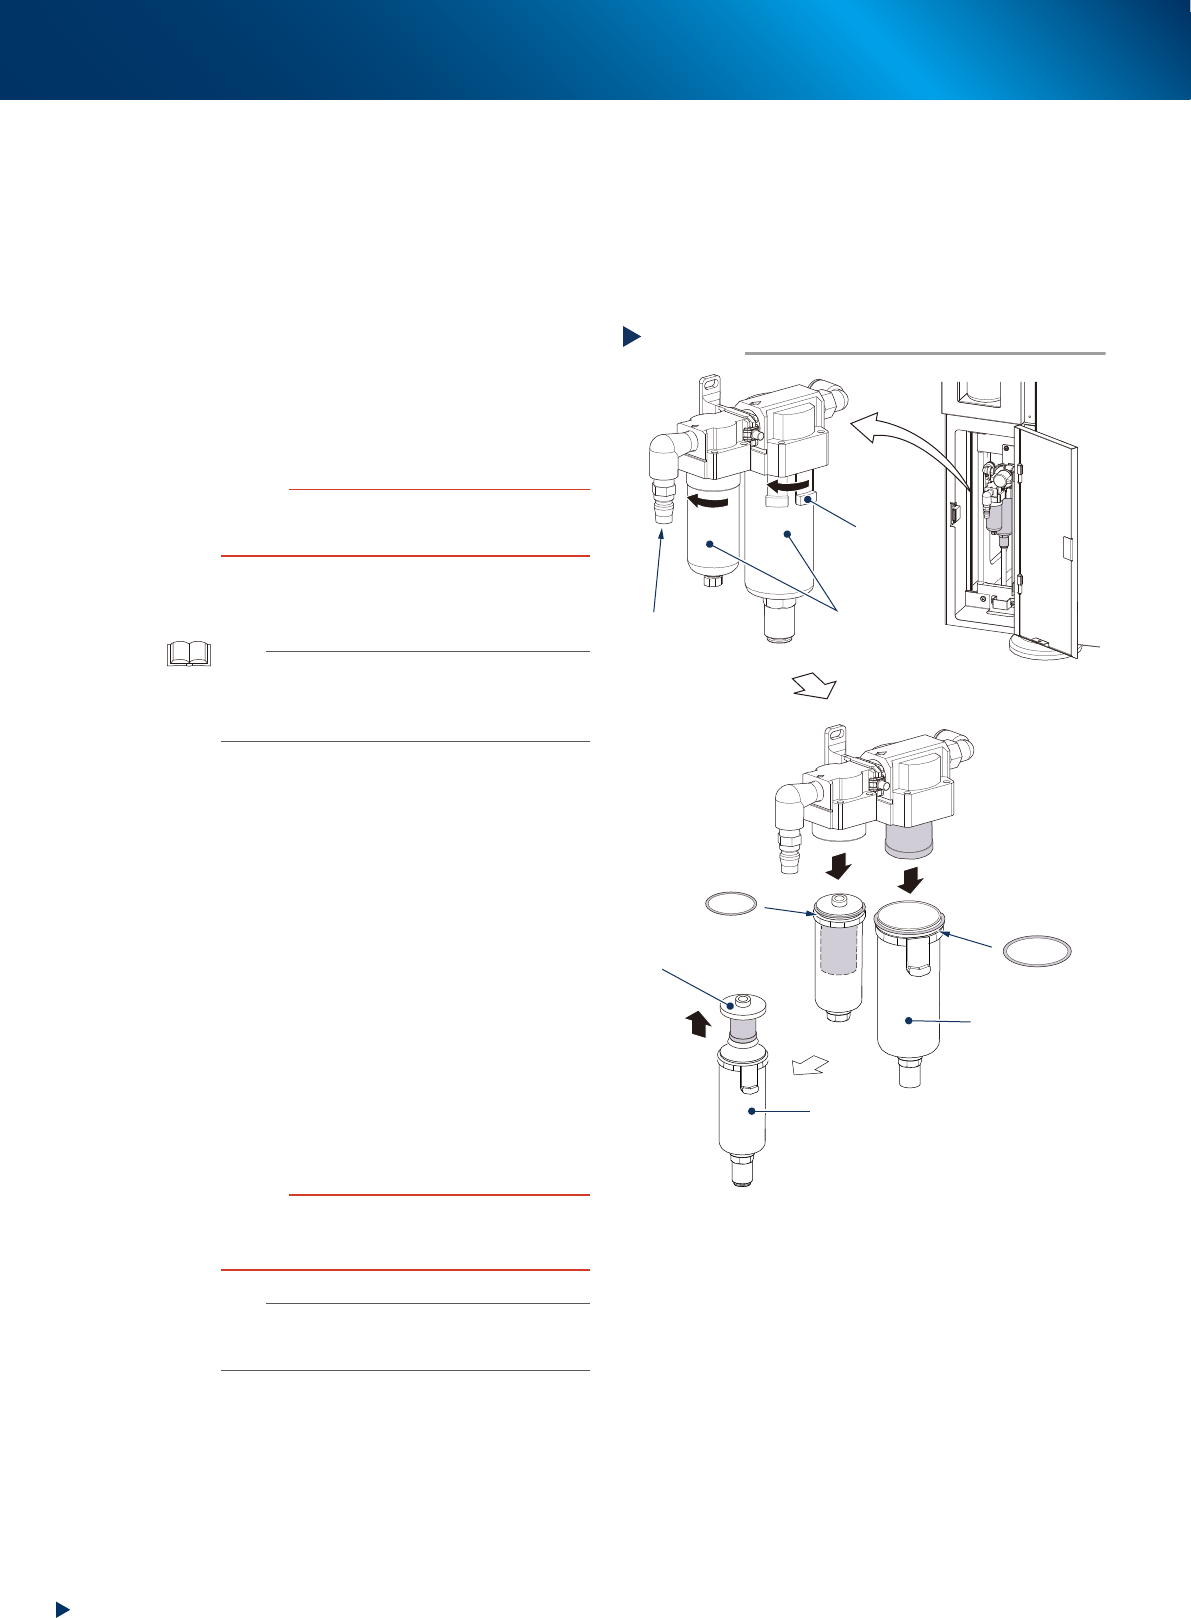
2.7.2 Replacing air/oil mist filter and cleaning cup.
Air filters and oil mist filters are installed to this machine to prevent oil, water, and impurities, etc., from
being introduced into the machine from the air compressor. This section describes the procedures for
inspecting, cleaning and replacing these filters. Make sure to disconnect the air coupler connected to the
supply air to work safely.
█
Cleaning the filter cup
1
Detach the air coupler.
1. Turn the "Air supply/exhaust" switch (valve)
clockwise (Exh) to turn air supply OFF.
2. Disconnect the air coupler on the air supply
connection unit.
c
CAUTION
Be aware that a loud air exhaust sound is heard when
disconnecting the air coupler. Use care to prevent oil,
water, and impurities, etc., from being sprayed out.
2
Check the inside of the lter cup for oil
or water deposits or soiling.
TIP
The drain cock at the bottom of the filter cup is an
auto-drain type. It automatically drains the oil or water
when deposited in the cup. It is recommended to connect a
hose to this drain cock.
3
Detach the lter cup.
Oil mist filter
Turn the cup to the left (arrow direction) and
pull the cup downward while pressing the
button.
Air filter
Turn the cup to the left (arrow direction) and
pull the cup downward. Then pull up filter
elements upward.
53323-KMJ-00
4
Clean the lter cup.
1. Lightly clean the filter cup with water.
2. When the cup is not cleaned well, pour the
water-diluted neutral detergent into the filter
cup and clean the inside.
3. Air blow the filter cup and wipe away any
moisture with clean cloth or paper.
c
CAUTION
Sometimes the cleaning blow air hits the face of the
worker, so that be sure to wear the protective goggles and
protective mask upon air blowing.
n
NOTE
When the filter is not clean upon checking, leave the filter
cup detached and proceed the procedure on the next
page, "Cleaning the filter cup".
Detaching the filter cups
Step 2
Filter cup
Detach the
air coupler
Button
O-Ring of the cup
O-Ring of the cup
Air filter
Oil mist filter
Filter element
53323-KMJ-00