卧式standard头部.pdf - 第49页
Page 47 V/S Standard Insertion Head Assembly T50090901 Rev . F This Document Supports Assembly 50090901 Rev. D 11. If the centering timing is correct, the centering fingers should be ex- tended forward and closed so the …
Page 46
T50090901 Rev. F V/S Standard Insertion Head Assembly
This Document Supports Assembly 50090901 Rev. D
5. After the IM Diagnostics has completed its initialization, select the fol-
lowing. Machine Set Up>Critical Axis Positions
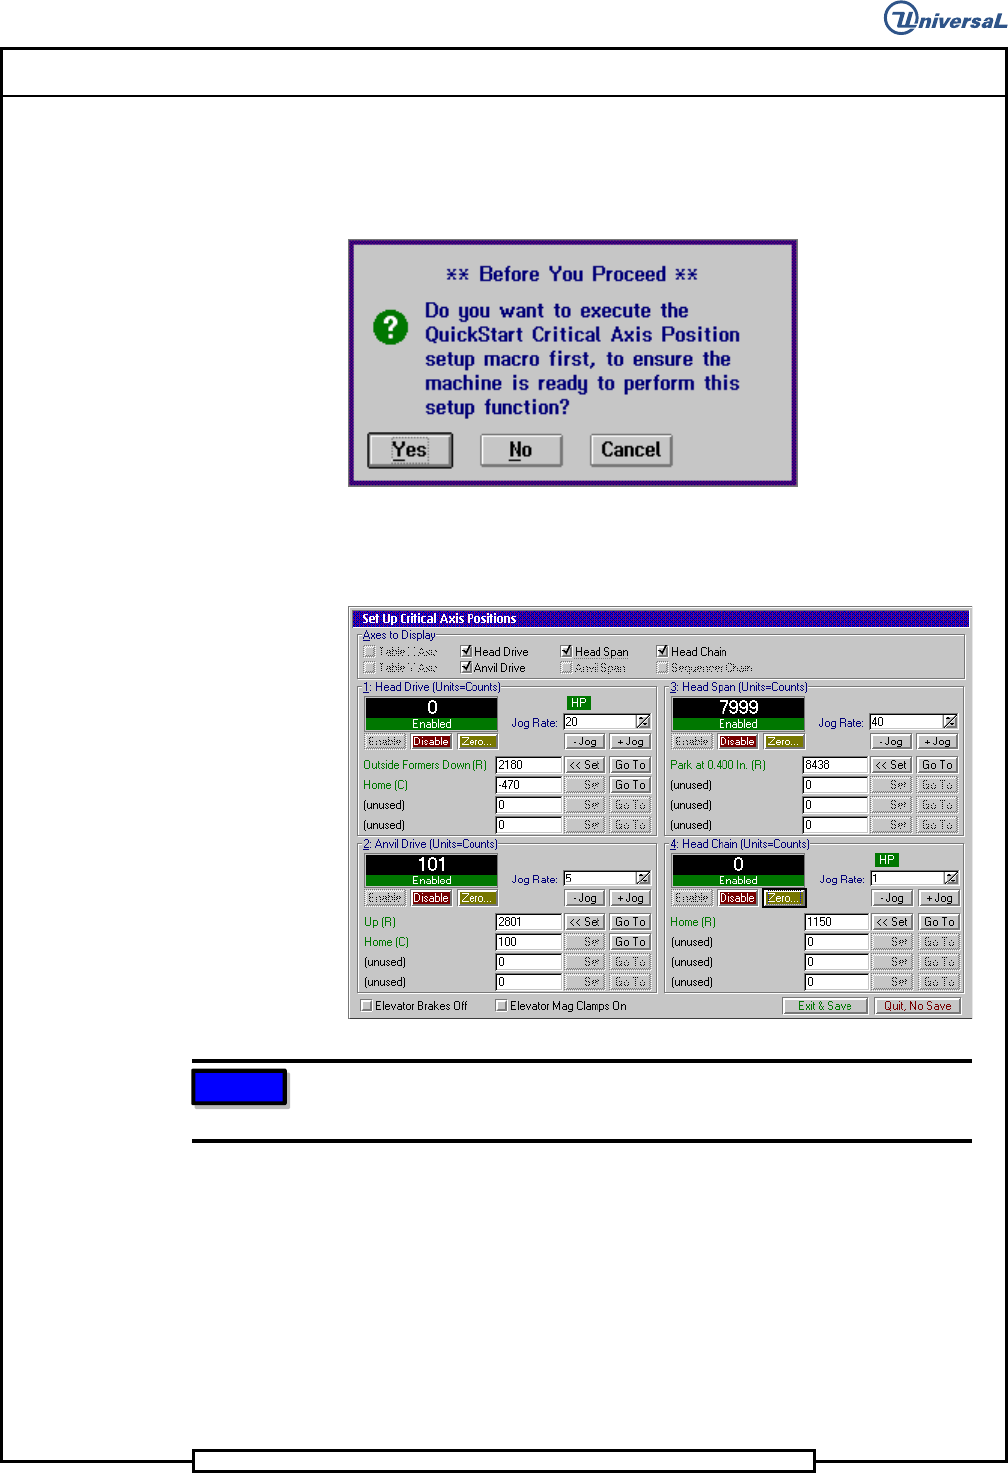
The following message is displayed.
6. Click on Yes. This zeros all axes.
The following screen is displayed
NOTE
If the unit of measurement is not in counts, right click on the rate field and
select Axis Position in Counts.
7. In the Set Up Critical Axis Positions screen, click on the Head Chain
and Head Drive.
8. Select Zero to zero the head drive.
9. Select Go To to drive the head drive to the Outside Formers Down po-
sition.
10. Select +Jog for the head drive and move the tooling 320 counts (this
represents the maximum depth stop value).

Page 47
V/S Standard Insertion Head Assembly T50090901 Rev. F
This Document Supports Assembly 50090901 Rev. D
11. If the centering timing is correct, the centering fingers should be ex-
tended forward and closed so the centering inserts are just touching. If
the timing is not correct, proceed as follows.
12. Loosen the cap screw that secures the centering drive belt tensioner,
move the tensioner to relieve the belt tension and secure the tensioner
to the housing.
13. Remove the centering drive belt from the centering driven pulley and
adjust the centering so the centering fingers are extended forward and
closed so the contact tips are just touching.
14. While holding the centering mechanism in position, engage the center-
ing drive belt on the centering driven pulley.
15. Loosen the cap screw securing the centering belt tensioner, allow the
tensioner to engage the belt then tighten the cap screw to secure the
tensioner in position.
16. A finer adjustment is then made by loosening the two socket head cap
screws that secure the centering drive pulley to the pulley shaft. Rotate
the drive pulley so the centering fingers are extended forward and
closed so the centering inserts are just touching.
17. Select -Jog for the head drive and move the tooling until there is some
separation between the centering inserts (approximately 150 counts).
18. Select +Jog for the head drive and move the tooling until the centering
inserts just touch. Ensure that the head drive position is 320 counts
above the Outside Formers Down position.
19. If no additional set ups are to be performed, exit out of the IM Diag-
nostics function.
End of procedure.
Head Disassembly
Purpose:
The following procedure is presented for disassembly of the head and re-
moval of the tooling housings and insertion tooling.
Special Tools:
Spring Hook (12757000)
Chain Spreader (47639901)
Snap Ring Pliers (47790601)
Adjustment Procedure:
1. Palm the machine down as detailed in the Operation Reference
Manual.

Page 48
T50090901 Rev. F V/S Standard Insertion Head Assembly
This Document Supports Assembly 50090901 Rev. D
2. Remove the screws that secure the centering housing assembly to the
insertion head, then remove the centering housing assembly.
3. Loosen the screw that secures the tension arm against centering drive
belt and secure the tension arm away from the belt.
4. Loosen the screws that secure the collar clamps on the centering cam
shaft then remove the collar clamps and centering cam shaft assembly.
5. Manually rotate the chains at the chain to chain assembly so the master
links are accessible at the insertion head.
6. Install the chain spreader tool between the idler sprockets in the chain
idler assembly, then extend the chain spreader to relieve tension on the
chains. Removing the top center cover of the machine facilitates ac-
cess to the chain idler assembly.
7. Remove the master links and move the chains back off the upper chain
sprockets.
8. Remove the screws that secure the chain clip guides to the upper idler
shaft then rotate the chain clip guides down.
9. Using the spring hook, remove the springs from the shear blade pins.
10. Hold down the shear blade pins and using the 5/16 allen wrench, rotate
the pinion until the flat surface is positioned toward the driver bodies.
11. Raise each driver body while pushing down on the shear blade pins.
This frees the detents from the tooling and allows the driver bodies to
slide up from the housings.
12. Loosen the two screws that secure the left idler plate tension on the
idler belt. Remove the screw that secures the left spring holder then re-
move the left spring holder and the compression spring.
13. Manually rotate the span axis assembly and move the tooling housings
fully closed.
14. Disconnect the pneumatic lines to the lift cylinders on the tooling hous-
ings.
15. Loosen the set screws that secure the coupling to the lead screw, then
remove the three screws that secure the motor to the housing. Remove
the motor, motor bracket and coupling.
16. Loosen the set screw that secures the collar clamp on the lead screw.
Unscrew the collar clamp from the lead screw while holding the lead
screw so it does not turn.
17. Remove the three button head screws and slide the duplex ball bearing
from the main housing and from the shaft.
18. Disconnect the head drive motor electrical connections.