5TROUBLESHOOTING_.pdf - 第19页
2.1 Easy Troubleshooting Remedy ( 5 ) Unlock the [ EMERGENCY STOP ] button . ( 6 ) Hold down the [ POWER ON ] button for more than 1 second to re - supply power to the machine . • When the LED of the [ POWER ON ] button …
2.1
Easy
Troubleshooting
2.1
.
2
Reset
Procedure
after
[
EMERGENCY
STOP
]
Button
When
an
[
EMERGENCY
STOP
]
button
is
pressed
,
follow
the
steps
below
to
reset
the
machine
to
its
normal
condition
.
Symptom
(
1
)
The
LED
of
the
[
POWER
ON
]
button
is
turned
red
,
indicating
that
the
load
power
supply
is
shut
off
.
Cause
(
1
)
An
[
EMERGENCY
STOP
〗
button
was
pressed
.
Remedy
(
1
)
Check
the
reason
why
the
[
EMERGENCY
STOP
]
button
was
pressed
.
(
2
)
Check
if
some
components
have
dropped
.
If
any
,
remove
them
.
Check
the
areas
under
the
vacuum
nozzles
at
Stations
#
1
through
#
11
.
Especially
,
when
a
component
has
dropped
on
the
component
recognition
section
at
Station
#
5
,
be
sure
to
remove
it
from
the
camera
.
(
3
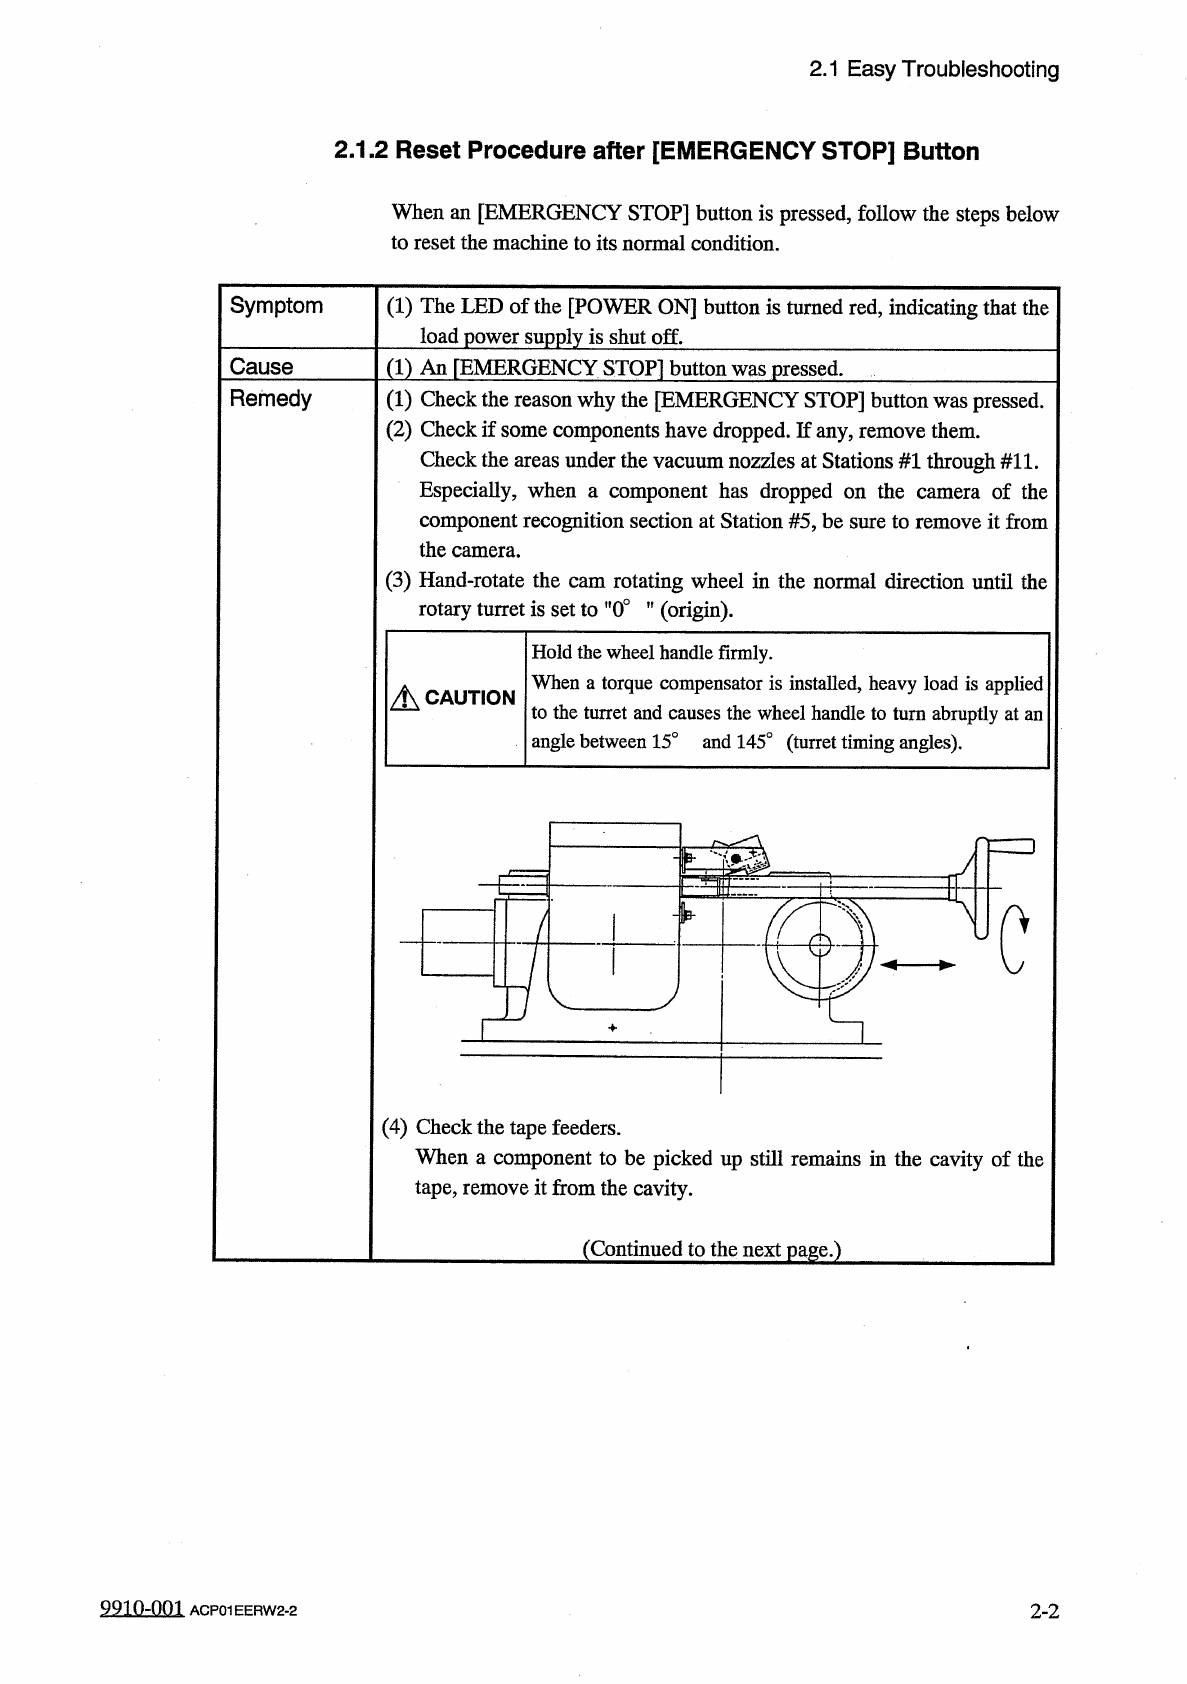
)
Hand
-
rotate
the
cam
rotating
wheel
in
the
normal
direction
until
the
rotary
turret
is
set
to
"
0
°
”
(
origin
)
.
of
the
camera
Hold
the
wheel
handle
firmly
.
When
a
torque
compensator
is
installed
,
heavy
load
is
applied
to
the
turret
and
causes
the
wheel
handle
to
turn
abruptly
at
an
angle
between
15
°
and
145
°
(
turret
timing
angles
)
.
A
CAUTION
rpzD
c
(
4
)
Check
the
tape
feeders
.
When
a
component
to
be
picked
up
still
remains
in
the
cavity
of
the
tape
,
remove
it
from
the
cavity
.
(
Continued
to
the
next
page
.
)
9910
-
001
ACP
01
EERW
2
-
2
2
-
2
2.1
Easy
Troubleshooting
Remedy
(
5
)
Unlock
the
[
EMERGENCY
STOP
]
button
.
(
6
)
Hold
down
the
[
POWER
ON
]
button
for
more
than
1
second
to
re
-
supply
power
to
the
machine
.
•
When
the
LED
of
the
[
POWER
ON
]
button
turns
green
,
it
indicates
that
power
is
supplied
to
the
machine
.
When
the
LED
is
kept
red
,
re
-
check
the
cause
and
remove
it
.
(
7
)
After
an
"
”
mark
has
appeared
before
”
RECOGNITION
"
in
the
"
ORIGIN
MONITOR
"
field
,
press
the
[
ZERO
]
button
to
zero
each
individual
devices
.
(
8
)
When
there
still
remains
an
unfinished
P
.
C
.
B
.
on
the
X
/
Y
table
,
determine
whether
or
not
the
P
.
C
.
B
.
should
be
completed
.
To
continue
the
placement
operation
,
open
the
"
AUTO
OPN
.
SUB
-
MENU
"
display
and
select
the
[
SEMI
-
AUTOMATIC
OPERATION
]
key
.
The
"
SEMI
-
AUTOMATIC
OPERATION
PLACEMENT
STEP
"
display
appears
on
the
screen
.
Press
the
[
FULL
AUTO
CONT
[
START
]
]
key
to
finish
the
P
.
C
.
B
.
completely
.
Refer
to
"
4.5
SEMI
-
AUTOMATIC
OPERATION
"
in
the
instruction
manual
(
Section
I
:
Operation
)
for
details
.
9910
-
001
2
-
3
ACP
01
EERW
2
-
3
2.1
Easy
Troubleshooting
2.1
.
3
L
/
R
Conveyor
Belt
Disengaged
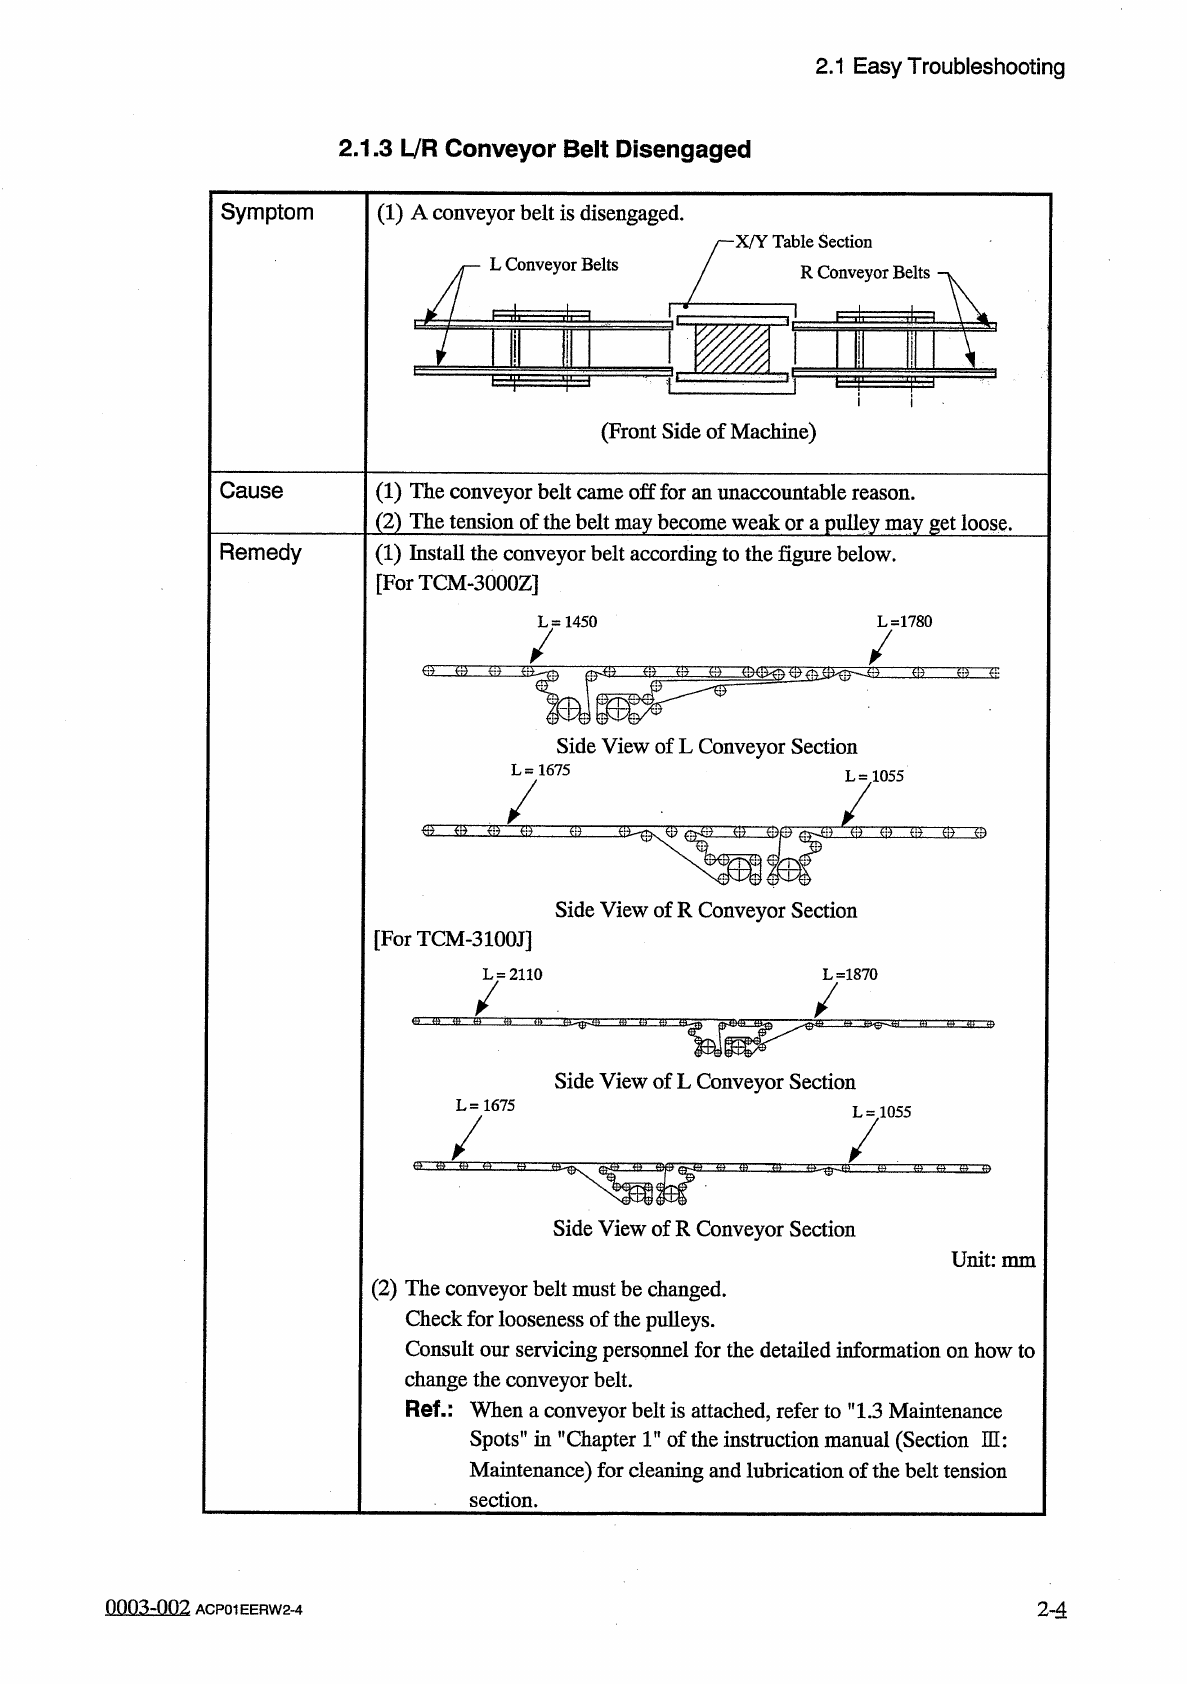
Symptom
(
1
)
A
conveyor
belt
is
disengaged
.
X
/
Y
Table
Section
R
Conveyor
Belts
L
Conveyor
Belts
4
1
(
Front
Side
of
Machine
)
Cause
(
1
)
The
conveyor
belt
came
off
for
an
unaccountable
reason
.
(
2
)
The
tension
of
the
belt
may
become
weak
or
a
pulley
may
get
loose
.
(
1
)
Install
the
conveyor
belt
according
to
the
figure
below
.
[
ForTCM
-
3000
Z
]
Remedy
L
=
1780
L
=
1450
Side
View
of
L
Conveyor
Section
L
=
1675
L
=
1055
nr
Side
View
of
R
Conveyor
Section
[
ForTCM
-
3100
J
]
L
=
1870
Side
View
of
L
Conveyor
Section
L
=
1675
L
-
1055
Side
View
of
R
Conveyor
Section
Unit
:
mm
(
2
)
The
conveyor
belt
must
be
changed
.
Check
for
looseness
of
the
pulleys
.
Consult
our
servicing
personnel
for
the
detailed
information
on
howto
change
the
conveyor
belt
.
Ref
-
:
When
a
conveyor
belt
is
attached
,
refer
Spots
"
in
"
Chapter
1
"
of
the
instruction
Maintenance
)
for
cleaning
and
lubrication
of
the
belt
tension
section
.
to
"
13
manua
;
Maintenance
al
(
Section
m
:
QQQ
3
-
Q
02
ACP
01
EERW
2
-
4
2
-
4