2500_Users_Manual-.pdf - 第107页
Tasks and Kits Set Preferences... Figure 3-21 Configuring Operating Preferences This set of check boxes allows you to configure some of TaskLink s optional system prompts and operating preferences. Press Fl to invoke Tas…
Operation
Antistatic
Precautions
The
devices
that
you
will
be
handling
and
programming
on
the
2500
are
sensitive
to
static
and
can
be
damaged
by
accidental
and
unintended
electrostatic
discharge
while
you
are
handling
them.
To
minimize
possible
damage
to
devices,
wear
your
wrist
strap
and
plug
the
end
into
the
ground
strap
connector
in
the
lower
left
corner
of
the
2500
(see
Figure
1-2).
CAUTION:
The
devices
being
processed
through
the
ProMaster
2500
and
components
on
Se
system's
circuit
boards
are
static
sensitive
and
may
be
damaged
“
electrostatic
discharge
(ESD).
To
help
eliminate
damage
from
ESD,
operators
and
service
personnel
should
wear
an
antistatic
wrist
strap
while
using
the
equipment.
The
wrist
strap
should
be
connected
to
the
grounding
plug.
It
should
contain
a
IM
ohm
(minimum
value)
to
10M
ohm
(maximum
value)
isolating
resistor.
Raising
the
Hood
While
a
Task
is
Running
The
2500
has
been
designed
to
operate
only
when
the
hood
is
down
in
the
operating
position
(see
Figure
1-2).
A
safety
interlock
switch
is
activated
when
the
hood
is
raised
to
stop
all
handler
motion
and
laser
marking.
It
must
be
lowered
into
operating
position
before
you
can
start
a
Task.
Do
not
lift
the
hood
while
the
handler
is
processing
devices.
If
you
raise
the
hood,
the
2500
will
immediately
stop
processing
and
leave
the
condition
of
the
devices
being
programmed
in
an
unknown
state.
Devices
in
the
programming
modules
may
not
complete
the
programming
operation
correctly
and
should
be
removed
and
discarded.
If
you
need
to
examine
something
under
the
hood
while
a
Job/Task
is
running,
select
Pause
from
the
TaskLink
screen
to
stop
the
2500,
after
the
current
device
(s)
has
completed
the
programming
cycle.
If
you
lift
the
hood
without
pausing
TaskLink
and
want
to
continue
running
the
Job/Task,
lower
the
hood
to
continue
operation.
WARNING:
Any
attempt
to
bypass
the
hood
interlock
could
result
in
operator
injury.
Do
not
attempt
to
defeat
this
safety
feature.
Operating
Noise
Level
The
typical
operating
noise
level
of
the
2500
may
exceed
70
dB
because
of
the
many
complex
functions
taking
place
at
the
same
time,
such
as:
•
Heavy
subassemblies
being
driven
rapidly
by
motors
along
sizable
lead
screws.
•
Air
actuators
being
rapidly
turned
on
and
off.
•
Vacuum
motors
making
noise.
WARNING:
Long
term
exposure
to
noise
levels
in
excess
of
70
dB
could
cause
hearing
loss.
Personnel
working
near
the
2500
should
wear
hearing
protection.
4-4
ProMaster
2500
User
Manual
Tasks
and
Kits
Set
Preferences...
Figure
3-21
Configuring
Operating
Preferences
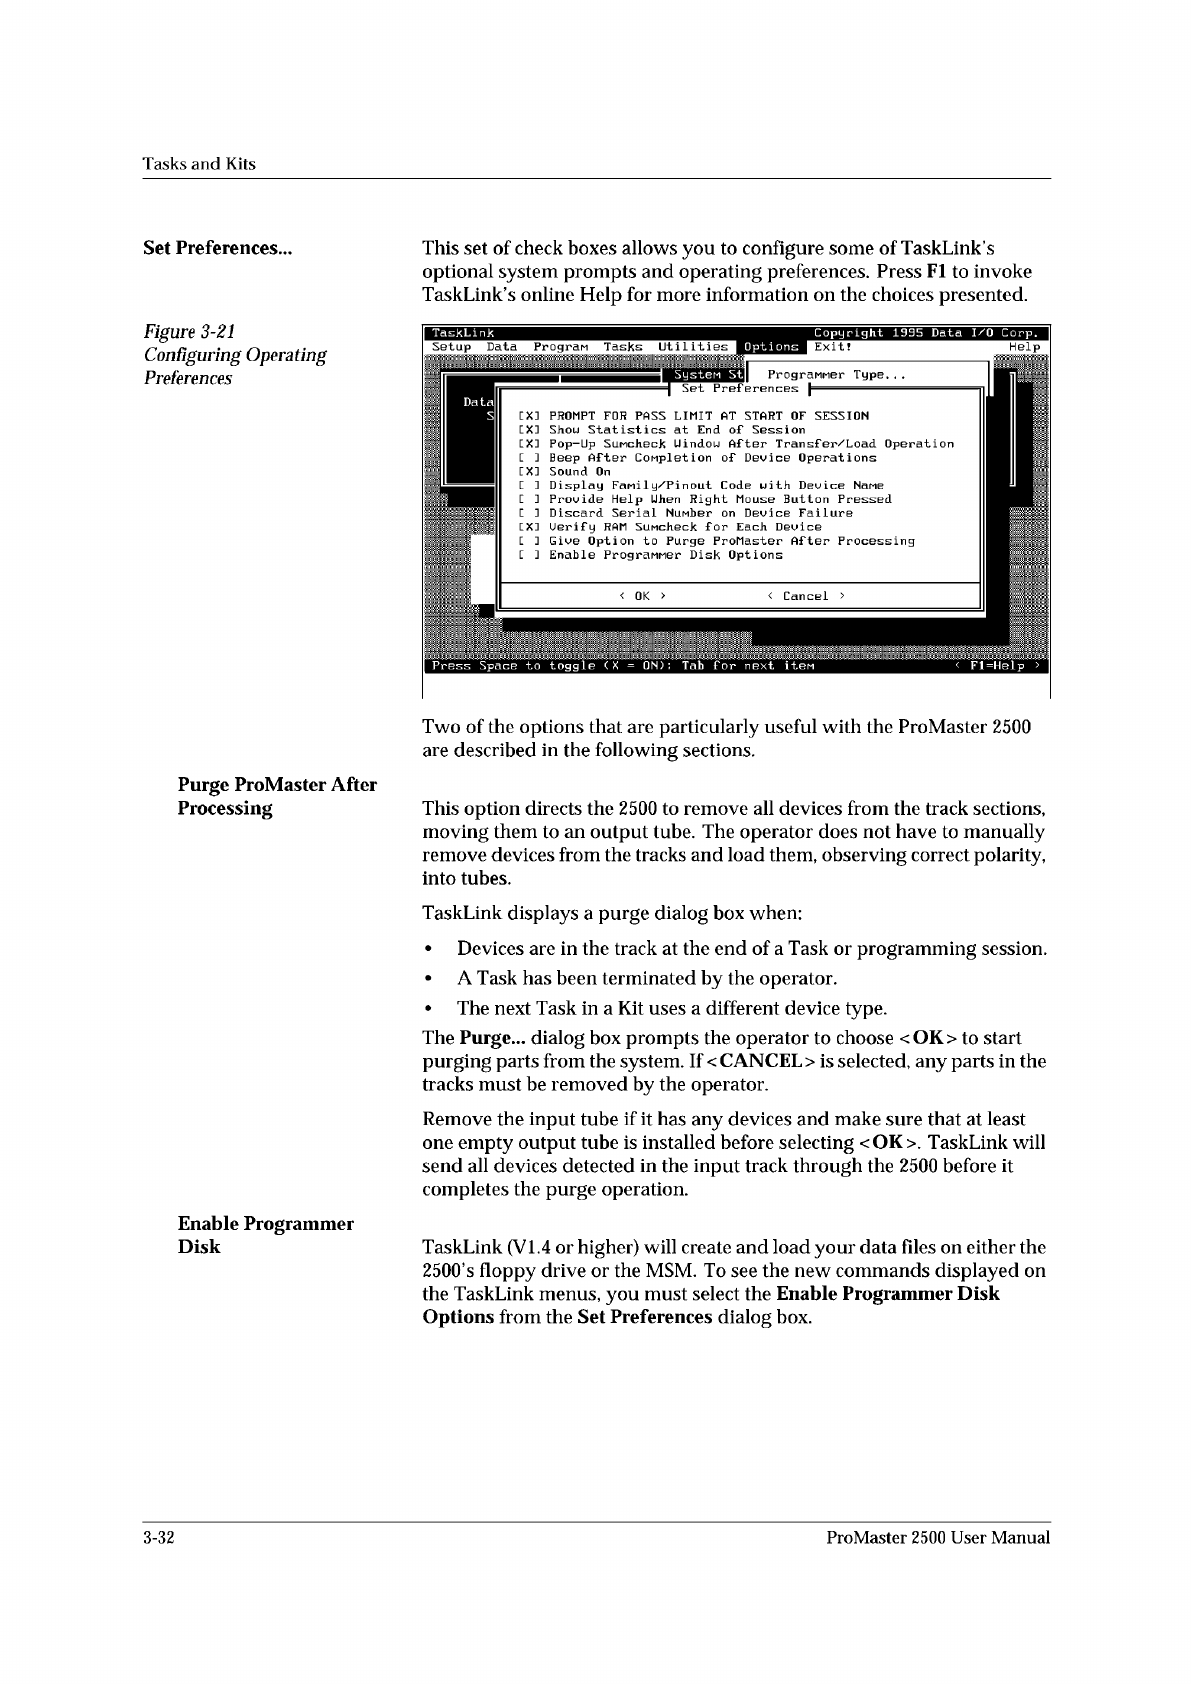
This
set
of
check
boxes
allows
you
to
configure
some
of
TaskLink
s
optional
system
prompts
and
operating
preferences.
Press
Fl
to
invoke
TaskLink
s
online
Help
for
more
information
on
the
choices
presented.
Programer
Type.
.
.
Set
Preferences
<
Cancel
>
<
OK
>
Systen
St
Data
S
PROMPT
FOR
PASS
LIMIT
AT
START
OF
SESSION
Shou
Statistics
at
End
of
Session
Pop-Up
SuMcheck
Uindou
After
Transf
er/Load
Operation
Beep
After
Completion
of
Device
Operations
Sound
On
Display
Fanil
y/P
in
out
Code
with
Device
Name
Provide
Help
Uhen
Right
Mouse
Button
Pressed
Discard
Serial
Number
on
Device
Failure
Uerif
y
RAM
SuMcheck
for
Each
Device
Give
Option
to
Purge
ProMaster
After
Processing
Enable
PrograMMer
Disk
Options
EX:
EX:
EX:
LXJ
E
]
[ ]
EX:
[ ]
L
J
j
覆
Press
Space
to
toggle
(
X
=
ON)
:
Tab
f
or
next
iten
I
TaskLink
Copyright
1995
Data
I/O
Corp.
II
Setup
Data
Progran
Tasks
Utilities
0
P
t
i
o
n
w
Help
Two
of
the
options
that
are
particularly
useful
with
the
ProMaster
2500
are
described
in
the
following
sections.
Purge
ProMaster
After
Processing
This
option
directs
the
2500
to
remove
all
devices
from
the
track
sections,
moving
them
to
an
output
tube.
The
operator
does
not
have
to
manually
remove
devices
from
the
tracks
and
load
them,
observing
correct
polarity,
into
tubes.
TaskLink
displays
a
purge
dialog
box
when:
•
Devices
are
in
the
track
at
the
end
of
a
Task
or
programming
session.
•
A
Task
has
been
terminated
by
the
operator.
•
The
next
Task
in
a
Kit
uses
a
different
device
type.
The
Purge...
dialog
box
prompts
the
operator
to
choose
<OK>
to
start
purging
parts
from
the
system.
If
<
CANCEL
>
is
selected,
any
parts
in
the
tracks
must
be
removed
by
the
operator.
Remove
the
input
tube
if
it
has
any
devices
and
make
sure
that
at
least
one
empty
output
tube
is
installed
before
selecting
<OK>.
TaskLink
will
send
all
devices
detected
in
the
input
track
through
the
2500
before
it
completes
the
purge
operation.
Enable
Programmer
Disk
TaskLink
(VI.
4
or
higher)
will
create
and
load
your
data
files
on
either
the
2500,s
floppy
drive
or
the
MSM.
To
see
the
new
commands
displayed
on
the
TaskLink
menus,
you
must
select
the
Enable
Programmer
Disk
Options
from
the
Set
Preferences
dialog
box.
3-32
ProMaster
2500
User
Manual
↵
↵
Tasks
and
Kits
Introduction
to
Kits
Kits
are
Tasks
that
have
been
daisy-chained
together
so
several
can
be
run
as
one
large
job.
The
most
common
use
for
Kits
is
to
string
together
the
separate
Tasks
used
to
program
all
the
devices
for
a
single
board.
In
Figure
3-23
there
are
four
devices
that
must
be
programmed
and
labeled
for
the
sample
board.
Each
device
has
one
Task
that
controls
the
process
for
producing
that
device.
The
Kit
acts
like
a
super-Task.
To
illustrate
this
point,
assume
that
60
boards
need
to
be
built.
When
the
Kit
fbr
this
board
is
run,
the
Task
1
pass
limit
is
set
to
60
devices.
When
that
count
is
reached,
TaskLink
displays
a
message
prompting
the
system
operator
to
change
over
for
the
second
Task.
When
ready
for
Task
2,
the
operator
presses
.
TaskLink
starts
Task
2,
and
60
devices
for
that
Task
are
programmed.
This
process
continues
for
Task
3
and
Task
4.
The
messages
screens
are
typically
used
when
the
Tasks
define
devices
using
different
package
types
(Task
1
uses
DIPs
and
Task
2
uses
PLCCs).
In
this
case,
a
message
screen
might
remind
the
operator
about
the
steps
required
to
change
over
from
one
package
type
to
another.
A
Kit
can
include
a
maximum
of
20
Tasks.
All
the
Tasks
for
a
Kit
must
be
in
the
same
database
file
(called
the
Source
Database
in
the
Kit
dialog
box),
but
the
Kit
can
be
stored
in
the
Source
Database
or
a
different
database
file.
When
the
Kit
is
run,
the
system
operator
specifies
the
number
of
Kits
(equal
to
the
number
of
complete
boards)
to
be
built.
Selecting
Kit
Parameters
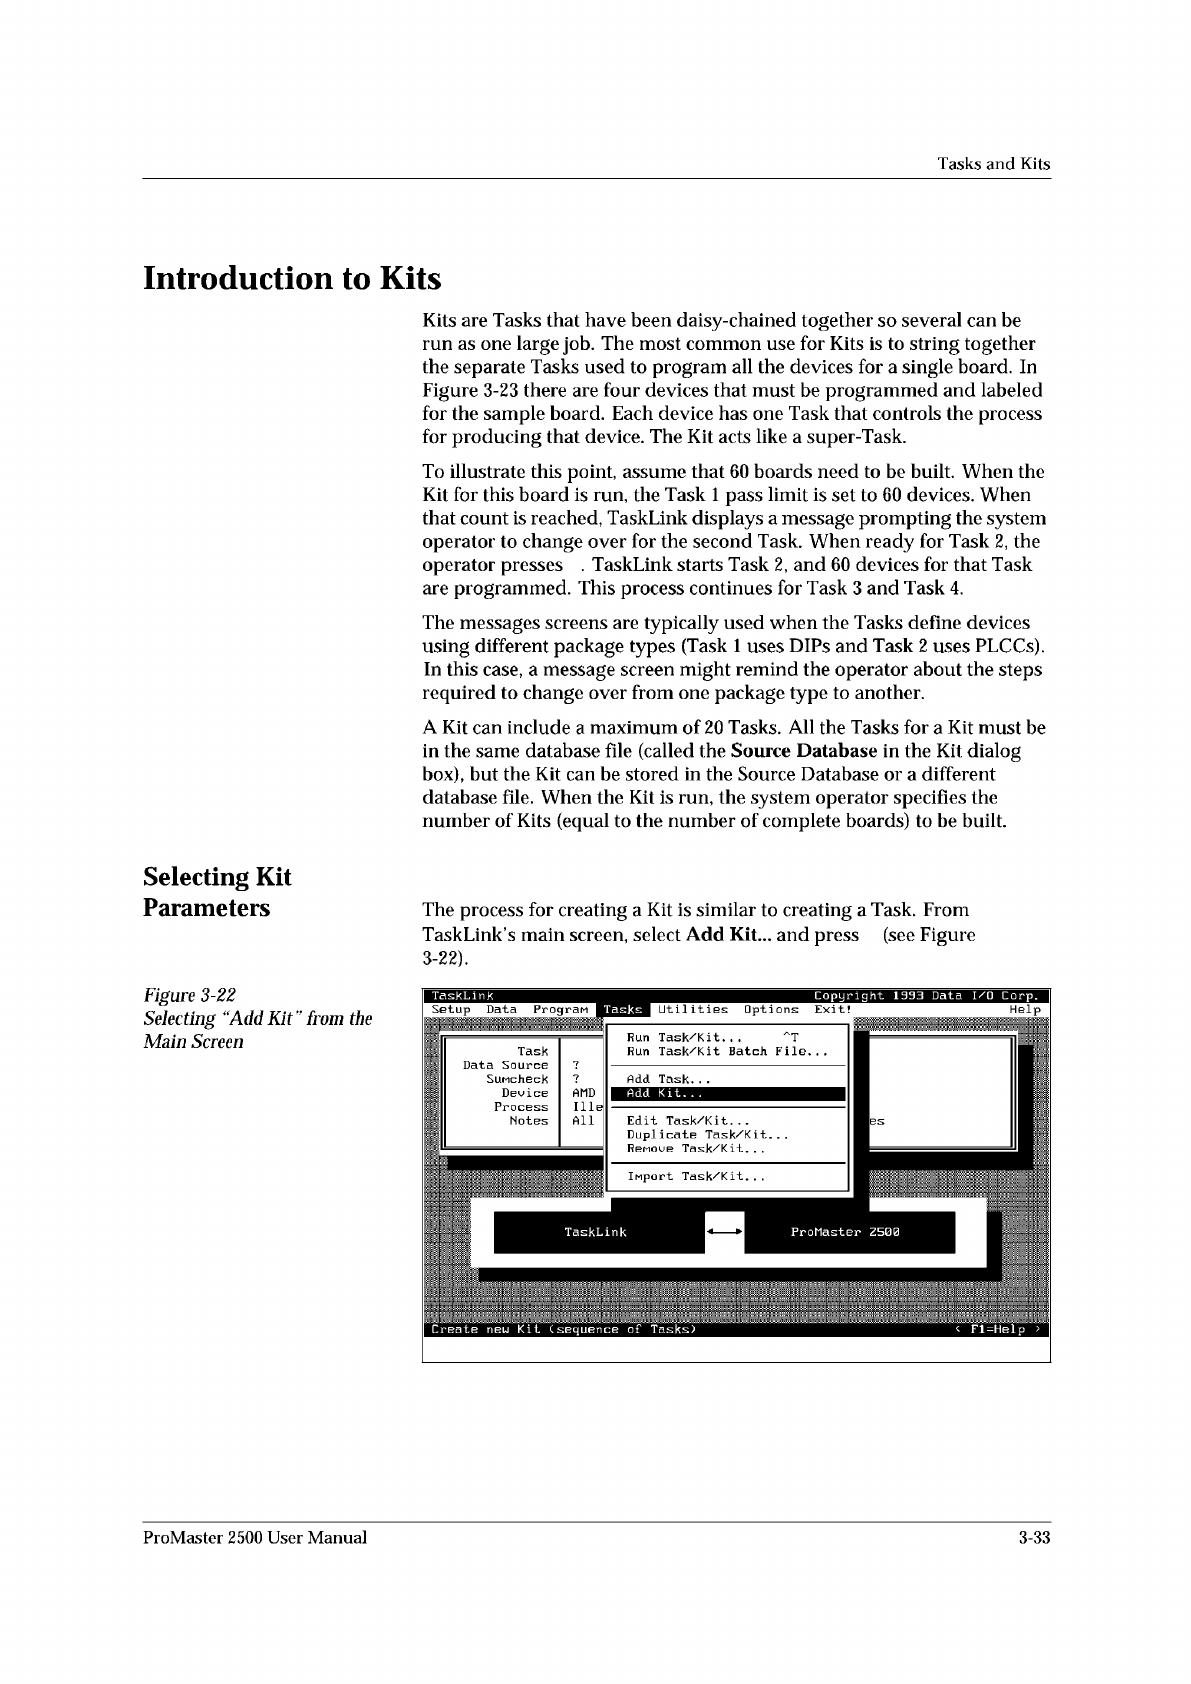
The
process
for
creating
a
Kit
is
similar
to
creating
a
Task.
From
TaskLink
s
main
screen,
select
Add
Kit...
and
press
(see
Figure
3-22).
Figure
3-22
Selecting
“Add
Kit”
from
t
加
Main
Screen
ProMaster
2500
User
Manual
3-33