2500_Users_Manual-.pdf - 第302页
↓ ↑ ↑ ↓ Firmware Keys and STOP Commands Function Keys to Press Description While in Remote Mode: Local mode LOWER CASE + L Changes the 2500 from remote mode to local mode. Select this mode to run operations such as diagn…
B
Firmware
Keys
and
STOP
Commands
The
ProMaster
2500
is
normally
operated
in
remote
mode
using
the
TaskLink
software.
Some
of
the
firmware
key
commands
listed
in
this
Appendix
are
active
only
while
the
handler
is
in
local
mode.
To
execute
a
firmware
key
command
from
one
of
the
handler
menus,
perform
the
following
steps:
1.
Put
the
handler
into
local
mode
by
pressing
the
LOWER
CASE
+
L
keys.
2.
Go
to
the
appropriate
menu
and
press
the
key
sequence
to
access
the
display.
3.
Enter
the
new
numeric
value
or
answer
the
prompt
from
the
2500's
keyboard
and
press
START.
The
2500
supports
a
second
set
of
commands
known
as
STOP
commands,
because
the
commands
are
entered
after
pressing
STOP
to
pause
the
2500.
These
differ
from
the
firmware
key
commands
because
they
can
be
used
while
processing
devices
so
you
do
not
have
to
exit
the
current
Task.
ProMaster
2500
User
Manual
B-l
↓ ↑
↑ ↓
Firmware
Keys
and
STOP
Commands
Function
Keys
to
Press
Description
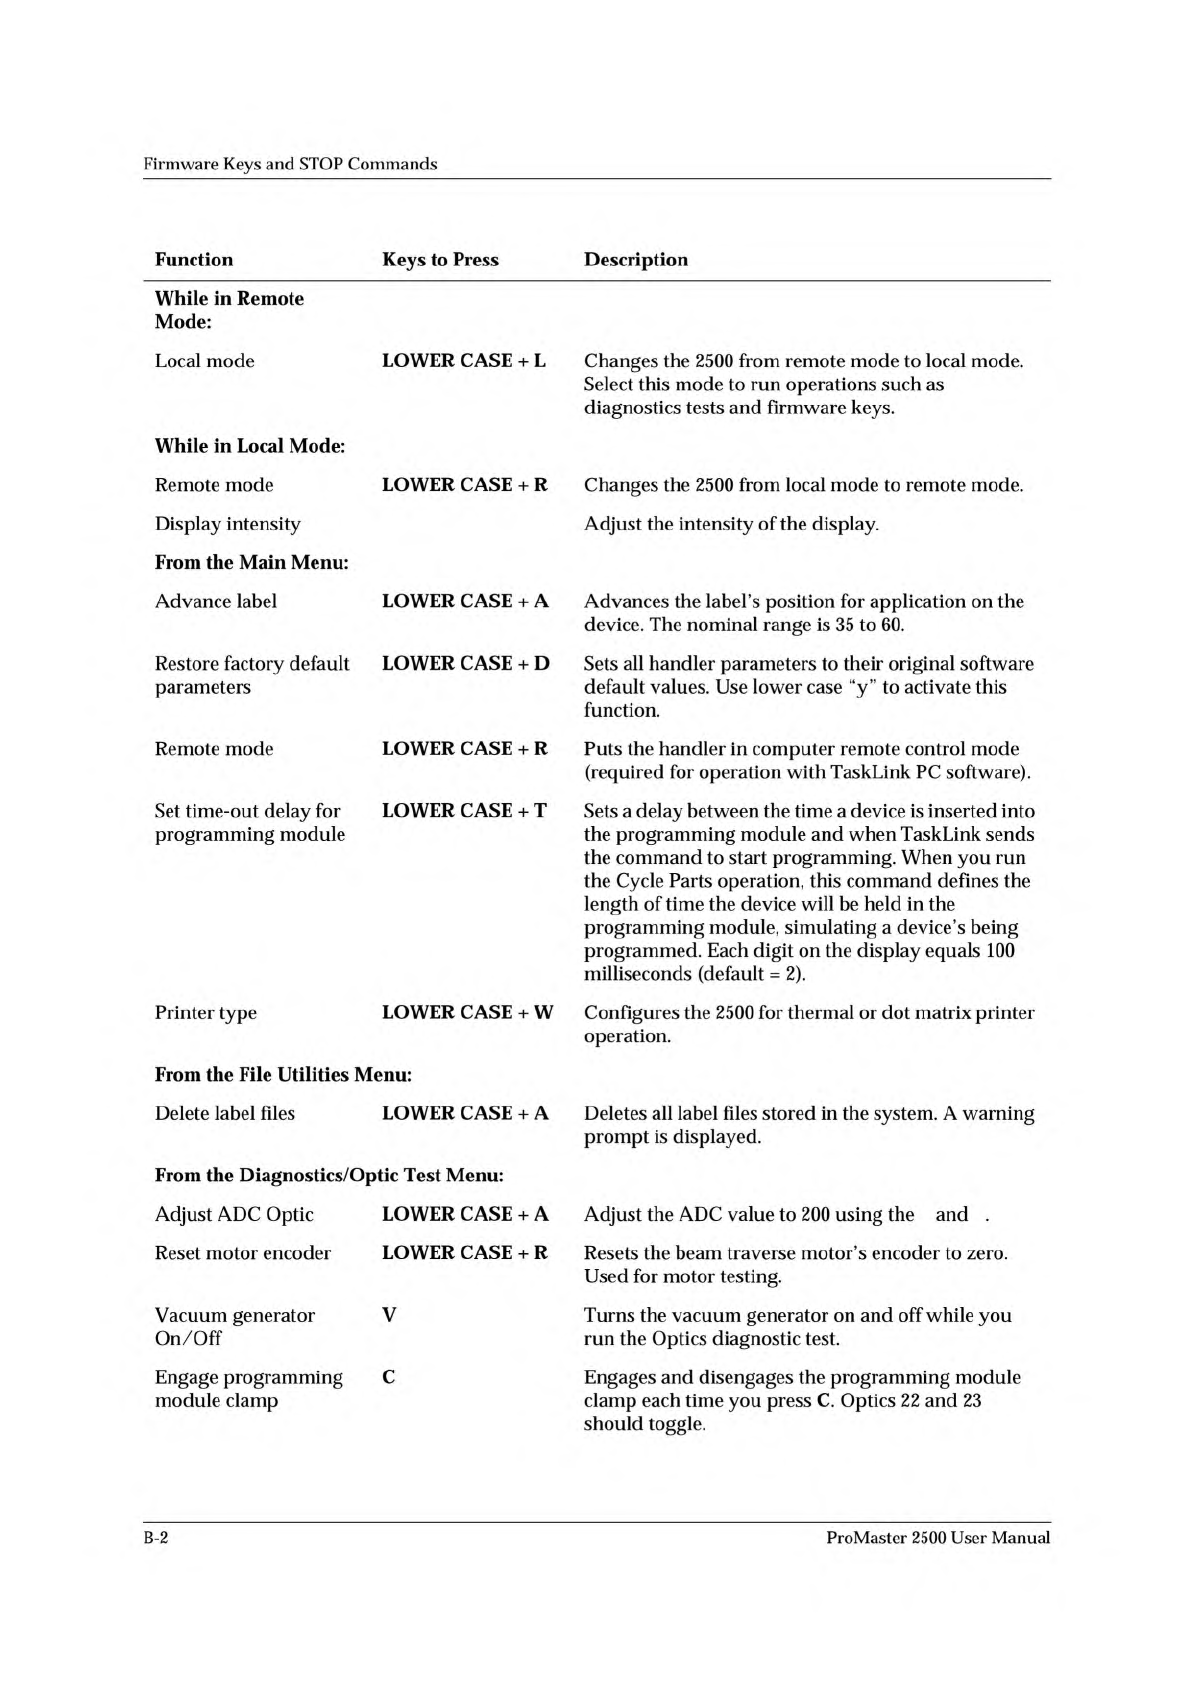
While
in
Remote
Mode:
Local
mode
LOWER
CASE
+
L
Changes
the
2500
from
remote
mode
to
local
mode.
Select
this
mode
to
run
operations
such
as
diagnostics
tests
and
firmware
keys.
While
in
Local
Mode:
Remote
mode
Display
intensity
LOWER
CASE
+
R
Changes
the
2500
from
local
mode
to
remote
mode.
Adjust
the
intensity
of
the
display.
From
the
Main
Menu:
Advance
label
LOWER
CASE
+
A
Advances
the
label's
position
for
application
on
the
device.
The
nominal
range
is
35
to
60.
Restore
factory
default
parameters
LOWER
CASE
+
D
Sets
all
handler
parameters
to
their
original
software
default
values.
Use
lower
case
“y”
to
activate
this
function.
Remote
mode
LOWER
CASE
+
R
Puts
the
handler
in
computer
remote
control
mode
(required
for
operation
with
TaskLink
PC
software).
Set
time-out
delay
for
programming
module
LOWER
CASE
+
T
Sets
a
delay
between
the
time
a
device
is
inserted
into
the
programming
module
and
when
TaskLink
sends
the
command
to
start
programming.
When
you
run
the
Cycle
Parts
operation,
this
command
defines
the
length
of
time
the
device
will
be
held
in
the
programming
module,
simulating
a
device's
being
programmed.
Each
digit
on
the
display
equals
100
milliseconds
(default
=
2).
Printer
type
LOWER
CASE
From
the
File
Utilities
Menu:
+
W
Configures
the
2500
for
thermal
or
dot
matrix
printer
operation.
Delete
label
files
LOWER
CASE
From
the
Diagnostics/Optic
Test
Menu:
+
A
Deletes
all
label
files
stored
in
the
system.
A
warning
prompt
is
displayed.
Adjust
ADC
Optic
LOWER
CASE
+
A
Adjust
the
ADC
value
to
200
using
the
and
.
Reset
motor
encoder
Vacuum
generator
On/Off
Engage
programming
module
clamp
LOWER
CASE
V
C
+
R
Resets
the
beam
traverse
motor's
encoder
to
zero.
Used
for
motor
testing.
Turns
the
vacuum
generator
on
and
off
while
you
run
the
Optics
diagnostic
test.
Engages
and
disengages
the
programming
module
clamp
each
time
you
press
C.
Optics
22
and
23
should
toggle.
B-2
ProMaster
2500
User
Manual
Firmware
Keys
and
STOP
Commands
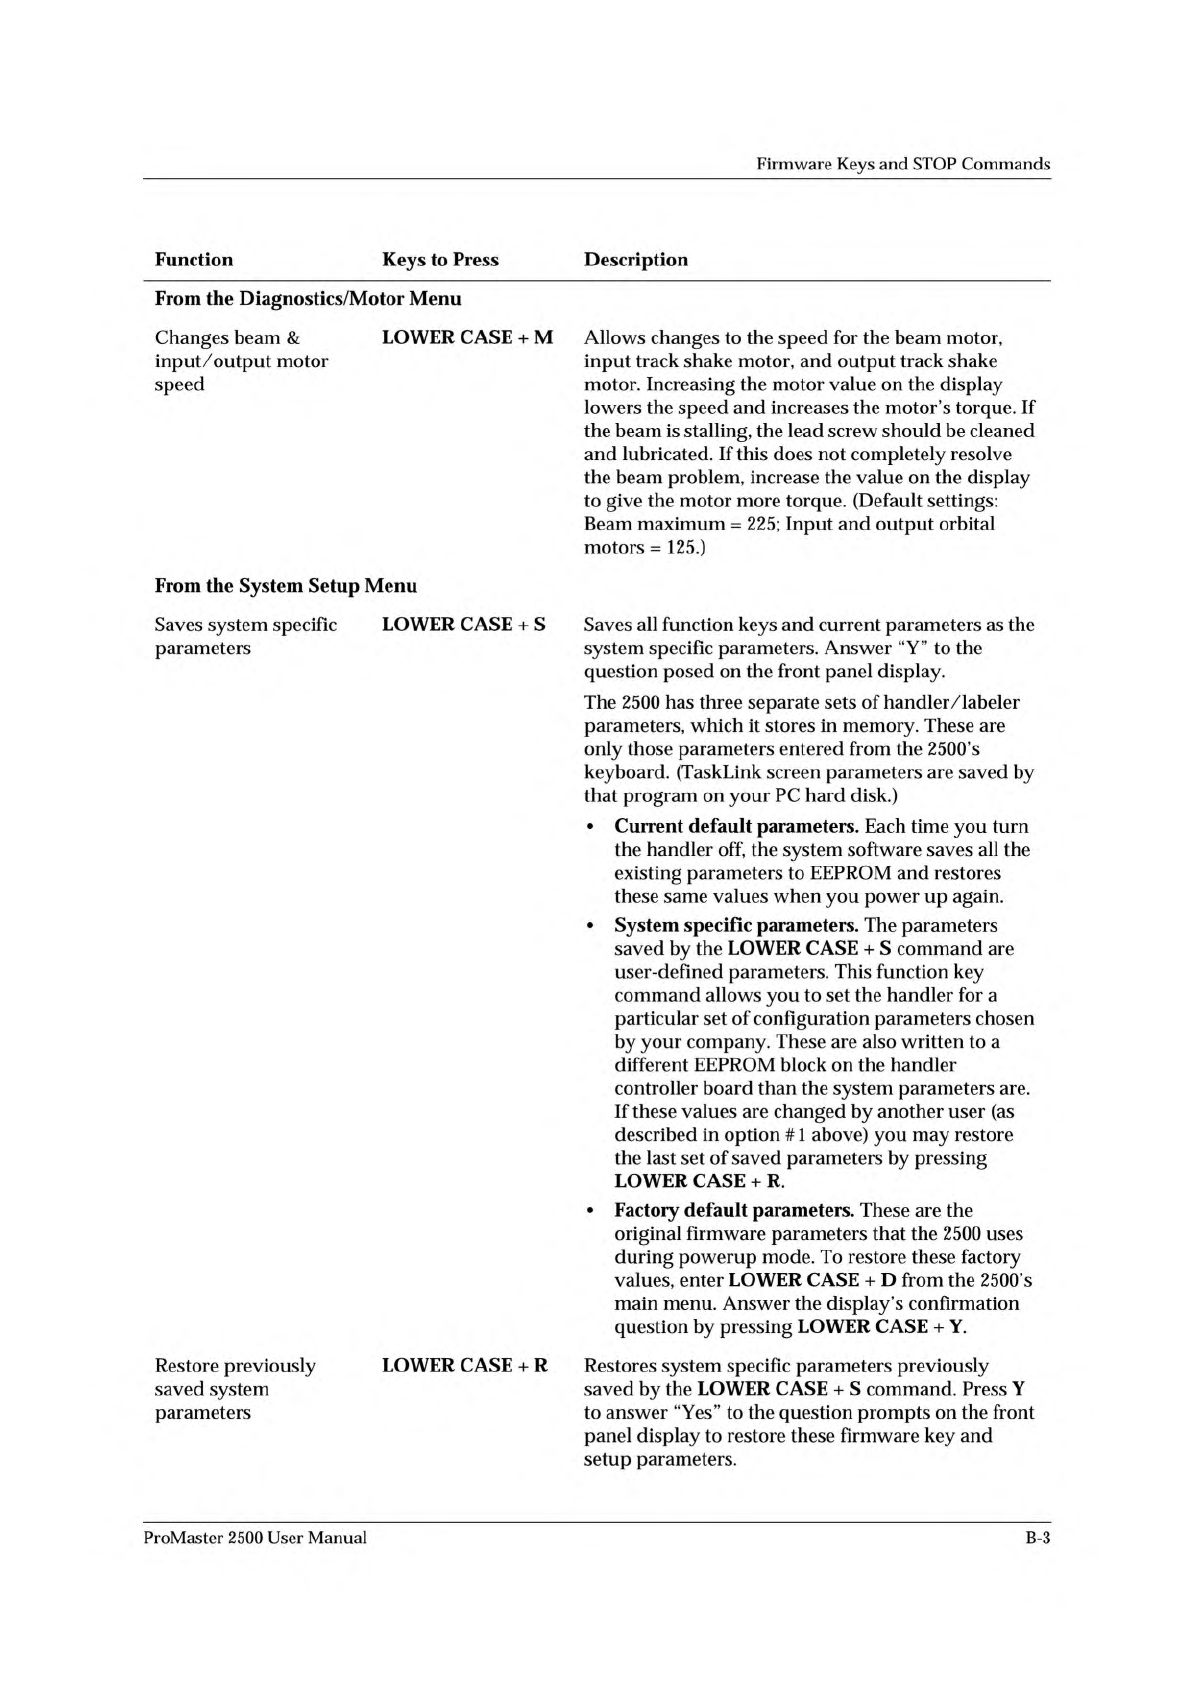
Function
Keys
to
Press
Description
From
the
Diagnostics/Motor
Menu
Changes
beam
&
input/output
motor
speed
LOWER
CASE
+
M
Allows
changes
to
the
speed
for
the
beam
motor,
input
track
shake
motor,
and
output
track
shake
motor.
Increasing
the
motor
value
on
the
display
lowers
the
speed
and
increases
the
motor's
torque.
If
the
beam
is
stalling,
the
lead
screw
should
be
cleaned
and
lubricated.
If
this
does
not
completely
resolve
the
beam
problem,
increase
the
value
on
the
display
to
give
the
motor
more
torque.
(Default
settings:
Beam
maximum
=
225;
Input
and
output
orbital
motors
=
125.)
From
the
System
Setup
Menu
Saves
system
specific
parameters
LOWER
CASE
+
S
Saves
all
function
keys
and
current
parameters
as
the
system
specific
parameters.
Answer
“Y”
to
the
question
posed
on
the
front
panel
display.
The
2500
has
three
separate
sets
of
handler/labeler
parameters,
which
it
stores
in
memory.
These
are
only
those
parameters
entered
from
the
2500's
keyboard.
(TaskLink
screen
parameters
are
saved
by
that
program
on
your
PC
hard
disk.)
•
Current
default
parameters.
Each
time
you
turn
the
handler
off,
the
system
software
saves
all
the
existing
parameters
to
EEPROM
and
restores
these
same
values
when
you
power
up
again.
•
System
specific
parameters.
The
parameters
saved
by
the
LOWER
CASE
+
S
command
are
user-defined
parameters.
This
function
key
command
allows
you
to
set
the
handler
for
a
particular
set
of
configuration
parameters
chosen
by
your
company.
These
are
also
written
to
a
different
EEPROM
block
on
the
handler
controller
board
than
the
system
parameters
are.
If
these
values
are
changed
by
another
user
(as
described
in
option
#
1
above)
you
may
restore
the
last
set
of
saved
parameters
by
pressing
LOWER
CASE
+
R.
•
Factory
default
parameters.
These
are
the
original
firmware
parameters
that
the
2500
uses
during
powerup
mode.
To
restore
these
factory
values,
enter
LOWER
CASE
+
D
from
the
2500's
main
menu.
Answer
the
display's
confirmation
question
by
pressing
LOWER
CASE
+
Y.
Restore
previously
saved
system
parameters
LOWER
CASE
+
R
Restores
system
specific
parameters
previously
saved
by
the
LOWER
CASE
+
S
command.
Press
Y
to
answer
“Yes”
to
the
question
prompts
on
the
front
panel
display
to
restore
these
firmware
key
and
setup
parameters.
ProMaster
2500
User
Manual
B-3