2500_Users_Manual-.pdf - 第421页
* * PROM ASTER 2500 MAIN MENU * * ENTER THE NUM BER OF THE DESIRED FUNCTION 1 - OPERATION S 3 - SYSTEM SETUP 2 - FILE UTIL ITIES 4 - DIAGNOSTICS * * * S YSTEM SETUP MENU * * * 1 - GENERAL 4 - MAIN MENU 2 - LABELER 3 - HA…
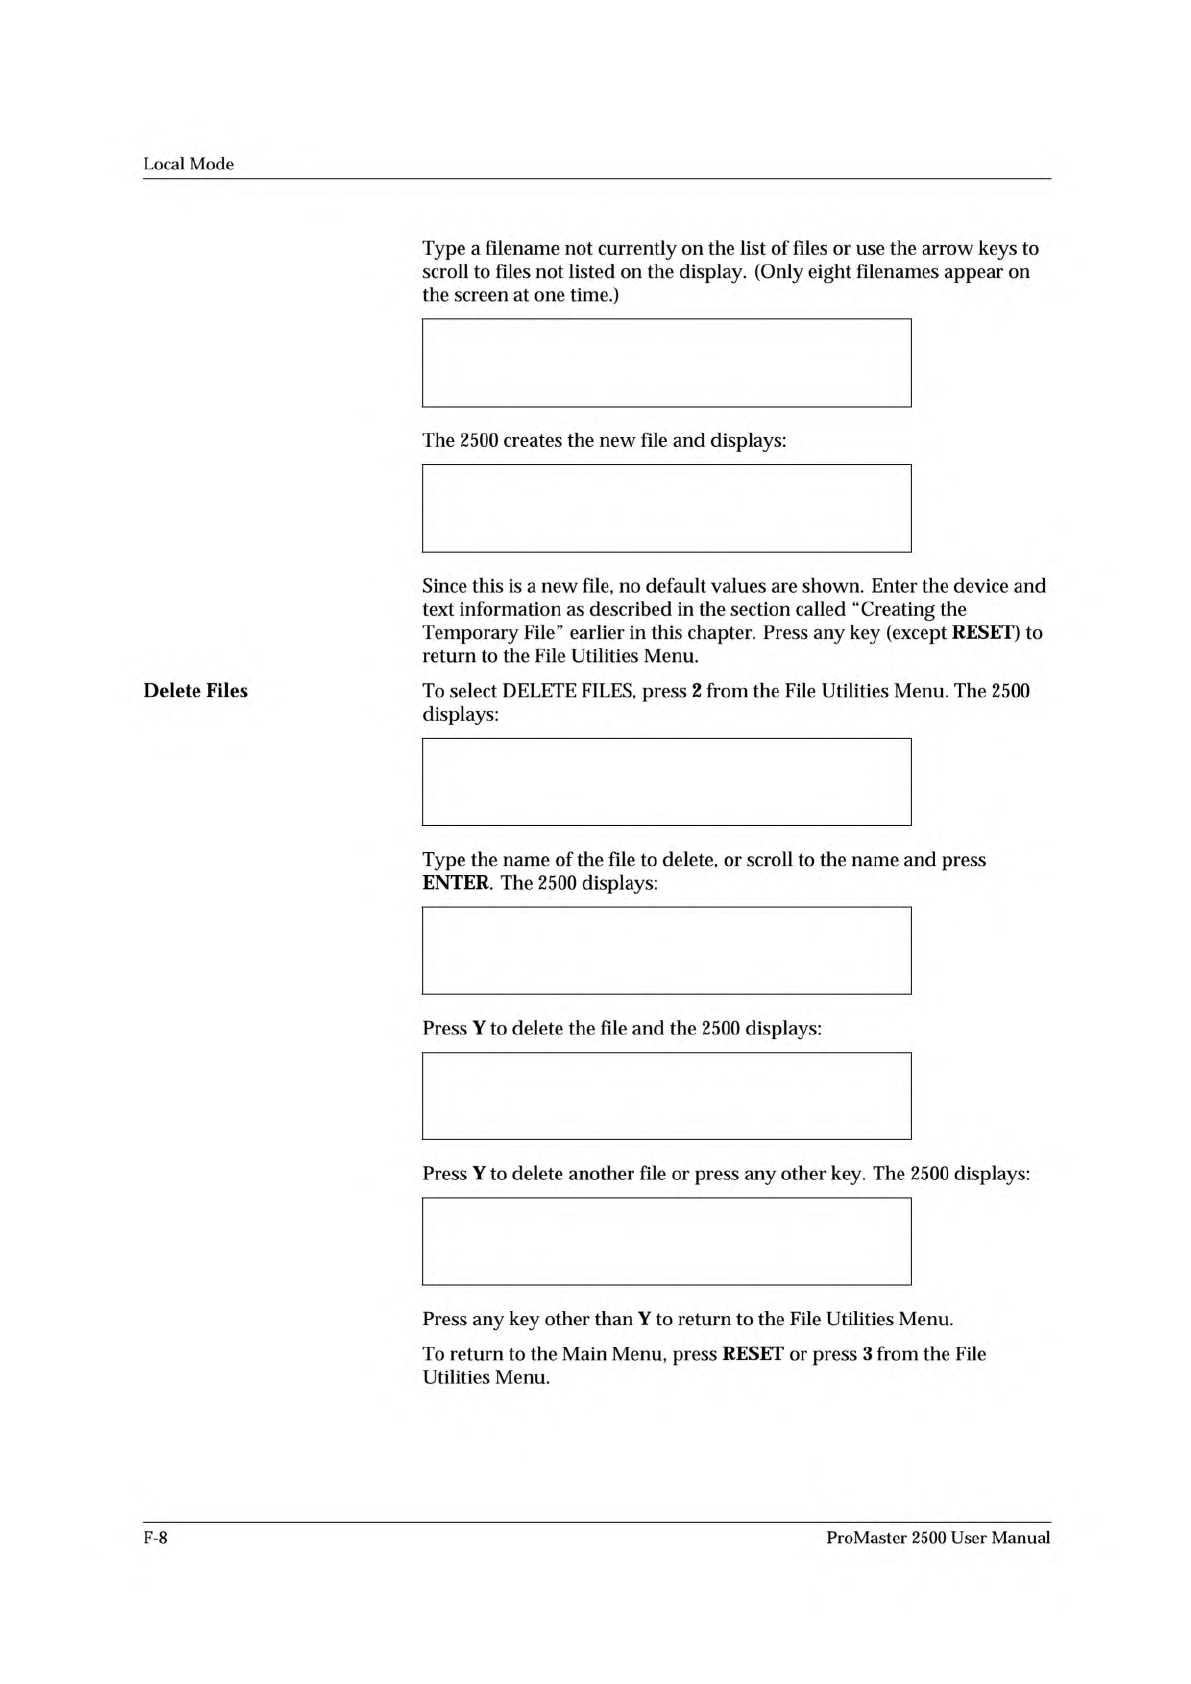
FILE EDIT MODE
FILE1 FILE2 FILE3 FILE4
FILE5 FILE6 FILE7 FILE8
ENTER FILE NAME TO EDIT: NEWNAME
FILE EDIT MODE NEW FILE: NEWNAME
CUSTOM PLCC 20 PLCC 28 PLCC 32
PLCC 44 PLCC 52 PLCC 68 PLCC 84
MOVE TO SELECTION THEN PRESS ENTER
FILE DELETE MODE
FILE1 FILE2 FILE3 FILE4
FILE5 FILE6 FILE7 FILE8
ENTER FILE NAME TO DELETE:
FILE DELETE MODE FILE NAME: NEWNAME
DELETE THIS FILE? (Y OR N)
FILE DELETE MODE FILE NAME: NEWNAME
DELETE THIS FILE? (Y OR N) Y
FILE WAS DELETED, DELETE ANOTHER FILE?
FILE DELETE MODE FILE NAME: NEWNAME
DELETE THIS FILE? (Y OR N) N
FILE NOT DELETED, DELETE ANOTHER FILE?
Local
Mode
Delete
Files
Type
a
filename
not
currently
on
the
list
of
files
or
use
the
arrow
keys
to
scroll
to
files
not
listed
on
the
display.
(Only
eight
filenames
appear
on
the
screen
at
one
time.)
The
2500
creates
the
new
file
and
displays:
Since
this
is
a
new
file,
no
default
values
are
shown.
Enter
the
device
and
text
information
as
described
in
the
section
called
“Creating
the
Temporary
File”
earlier
in
this
chapter.
Press
any
key
(except
RESET)
to
return
to
the
File
Utilities
Menu.
To
select
DELETE
FILES,
press
2
from
the
File
Utilities
Menu.
The
2500
displays:
Type
the
name
of
the
file
to
delete,
or
scroll
to
the
name
and
press
ENTER.
The
2500
displays:
Press
Y
to
delete
the
file
and
the
2500
displays:
Press
Y
to
delete
another
file
or
press
any
other
key.
The
2500
displays:
Press
any
key
other
than
Y
to
return
to
the
File
Utilities
Menu.
To
return
to
the
Main
Menu,
press
RESET
or
press
3
from
the
File
Utilities
Menu.
F-8
ProMaster
2500
User
Manual
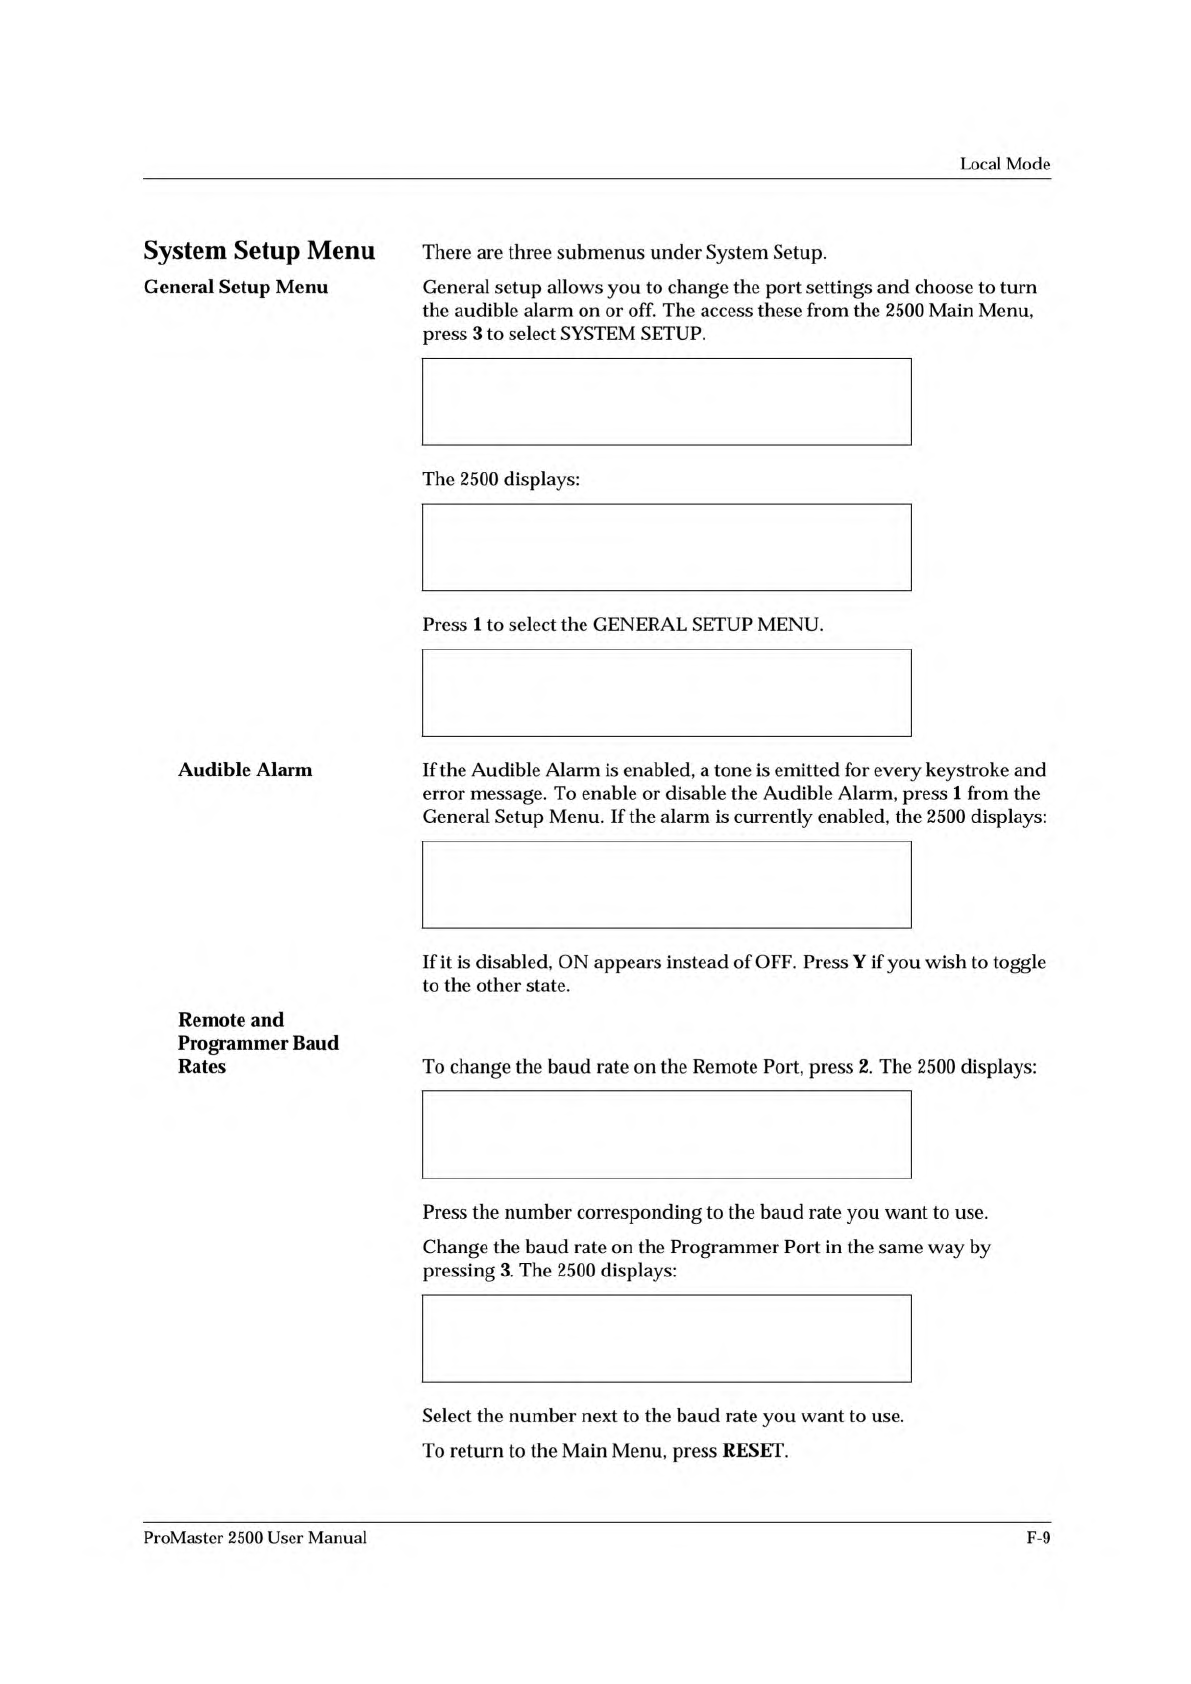
* * PROMASTER 2500 MAIN MENU * *
ENTER THE NUMBER OF THE DESIRED FUNCTION
1 - OPERATIONS 3 - SYSTEM SETUP
2 - FILE UTILITIES 4 - DIAGNOSTICS
* * * SYSTEM SETUP MENU * * *
1 - GENERAL 4 - MAIN MENU
2 - LABELER
3 - HANDLER
* * * GENERAL SETUP MENU * * *
1 - AUDIBLE ALARM 4 - SETUP MENU
2 - REMOTE BAUD RATE
3 - PROGRAMMER BAUD RATE
DO YOU WANT AUDIBLE ALARM OFF?
(Y OR N):
ENTER NUMBER OF REMOTE BAUD RATE
DESIRED (X):
1 - 1200 2 - 2400 3 - 4800 4 - 9600
5 - 19200 6 - 38400
ENTER NUMBER OF PROGRAMMER BAUD RATE
DESIRED (X):
1 - 1200 2 - 2400 3 - 4800 4 - 9600
5 - 19200 6 - 38400
Local
Mode
System
Setup
Menu
General
Setup
Menu
Audible
Alarm
Remote
and
Programmer
Baud
Rates
The
2500
displays:
Press
1
to
select
the
GENERAL
SETUP
MENU.
To
change
the
baud
rate
on
the
Remote
Port,
press
2.
The
2500
displays:
If
the
Audible
Alarm
is
enabled,
a
tone
is
emitted
for
every
keystroke
and
error
message.
To
enable
or
disable
the
Audible
Alarm,
press
1
from
the
General
Setup
Menu.
If
the
alarm
is
currently
enabled,
the
2500
displays:
If
it
is
disabled,
ON
appears
instead
of
OFF.
Press
Y
if
you
wish
to
toggle
to
the
other
state.
Press
the
number
corresponding
to
the
baud
rate
you
want
to
use.
Change
the
baud
rate
on
the
Programmer
Port
in
the
same
way
by
pressing
3.
The
2500
displays:
Select
the
number
next
to
the
baud
rate
you
want
to
use.
To
return
to
the
Main
Menu,
press
RESET.
There
are
three
submenus
under
System
Setup.
General
setup
allows
you
to
change
the
port
settings
and
choose
to
turn
the
audible
alarm
on
or
off.
The
access
these
from
the
2500
Main
Menu,
press
3
to
select
SYSTEM
SETUP.
ProMaster
2500
User
Manual
F-9
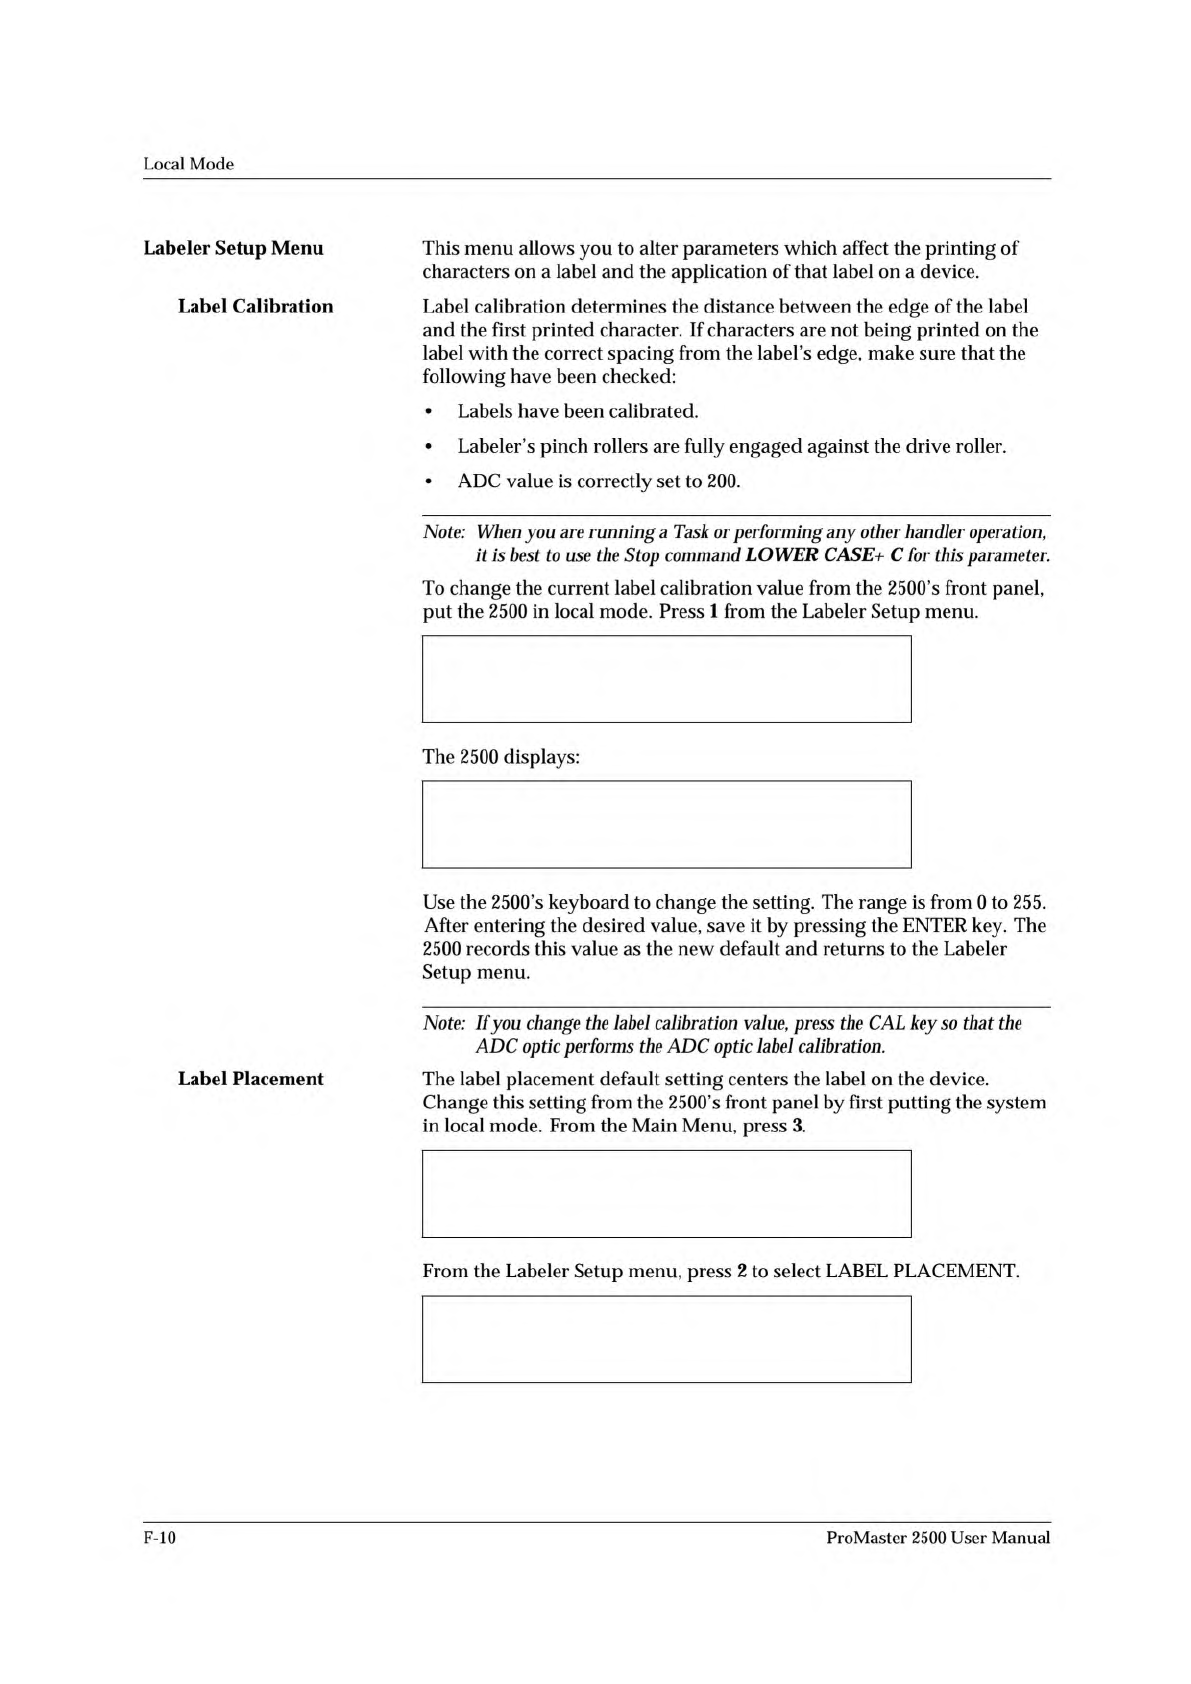
* * * LABELER SETUP MENU * * *
1 - LABEL CALIBRATION 4 - SETUP MENU
2 - LABEL PLACEMENT
3 - LABEL ADJUST
ENTER LABEL CALIBRATION VALUE (XX):_
* * PROMASTER 2500 MAIN MENU * *
ENTER THE NUMBER OF THE DESIRED FUNCTION
1 - OPERATIONS 3 - SYSTEM SETUP
2 - FILE UTILITIES 4 - DIAGNOSTICS
* * * LABELER SETUP MENU * * *
1 - LABEL CALIBRATION 4 - SETUP MENU
2 - LABEL PLACEMENT
3 - LABEL ADJUST
Local
Mode
Labeler
Setup
Menu
Label
Calibration
Label
Placement
This
menu
allows
you
to
alter
parameters
which
affect
the
printing
of
characters
on
a
label
and
the
application
of
that
label
on
a
device.
Label
calibration
determines
the
distance
between
the
edge
of
the
label
and
the
first
printed
character.
If
characters
are
not
being
printed
on
the
label
with
the
correct
spacing
from
the
label's
edge,
make
sure
that
the
following
have
been
checked:
•
Labels
have
been
calibrated.
•
Labeler's
pinch
rollers
are
fully
engaged
against
the
drive
roller.
•
ADC
value
is
correctly
set
to
200.
Note:
When
you
are
running
a
Task
or
performing
any
other
handler
operation,
it
is
best
to
use
the
Stop
command
LOWER
CASE+
C
for
this
parameter.
To
change
the
current
label
calibration
value
from
the
2500's
front
panel,
put
the
2500
in
local
mode.
Press
1
from
the
Labeler
Setup
menu.
The
2500
displays:
From
the
Labeler
Setup
menu,
press
2
to
select
LABEL
PLACEMENT.
Use
the
2500's
keyboard
to
change
the
setting.
The
range
is
from
0
to
255.
After
entering
the
desired
value,
save
it
by
pressing
the
ENTER
key.
The
2500
records
this
value
as
the
new
default
and
returns
to
the
Labeler
Setup
menu.
Note:
If
you
change
the
label
calibration
value,
press
the
CAL
key
so
that
the
ADC
optic
perforins
the
ADC
optic
label
calibration.
The
label
placement
default
setting
centers
the
label
on
the
device.
Change
this
setting
from
the
2500's
front
panel
by
first
putting
the
system
in
local
mode.
From
the
Main
Menu,
press
3.
F-10
ProMaster
2500
User
Manual