00196478-08_MM_SX12DX12_en.pdf - 第74页
Major Maintenance Maintenance Tasks for Vacuum Pump 5.8.4 Performing Maintenance T asks 74 Maintenance Manual SIPLACE SX1/SX2/DX1/DX2 5.8.4 5 . 8 . 4 P e r f o r m in g M a in t e n a n c e T a s k s Performing Maintenan…

Major Maintenance
5.8.1 Tools, Consumables, Spare and Wear Parts Maintenance Tasks for Vacuum Pump
Maintenance Manual SIPLACE SX1/SX2/DX1/DX2 73
5.8
5.8 Maintenance Tasks for Vacuum Pump
Maintenance Tasks for Vacuum Pump
SXDX12V2 The vacuum pum p is an opti on
5.8.1
5.8.1 Tools, Consumables, Spare and Wear Parts
Tools, Consumables, Spare and Wear Parts
▪ If needed, filter insert [03077677-xx]
SXDX12V2
▪ Assembly instructions for vacuum pump SX1/SX2 [00196614-xx]
▪ Service manual for your machine
5.8.2
5.8.2 Preparatory Steps
Preparatory Steps
Risk of injury when working near the tap e cutter
► Switch off the machine and secure it to prevent unauthorized reactivation. Observe the instructions
in section "1.2 Preparatory Work..." [ ➙ 12].
► Interrupt the compressed air supply to the machine.
SXDX12V2
► Dismantle the waste slide. Read the service manual for your machine first.
► Dismantle the cover plate over the vacuum pump.
5.8.3
5.8.3 Recommended maintenance intervals
Recommended maintenance intervals
NOTICE
The vacuum pump is an option.
The vacuum pump is located at location 2 behind the COT-insert.
WARNING
Risk of injury when working near the cutter.
When working in the area of the tape cutter, move the component trolley out of the machine
and disconnect the machine from the mains supply and the compressed air supply.
► Wait until the operating pressure has dropped to 0 MPa.
► Always secure the machine against unauthorized reactivation.
► Do not reach into the tape cutter.
CAUTION
Make sure you do not damage any cables and hoses.
CAUTION
Loosened vacuum pump
It is possible to remove the vacuum pump from the machine but it is not necessary.
For a better access, however, it may be useful to loosen the vacuum pump and pull it a bit to
the front within the machine. Also read the Assembly Instructions for the vacuum pump.
► Make sure that the vacuum pump cannot fall out of the machine.
Maintenance inter-
val
Spare part Task
Every 6 months Filter insert [03077677-xx] Check the filter insert and replace if necessary.
NOTICE
Working life
The filter insert has a working life of at minimum 7500 hours up to 25000 hours. For more infor-
mation about the product life, refer to the manufacturer's documentation (see http://www.beck-
er-international.com – Vacuum pump rotary vane pumps, dry running, type VX4.25)
Major Maintenance
Maintenance Tasks for Vacuum Pump 5.8.4 Performing Maintenance Tasks
74 Maintenance Manual SIPLACE SX1/SX2/DX1/DX2
5.8.4
5.8.4 Performing Maintenance Tasks
Performing Maintenance Tasks
SXDX12V2
5.8.4.1
5.8.4.1 Checking/Replacing the Filter Insert
Checking/Replacing the Filter Insert
NOTICE
Observe the manufacturer's instructions
► For more information about maintenance intervals and about how to perform the individual
maintenance tasks, read the manufacturer's instructions for your vacuum pump.
NOTICE
Observe the assembly instructions
► For these tasks, also read the "Assembly instructions SX1/SX2/DX1/DX2" [00196614-xx].
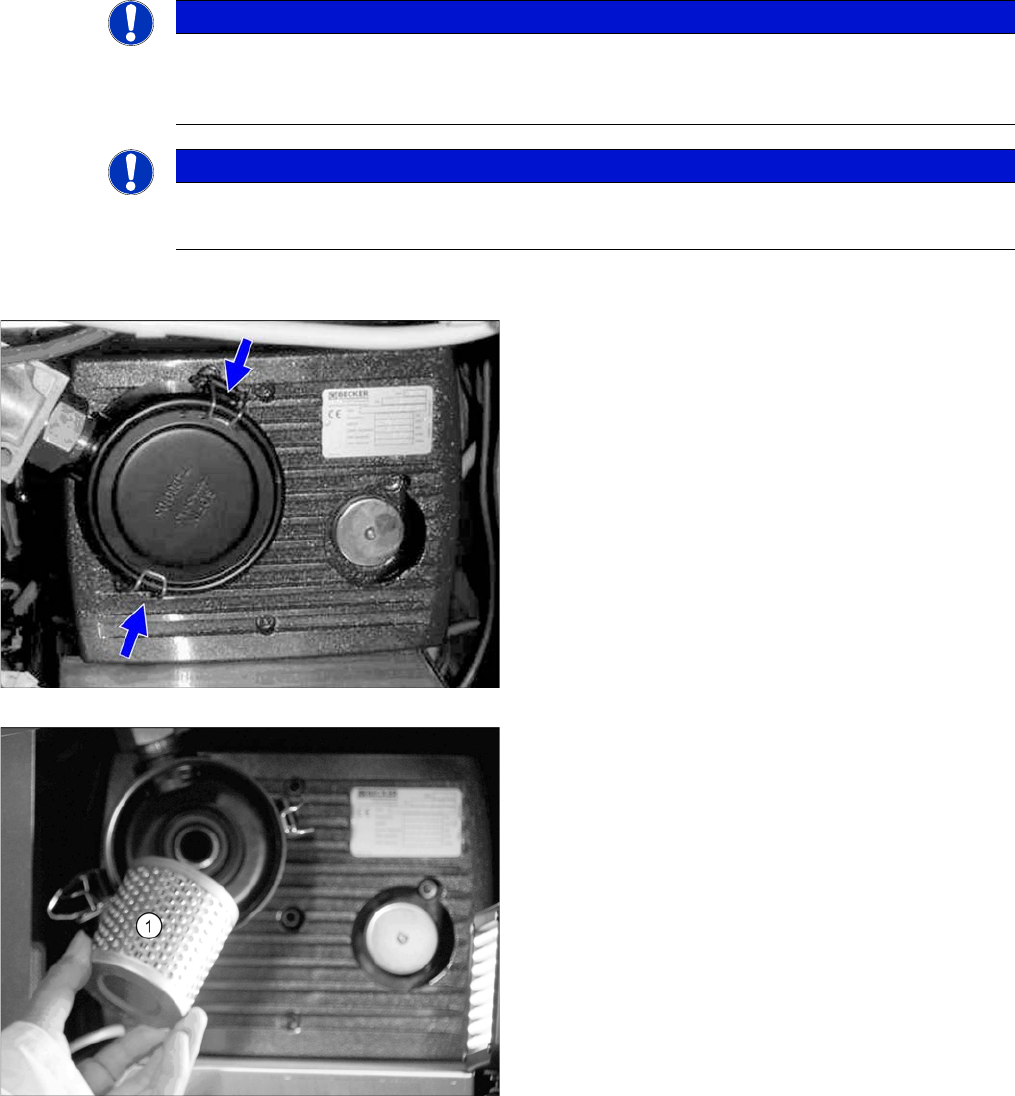
► Open the edgewise retaining clamp of the filter casing
and remove the cap.
► Remove the vacuum filter (1).
► Check the vacuum filter and replace it, if necessary
(filter insert [03077677-xx]).
Major Maintenance
5.8.5 Final work Maintenance Tasks for Vacuum Pump
Maintenance Manual SIPLACE SX1/SX2/DX1/DX2 75
5.8.5
5.8.5 Final work
Final work
► Installation is performed by following the above instructions in the reverse order. Also observe the
following instructions:
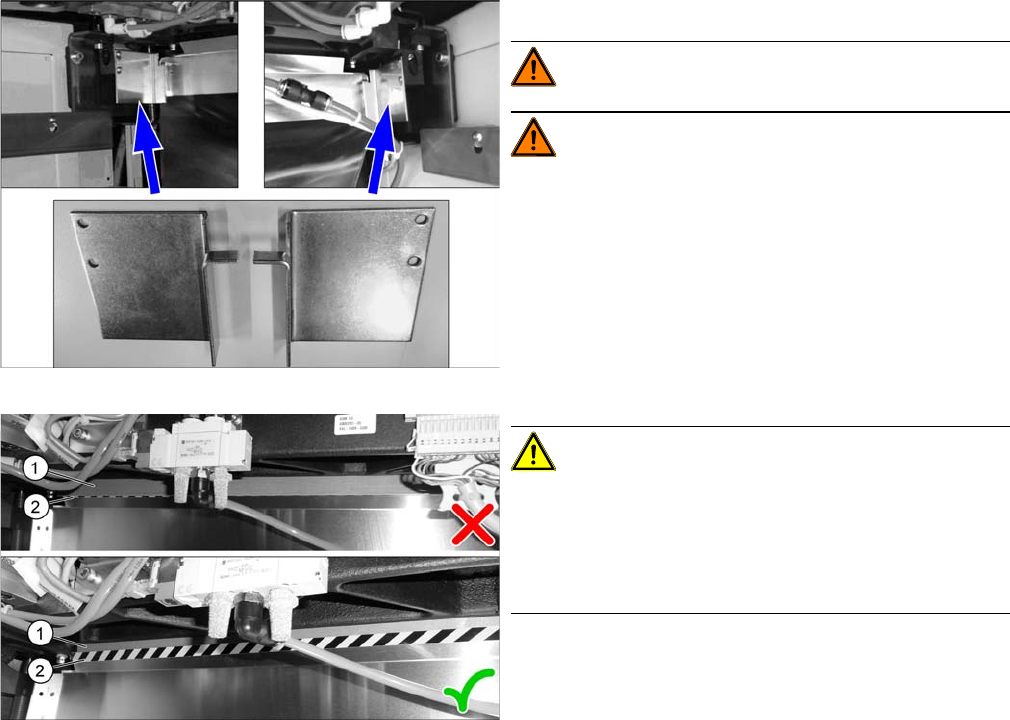
Compone nt Supply - Manual Tables - Fitting Pr otections - SW Version
SXDX12V1V2 – Tape Cutter – Waste Tape Chute – Pay Attention to the Plastic Strips – SW Version
Manual tables only:
WARNING!
WARNING! There is a risk of injury on manual
tables without the two protections.
► Fit the two protections.
CAUTION!
Make sure that the plastic strips (1) (if present) are locat-
ed behind the plate (2) when you hook up the used tape
chute.
The black-yellow hatched label must be completely visi-
ble.