EUKYX-199-4110_G5S2_Instruction_Vol4_E.pdf - 第352页
EUKYX 5-4 199-4100 2. T roubleshooting on Pickup Errors (2 ) Machine-Based Factors When a component has no problem , check the mai n body of the mach ine . A fai lure can be trac ked by c he cki ng if it occurs on a spec…
EUKYX
5-3199-4100
2. Troubleshooting on Pickup Errors
2. Troubleshooting on Pickup Errors
2.1 Cause and Remedy of Pickup Errors
(1) Component-Based Factors
When the cause of a failure lies in specific components or lots, the components must be examined
first of all.
Shown below are the cases of failures whose factors lie in components.
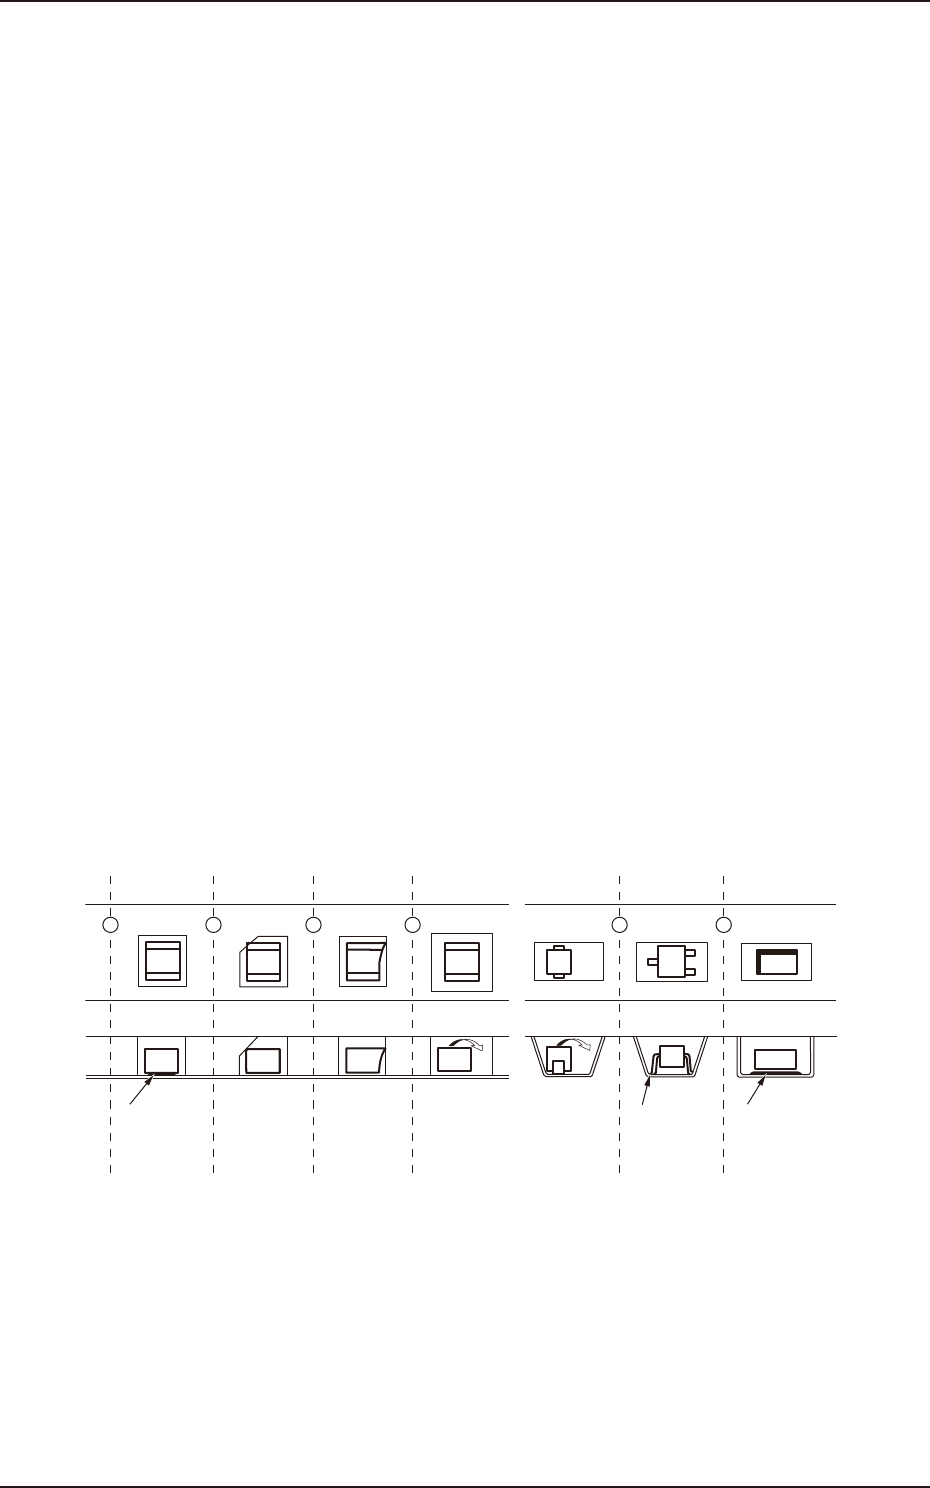
[Factors of Pickup Errors on Component Side]
(1-1) A component adheres to the bottom tape.
(1-2) The shape of a cavity is defective.
(1-3) The shape of a component is defective.
(1-4) A component turns sideways because the tape cavity is too large.
(1-5) The flatness of the cavity bottom is defective.
(1-6) Oil or mold lubricant adheres to the bottom of a component.
The failures described in (1-1) through (1-4) have a tendency to occur easily due to the components
packaged in a paper tape and the failures described in (1-4) through (1-6) due to the components
packaged in an embossed tape.
Special caution should be paid to minute components such as 0603 and 1005 types because such
components are directly affected by how they are packaged in the tape.
To determine whether or not the taped components are packaged in good condition, turn the tape
upside down and check to see how the components fall down from the cavities. If the components
fall down freely, it means that they were packaged in good condition.
The specifications of taping are specified in "JIS-C0806". However, as the detailed regulations are
not provided as for the failures described in (1-1) through (1-6), it is required to ask the component
maker about the details when the components are purchased.
Component
adheres to
bottom tape.
(1-1)
Troubles caused by taping
(1-2) (1-3) (1-4) (1-4) (1-5) (1-6)
Component
is trapped by
burr of square
cavity.
Component
is trapped by
burr.
Component turns sideways
as tape hole is large.
Lead is trapped
at R section
of cavity bottom.
Oil, etc., adhere to
component bottom.
F4E2

EUKYX
5-4199-4100
2. Troubleshooting on Pickup Errors
(2) Machine-Based Factors
When a component has no problem, check the main body of the machine.
A failure can be tracked by checking if it occurs on a specific vacuum nozzle or feeder slot No.
(lane).
(2-1) When the vacuum nozzle has been specified :
Check the following items for the specified vacuum nozzle.
• Check if the vacuum nozzle is abnormal.
• Check if the vacuum line is abnormal.
• Check if the vacuum ON/OFF valve is abnormal.
• Check if the side view camera is abnormal.
When a factory is dusty or a lot of components packaged in paper tapes are used, the vacuum
nozzles and their filters get dirty easily.
Therefore, it becomes important to clean the vacuum nozzles and filters periodically.
Refer to " (1) Frequent Pickup Errors on Specific Vacuum Nozzle" of “2.2 Symptom-Based
Troubleshooting” in this chapter for the troubleshooting.
(2-2) When the feeder slot No. has been specified :
Check the following items for the specified feeder slot No. (tape feeder).
• Check if the tape feeder is loaded correctly with components.
• Check if the top cover tape is peeled off normally.
• Check if the data related to the component picks is normal.
Refer to "(2) Frequent Pickup Errors on Specific Feeder Slot No." of “2.2 Symptom-Based
Troubleshooting” in this chapter for the troubleshooting.
Reference
Reference
EUKYX
5-5199-4100
2.2 Symptom-Based Troubleshooting
2.2 Symptom-Based Troubleshooting
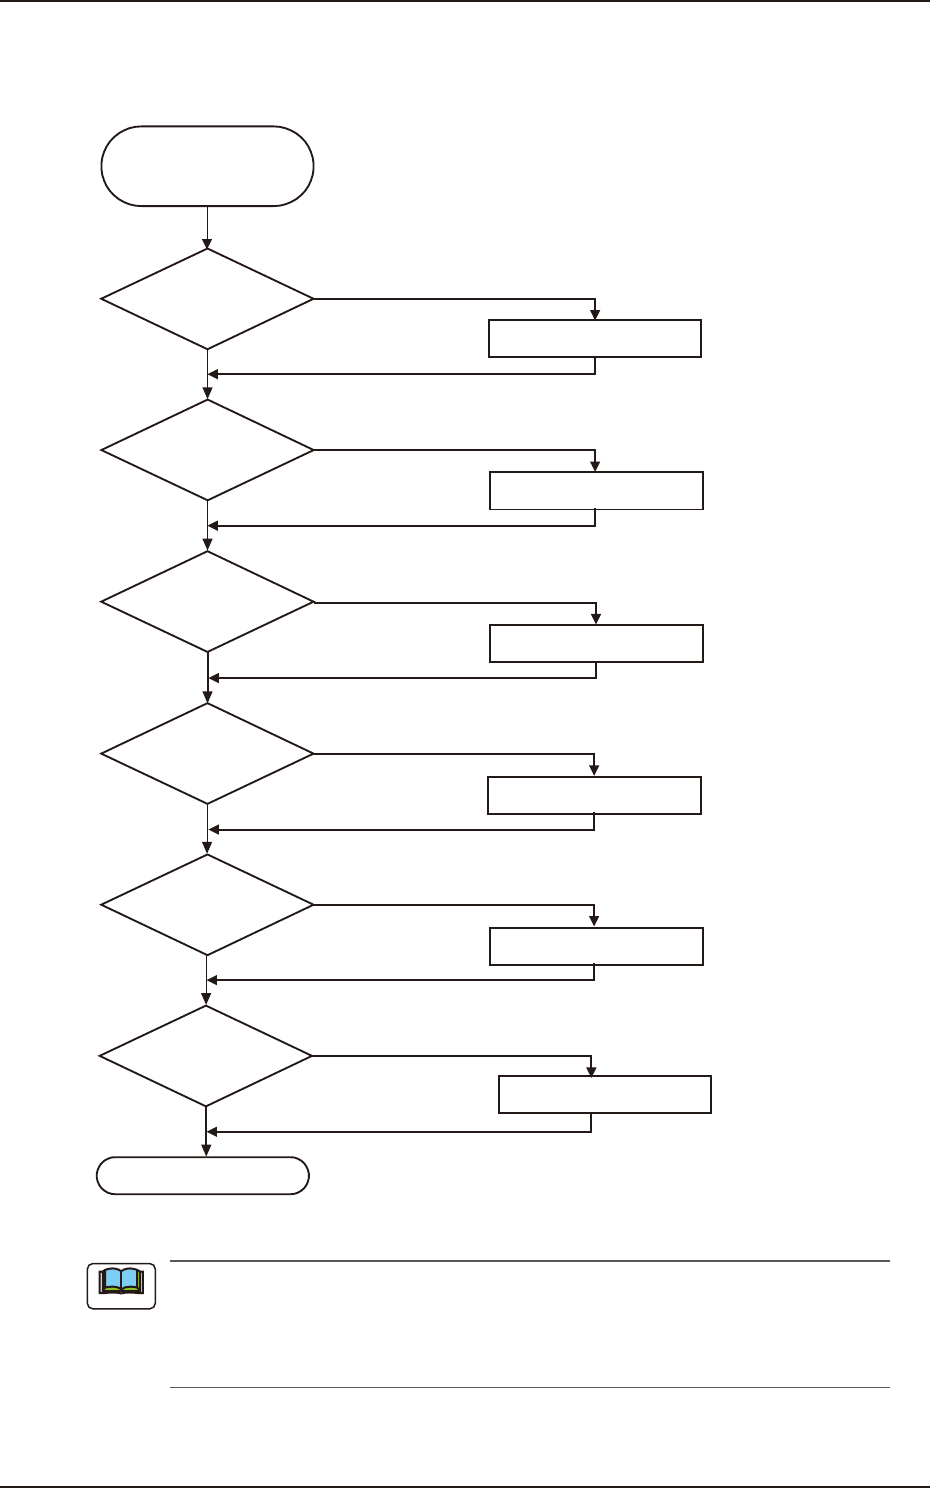
(1) Frequent Pickup Errors on Specific Vacuum Nozzle
Dirty Vacuum
Nozzle
Frequent Pick-Up Errors
on Specific Nozzle
Operation Check
Cleaning
NG
Cleaning
Replacement
Cleaning
OK
NG
NG
NG
NG
OK
OK
OK
OK
Clogged Hole of
Vacuum Nozzle
NG
Nicks on Side View
Camera
Replacement
Dirty Side View Camera
Replacement
Note (b)
Dirty and Clogged
Vacuum Filter
Movement of Vacuum
ON/OFF Valve
OK
F4E3
(a) Refer to “Chapter 1 Maintenance” for the cleaning and replacement procedures.
(b) Check the vacuum ON/OFF switching in the [OutP Chk] button in the "INP/OUT"
window. (Operation Sequence: [MAINT] Button
→
[DVC Check] Button
→
[InP/OutP]
button.
Note