Spectrum Operating Manual - 第117页
S2-9 XXX Se ri es Dispensing Sys te m IOM Man ual Maintenance © 2023 Nordson C orporatio n 6-5 Ite m Des c ription 1 Purge Boot 2 P urge Station Cover 3 Purg e Station Cup 4 Purge Stat ion 5 S cale Station Cover 6 Scale …
S2-9XXX Series Dispensing System IOM Manual Maintenance
6-4 © 2023 Nordson Corporation
6.5.1 Replacing Purge and Scale Station Cups
The cups in the purge and scale stations should be replaced at the intervals recommended in Table 6-1.
To replace the purge and scale cups (Figure 6-1):
WARNING! Follow all local regulations, the material manufacturer SDS, and facility practices
concerning personal protective equipment and disposal of hazardous materials.
NOTE The setup procedure does not need to be performed after replacing the purge station and
scale station cups.
1. When the dispensing system is idle, open the dispensing area door.
2. Remove the covers on the purge station and scale stations.
3. Remove and discard the plastic cups inside the purge and scale stations and inspect the
interior surfaces for spilled fluid.
If the interior of the purge station has spilled fluid, clean with the recommended
cleaning agent and a soft cloth.
If the interior of the scale station has spilled fluid, contact Asymtek Technical Support.
CAUTION! Avoid putting downward pressure on the scale or damage to the sensitive
weighing mechanism will occur.
4. Place a new plastic cup inside of each station.
5. Clean the covers using isopropyl alcohol and a soft cloth.
6. Reinstall the covers and close the dispensing area door.
S2-9XXX Series Dispensing System IOM Manual Maintenance
© 2023 Nordson Corporation 6-5
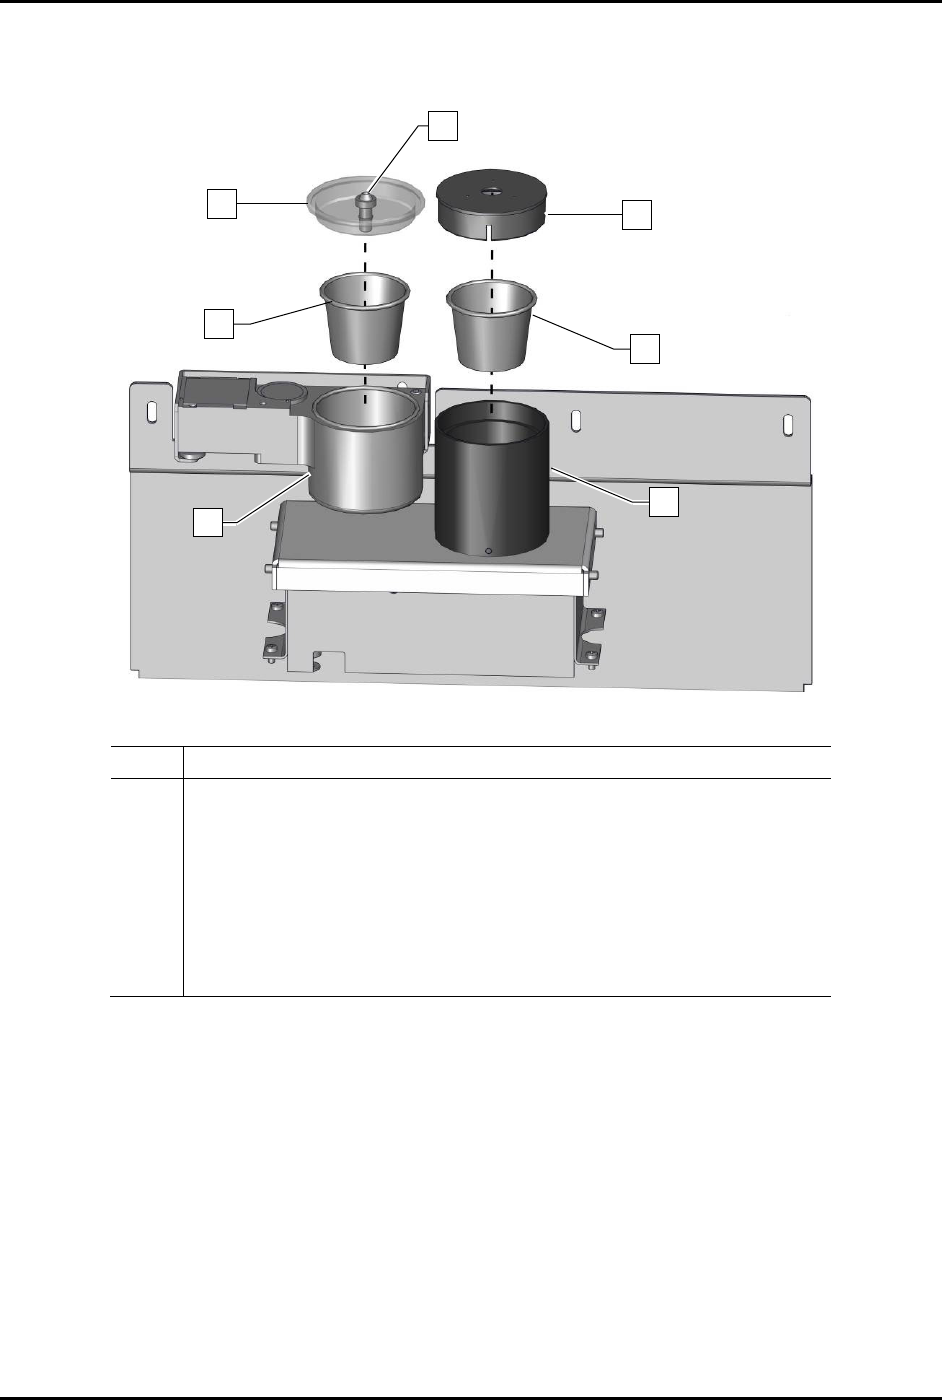
Item Description
1 Purge Boot
2
Purge Station Cover
3 Purge Station Cup
4 Purge Station
5 Scale Station Cover
6 Scale Station Cup
7 Scale Station
Figure 6-1 Replacing the Purge and Scale Station Cups
5
6
4
3
1
7
2

S2-9XXX Series Dispensing System IOM Manual Maintenance
6-6 © 2023 Nordson Corporation
6.5.2 Replacing the Purge Boot
To replace the purge boot (Figure 6-2):
WARNING! Follow all manufacturer SDS, facility requirements, and local ordinances
concerning personal protective equipment and disposal of hazardous materials.
1. When the dispensing system is idle, open the dispensing area door.
2. Remove the purge station cover.
3. Discard the used purge boot in accordance with local safety/environmental regulations.
4. If the purge station cover is dirty, clean it with the recommended cleaning agent and a soft
cloth.
5. Insert a new purge boot, narrow end first, into the top of the purge station cover.
6. Push the purge boot downward through the hole in the cover until it starts to emerge from
the bottom.
7. Using fingers or needle-nose pliers, grip the bottom of the purge boot and pull gently
through the hole until it is fully seated. Slight scoring on the bottom end of the purge boot is
acceptable, but the top of the purge boot must be undamaged.
8. Reinstall the purge station cover.
9. Close the dispensing area door.
Item
Description
1
Purge Boot
2 Purge Station Cover
Figure 6-2 Replacing the Purge Boot
2
1