Spectrum Operating Manual - 第175页
S2-9 XXX Se ri es Dispensing Sys te m IOM Man ual Parts Replacement © 2023 Nordson C orpor ation 8-23 Ite m Descrip ti on 1 Tensione r 2 C on veyor Be lt 3 Pu ll e y (one o n e ach end) 4 Rea r Con veyor Rail 5 Stop Pi n…
S2-9XXX Series Dispensing System IOM Manual Parts Replacement
8-22 © 2023 Nordson Corporation
8.14 Replacing the Conveyer Belts
Checking the condition of the conveyor belts should be part of the routine maintenance schedule for the
dispensing system. Cracked, worn, or broken belts should be replaced immediately.
To maintain reliable system performance, it is recommended that the conveyor belts be changed every six
months. However, the belts may need to be changed more frequently or less frequently, de
pending on the
volume of workpiece production.
Tools and Materials Needed:
• Hex Key Set (Item 59)
• Soft Cloth and Cotton Swabs
• Torque Wrench
• Replacement Conveyor Belts
• Isopropyl Alcohol
• Removable Thread Locker 242
• Phillips Head Screwdriver
(Item 59)
WARNING! Ensure the dispensing system has been completely shutdown before attempting to
remove or install any panel, electrical component, or pneumatic component.
WARNING! This procedure should only be performed by a trained service technician.
NOTE Only one belt should be removed at a time. Use the other belt as a reference for proper
orientation of the belt being replaced.
To remove a conveyor belt (Figure 8-19):
1. Use the Fluidmove Jog Controls to move the dispense head to the back of the machine.
Refer to the Fluidmove User Guide or Fluidmove Online Help.
2. Use the Fluidmove Jog Controls to move the rear conveyor rail as needed. Refer to the
Fluidmove User Guide or Fluidmove Online Help.
3. Perf
orm a service shutdown, see 2.14 Service Shutdown.
4. Open the dispensing area door.
5. Remove any rail-mounted components that interfere with belt removal/replacement.
If stop pins interfere, use a 2.5 mm hex key to remove the stop pins along the length of
the conveyor rails.
NOTE For ease of reinstallation, you should note the locations and orientations of the
rail-mounted components before removing them.
6. Loosen the pulley screws at each end of the conveyor and move the pulleys to
the right or
left to loosen the belt.
7. Slide the old conveyor belt off the pulleys and discard.
S2-9XXX Series Dispensing System IOM Manual Parts Replacement
© 2023 Nordson Corporation 8-23
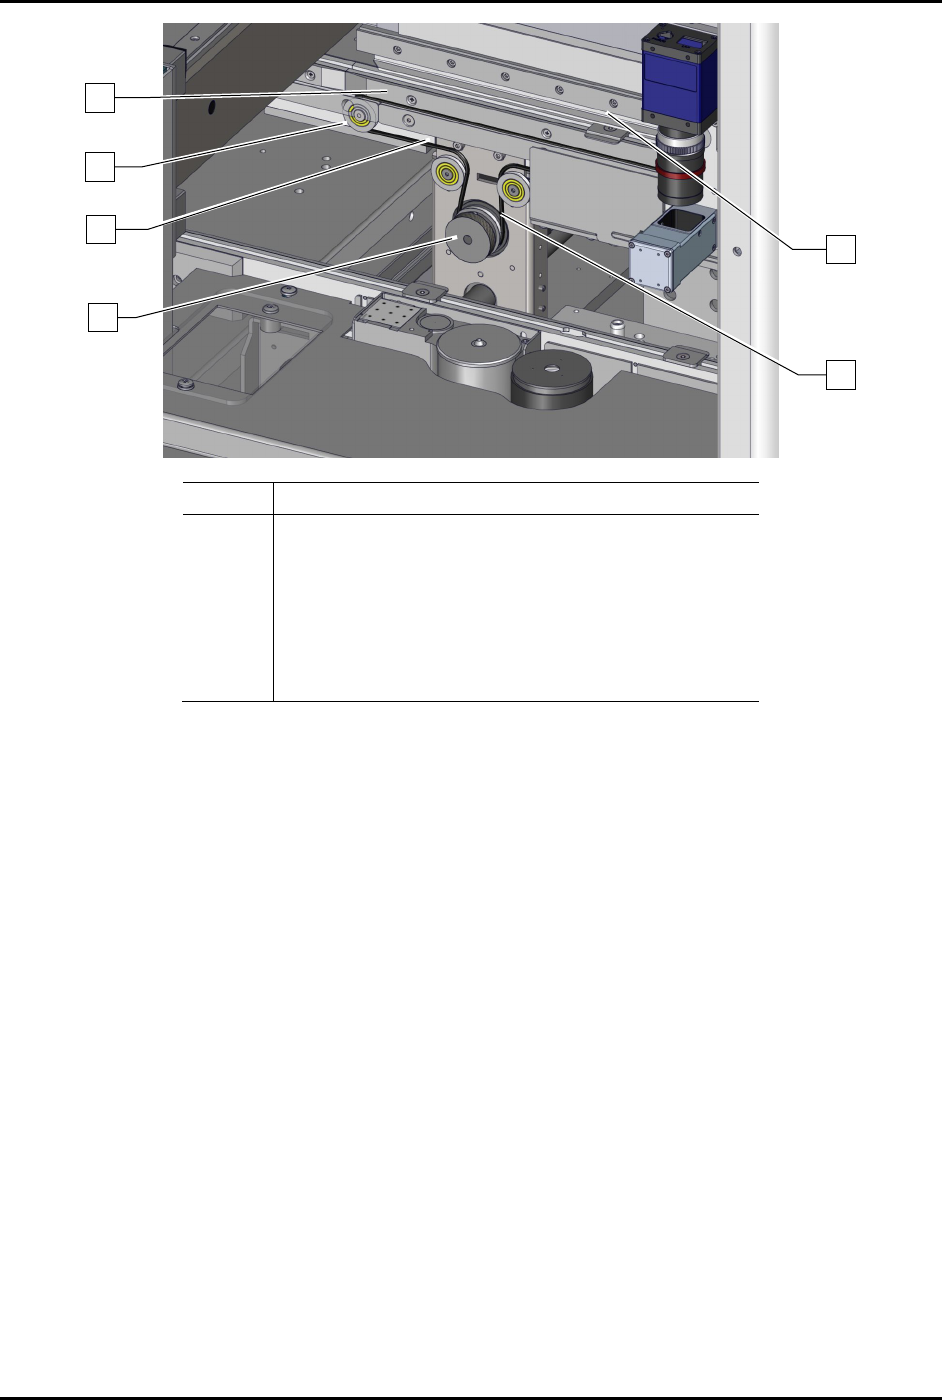
Item
Description
1 Tensioner
2 Conveyor Belt
3 Pulley (one on each end)
4 Rear Conveyor Rail
5 Stop Pin
6 Belt Adjustment Pulley
Figure 8-19 Replacing the Conveyor Belt
To install a conveyor belt (Figure 8-19):
1. Using isopropyl alcohol and a soft cloth or cotton swabs, clean all metal surfaces that
contact the belt, including pulleys and rails.
2. Compare the new conveyor belt to the one remaining on the other rail to determine its
proper orientation.
3. Loop the conveyor belt around the pulley tire at one end of the conveyor rail and extend th
e
conveyor belt toward the other end.
4. Loop the conveyor belt around the two (2) pulleys on the tensioner.
5. Continue to extend the conveyor belt and loop the conveyor belt onto the pulley at the far
end of the conveyor rail. If you cannot get the conveyor belt onto the pulley, proceed as
follows:
a. Loosen the 4 mm screw attaching the tension pulley to the conveyor rail bracket.
b. Slide the tension p
ulley to the right to reduce tension and provide the slack in the
conveyor belt.
c. Hold the tension pulley and conveyor belt securely in place while tightening the screw
with a 4 mm hex key.
d. Torque the screw to 1.4 Nm (12 in-lbs).
3
2
5
1
6
4

S2-9XXX Series Dispensing System IOM Manual Parts Replacement
8-24 © 2023 Nordson Corporation
6. Reinstall any removed stop pins to their former positions.
7. Close the dispensing area door.
8. When both conveyor belts have been replaced, power on the dispensing system, see
4.3 Powering on the Dispensing System.
9. Click on both the left and right conveyor belt jog buttons to move the conveyor belts in both
directions.
The conveyor belts should move smoothly in both directions with no slipping on their
pulleys.
10. If necessary,
tension the conveyor belts, see 6.13 Tensioning the Conveyor Belts.