MR8740T_user_manual_eng_20191016H.pdf - 第197页
192 Sending Data to a Computer With the FTP Client Function 1 1.3 Sending Data to a Computer With the FTP Client Function The instrument is equipped with the FTP transmission function (FTP client). Y ou can send data to …
191
Managing Data in the Instrument With the FTP Server Function
Conguring the FTP client setting with the instrument
> [System] > [Comm.]
1
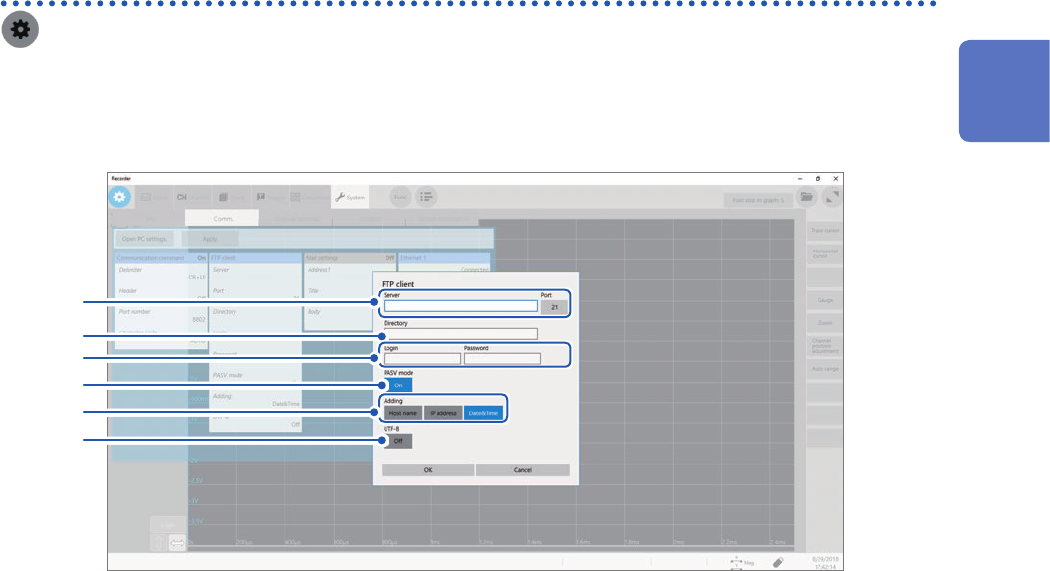
Click [FTP Client].
The setting dialog box will appear.
2
3
4
5
7
6
2
Click the [Server] box and the [Port] button in turn.
The key pad and numerical value entry dialog box appears.
Enter a computer name or an IP address in the [Server] box. In the [Port] box, enter a port number with which
the FTP server is operating if the number is not the standard number of 21.
3
Enter a directory name in the [Directory] box.
Choose a directory of the FTP server you would like to save data into.
4
Enter a login name and password to use for logging in to the FTP server in the [Login] and
[Password] box, respectively.
Enter the user name and password specied for the FTP server of the computer.
Refer to “Congure the access user setting” (p. 190).
5
Click the [PASV Mode].button to choose a PASV mode setting.
To establish communications in PASV mode, set it to [On].
6
Click any of the buttons in the [Adding] area, and choose an identier.
Click the buttons to add identiers to the le name.
• No identiers are added when you select a le to be sent on the le screen. Files with the same name are
overwritten.
• When you have congured the setting to append numerical calculation results to existing les (when you set
the [Calculation result] button to [On] or choose [Append] in the [File] box), no identiers representing
time of day are added.
• Moreover, if a le with the same name exists, the instrument tries to append the le.
• No button in the [Adding] area is enabled, a le with the same name is overwritten when it exists. Note that
all les with the same name will be overwritten if [Date&Time] is disabled with the continuous measurement
setting and some others.
7
Click the [UTF-8] button to choose an UFT-8 support setting.
11
Connecting the Instrument to Computers
192
Sending Data to a Computer With the FTP Client Function
11.3 Sending Data to a Computer With the FTP Client
Function
The instrument is equipped with the FTP transmission function (FTP client). You can send data to
the FTP server on the network.
FTP transmission method
Real-time save data transmission Automatically sends waveform data during measurement.
Congure the real-time save settings and specify the save destination to
[FTP].
Auto-save data transmission Automatically sends save target data on completion of the measurement,
according to the auto-save settings.
Congure the auto-save settings and set the save destination to [FTP].
Transmission with the save icon When you click the save icon, the data to be saved is automatically sent.
In the manually-saving setting, set the save destination to [FTP].
• The date of a le sent to the computer is set at when the le was sent.
• Transmission to all FTP servers is not necessarily guaranteed due to differences among servers.
• If a le with the same name exists in the destination, the le is overwritten.
193
Sending Data to a Computer With the FTP Client Function
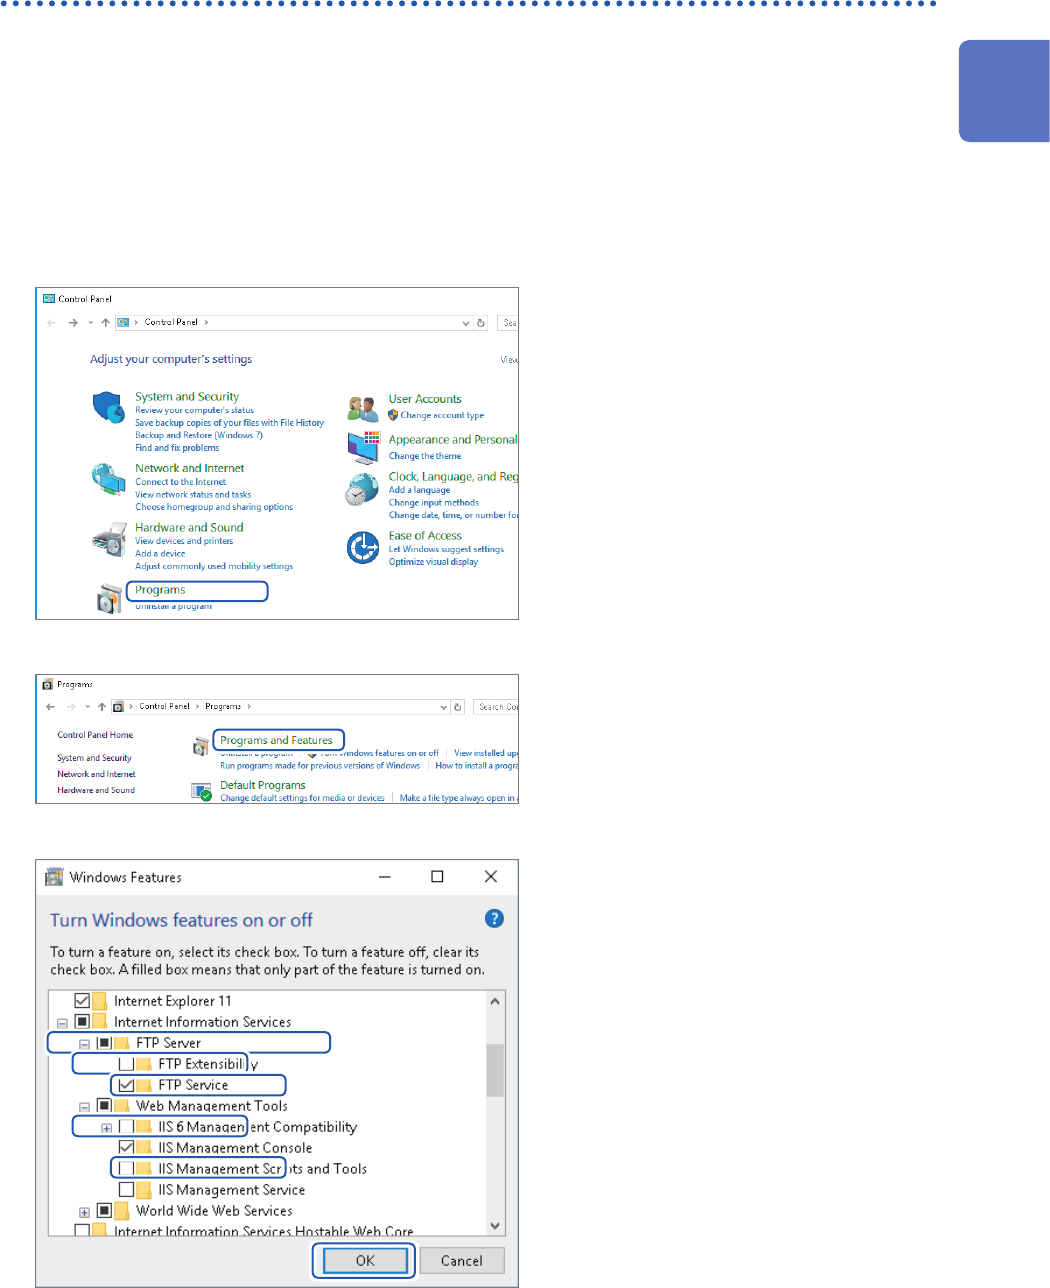
Conguring an FTP server setting on a computer
The following example shows how to congure the FTP server settings on Windows 10.
The Microsoft
®
Windows
®
Home Edition does not include any FTP server. Use free software such
as the FileZilla Server.
• The setting contents may vary with environment. When necessary, refer to the help topics of the
FTP server or consult your network administrator.
• Microsoft
®
Windows
®
administrator privileges are required for setup.
Enabling the FTP
1
Start [Control Panel], and then
click [Programs].
2
Click [Turn Windows features on
or off].
The [Windows Features] dialog box
appear.
3
Click [+] on the left of [Internet
Information Services] to expand it.
Click [+] on the left of [FTP Server]
to expand it, and then choose [FTP
Service].
Click [+] on the left of [Web
Management Tools] to expand it,
and then select [IIS Management
Console].
Click [OK].
11
Connecting the Instrument to Computers