MR8740T_user_manual_eng_20191016H.pdf - 第202页
197 Sending Data to a Computer With the FTP Client Function Conguring the FTP client setting with the instrument > [System] > [Comm.] 1 Click [FTP Client] . The setting dialog box will appear . 2 3 4 5 6 7 2 Click…
196
Sending Data to a Computer With the FTP Client Function
Congure the access user setting
Congure this setting to use the FTP client with the instrument. (See step 4 “Enter your login name
and password in the [Login] and [Password] boxes, respectively” on p. 197.)
You can use the FTP with a user name and password you specied.
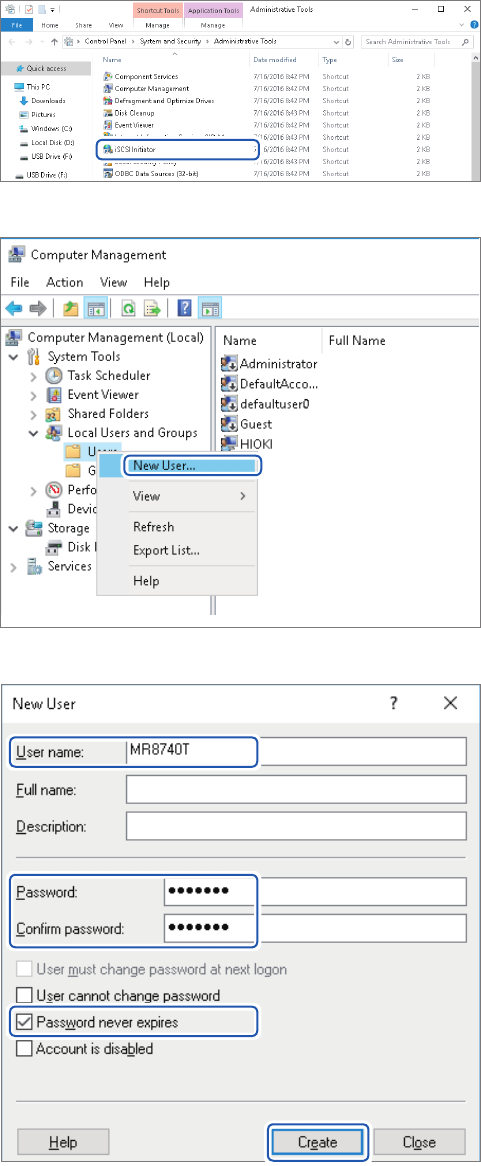
11
Choose [Computer Management]
in [Administrative Tools]
mentioned in step
5
(p. 194).
12
Right-click [Users] under [Local
Users and Groups], then choose
[New User].
13
Enter your user name, password,
and the same password entered
in the [User name], [Password],
and [Conrm password] boxes,
respectively, then select the
[Password never expires] check
box.
14
Click [Create].

197
Sending Data to a Computer With the FTP Client Function
Conguring the FTP client setting with the instrument
> [System] > [Comm.]
1
Click [FTP Client].
The setting dialog box will appear.
2
3
4
5
6
7
2
Click the [Server] box and the [Port] button in turn.
Click the boxes to open the touch key or the numeric input dialog box.
Enter a computer name or an IP address in the [Server] box. In the [Port] box, enter a port number with which
the FTP server is operating if the number is not the standard number of 21.
3
Enter a directory name in the [Directory] box.
Choose a directory of the FTP server you would like to save data into.
4
Enter a login name and password to use for logging in to the FTP server in the [Login] and
[Password] box, respectively.
Enter the user name and password specied for the FTP server of the computer.
Refer to “Congure the access user setting” (p. 196).
5
Click the [PASV Mode].button to choose a PASV mode setting.
To establish communications in PASV mode, set it to [On].
6
Click any of the buttons in the [Adding] area, and choose an identier.
Click the buttons to add identiers to the le name.
• No identiers are added when you select a le to be sent on the le screen. Files with the same name are
overwritten.
• When you have congured the setting to append numerical calculation results to existing les (when you set
the [Calculation result] button to [On] or choose [Append] in the [File] box), no identiers representing
time of day are added.
• Moreover, if a le with the same name exists, the instrument tries to append the le.
• No button in the [Adding] area is enabled, a le with the same name is overwritten when it exists. Note that
all les with the same name will be overwritten if [Date&Time] is disabled with the continuous measurement
setting and some others.
7
Click the [UTF-8] button to choose an UFT-8 support setting.
11
Connecting the Instrument to Computers
198
Sending Email messages
11.4 Sending Email messages
The instrument is equipped with the email transmission function. You can send email messages to
computers in the network or to those installed in remote locations via the SMTP server. Moreover,
you can install the instrument in a remote location and collect measured data through an email
attachment.
How to send email messages
Auto-save email message Automatically sends an email message with data saved on completion
of measurement attached, according to the auto-save settings.
Set [Auto save settings] to [On] and choose [Mail] in the [Media] box
in advance. (p. 84)
Manual email transmission with
the save icon
When you click the save icon, an email with the data saved attached is
automatically sent. Set the [Media] box of the manual save setting to
[Mail] in advance.
Test email message Checks if an email message is successfully sent.
Encryption of email attachments
You can encrypt email attachments, such as screen data and measured data, to prevent it from
getting into outsiders.
• If transmission conditions are frequently satised, email messages will frequently be sent.
• Data size of an email attachment may get extremely large. Depending on the communication
environment, an email message cannot correctly be sent if the size is extremely large.
• Email attachment data is encrypted in ZIP format by WinZip 128-bit AE-2 / AES encryption.
Encrypted les can be unzipped by Corel WinZip or free software such as 7z. (The WinZip AES
encryption is much securer than the standard zip encryption; however, supporting software
is limited. The built-in ZIP feature of Microsoft
®
Windows
®
cannot unzip encrypted les in this
format.)
• Files are encrypted by 128-bit AES encryption. Presently, this encryption method is sufciently
strong; however, Hioki does not guarantee that les are never decrypted.
• Do not reveal your encryption password to outsiders. Note that you cannot decrypt any les if you
forget your password or enter an invalid password.
• When you have set or changed the password, send a test email message rst to check whether
you can unzip an attachment before actual use.
• Encrypted ZIP les are not compressed.
• When les are encrypted and zipped, sending email messages require a long time due to
conversion time.
• The instrument supports pop-before-smtp and smtp-auth (PLAIN, LOGIN, CRAM-MD5) as the
SMTP authentication (since the instrument does not support IMAP, SSL, or STARTTLS, you
cannot send email messages to some mail servers, such as Gmail).
• We cannot guarantee transmission to all SMTP servers due to differences among servers.
• AES is the encryption standard specied in the U.S. Federal Information Processing Standard
(FIPS) PUB 197.
• The instrument have no email reception function but the transmission function.
• You cannot load any compressed and encrypted data as it is on the instrument or on the Wave
Viewer (Wv).
*: Trademark of another company