MR8740T_user_manual_eng_20191016H.pdf - 第53页
48 Conguring Measuring-Module-Specic Settings 4 Click the [Burn out] box, and then choose between [On] and [Off] from the list for the wire break detection setting. Y ou can detect a broken thermocouple wire during tem…
47
Conguring Measuring-Module-Specic Settings
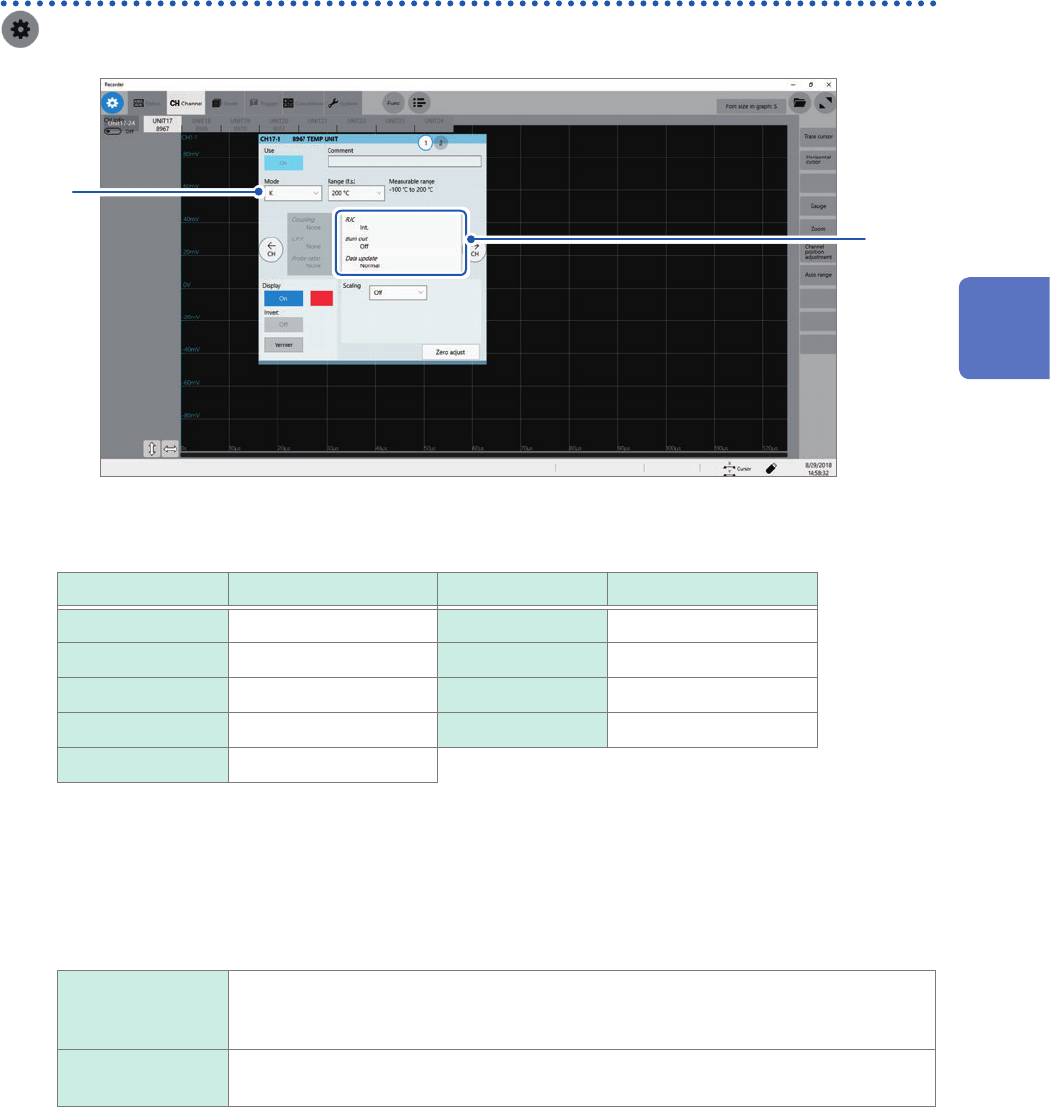
Conguring Model 8967 Temp Unit settings
> [Channel] > [8967]
1
2
3
4
5
6
1
Click the [Mode] box, and then choose a thermocouple type from the list.
Choose an option depending on the type of a thermocouple to be used.
Mode Measurable range Mode Measurable range
K
−200°C to 1350°C R 0°C to 1700°C
J −200°C to 1100°C S 0°C to 1700°C
E −200°C to 800°C B 400°C to 1800°C
T −200°C to 400°C W 0°C to 2000°C
N −200°C to 1300°C
2
Click the area that includes [RJC].
The setting dialog box appears.
3
Click the [RJC] box, and then choose between [Int.] and [Ext.] from the list for reference
junction compensation.
Int.
Executes the reference junction compensation inside the module.
(Measurement accuracy: The sum of the accuracy of the temperature measurement
and that of the reference junction compensation)
Ext. Does not execute the reference junction compensation inside the module.
(Measurement accuracy: The accuracy of the temperature measurement only)
When connecting a thermocouple directly to the module, choose [Int.].
When connecting a thermocouple via a reference junction device that includes a zero-point bath, choose [Ext.].
3
Advanced Functions

48
Conguring Measuring-Module-Specic Settings
4
Click the [Burn out] box, and then choose between [On] and [Off] from the list for the wire
break detection setting.
You can detect a broken thermocouple wire during temperature measurement. If a thermocouple wire breaks,
measured values will uctuate.
Off
Does not check wires for a break.
On Check wires for a break by owing about a minuscule current of 100 nA through the
thermocouple.
If the thermocouple wires are long or have a relatively high resistance, set [Burn out] to [Off] to avoid
measurement errors.
5
Click the [Data update] box, and then choose a data update interval from the list.
Fast Updates data about every 1.2 ms.
Choose this option for a quicker response. However, choosing this option causes some
increase in noise superimposed on input signals.
Normal
Updates data about every 100 ms.
Choosing this option eliminates noise, leading to stable measurement.
Slow Updates data about every 500 ms.
Choosing this option leads to stabler measurement.
6
Click [Close].
The setting dialog box closes.
49
Conguring Measuring-Module-Specic Settings
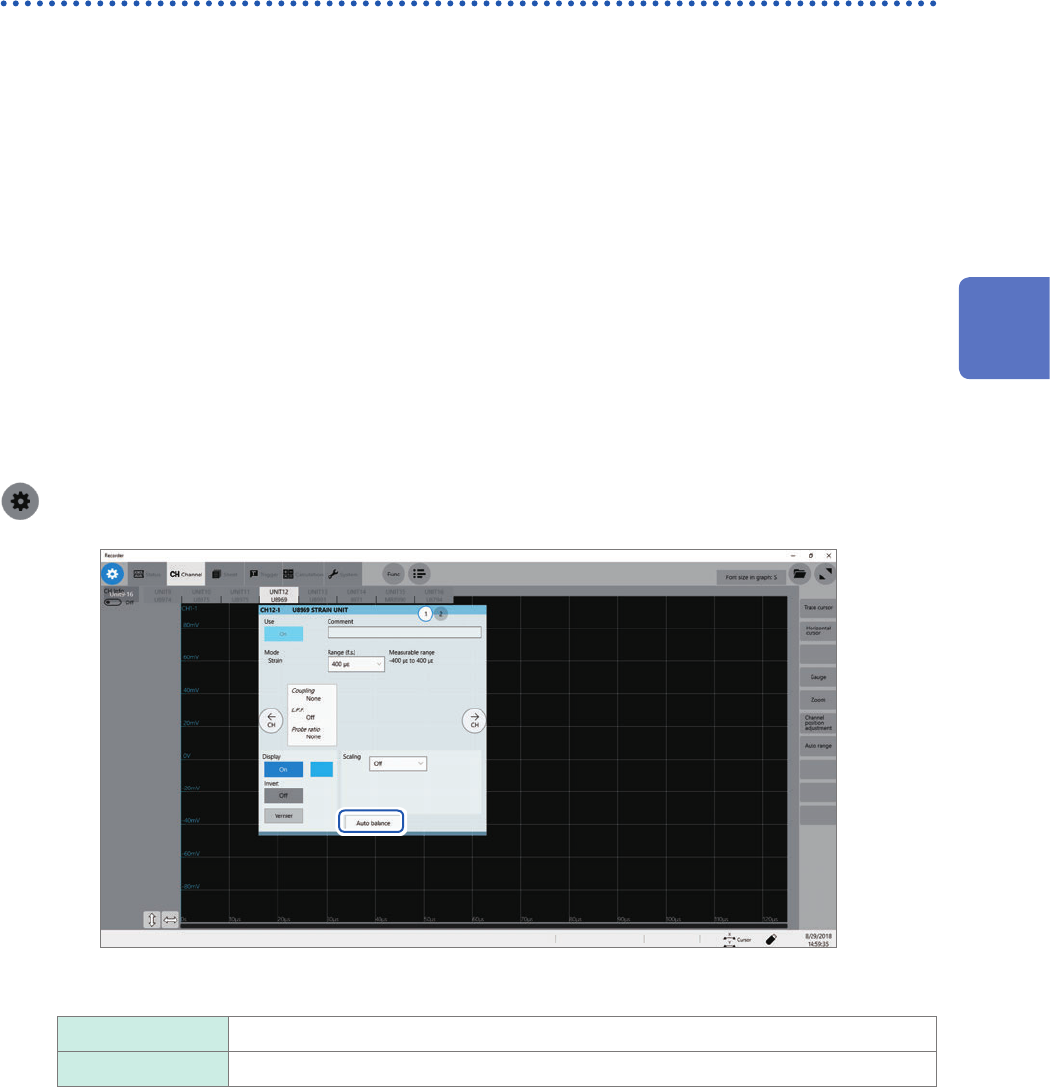
Conguring Model U8969 Strain Unit settings
Model U8969 Strain Unit can execute auto-balance.
Executing auto-balance regulates the reference output level of a transducer at the specied zero
position. Auto-balance is available for Model U8969 Strain Unit only.
You can use Model 8969 Strain Unit you own with this instrument. The instrument displays the
model name of Model 8969 Strain Unit as [U8969].
Before executing auto-balance
• Turn on the instrument and leave it for 30 minutes to allow the internal temperature of the module
to stabilize.
• After connecting a strain gauge converter to the module, execute auto-balance without any input
including distortion.
• You cannot execute auto-balance during measurement.
• No operation is accepted during auto-balance.
To execute auto-balance on the channel screen of each channel
> [Channel] > [U8969]
Click [Auto balance], and then choose an auto-balance setting from the list.
One channel only Executes auto-balance for only a channel displayed on the channel screen.
All Executes auto-balance for all of the channels Model U8969 is installed in.
3
Advanced Functions