MR8740T_user_manual_eng_20191016H.pdf - 第64页
59 Conguring Measuring-Module-Specic Settings Conguring Model U8974 High V oltage Unit settings > [Channel] > [U8974] 3 1 2 1 In the [Mode] area, click the [DC] or [RMS] to choose a measurement mode. DC For vo…

58
Conguring Measuring-Module-Specic Settings
5
Click the [Calibration] box, and then choose a calibration setting from the list.
Enabling this setting automatically calibrates the module or synchronizes the channels at the start of
measurement. The synchronization between channels allows integration calculations to synchronize with each
other.
Off
Does not calibrate the module nor synchronize the channels.
On Calibrates the instrument and synchronizes the channels.
Synchronization Synchronizes between channels only.
• It takes about 150 ms to calibrate the module. During this period of time, no measurement is performed.
• If the channels are synchronized with each other, the instrument sends a signal that interrupts the integration
to each module at the start of measurement; thus, the instrument has to wait until the rst integration
nishes.
The wait time required for this process stands at the sum of 10 ms and integration time*.
*: The integration time varies depending on the NPLC setting.
Even when synchronization is not performed, the wait time described above is required for measurement
performed immediately after the settings of Model MR8990 Digital Voltmeter Unit has been changed. No
wait time is required when the measurement is performed without any setting changes
• When [Calibration] is set to [Off] (default setting), execute calibration manually.
Refer to “2.9 Executing Calibration (For the Instrument With Model MR8990 Installed)” in Quick Start
Manual.
6
Click [Close].
The setting dialog box closes.
59
Conguring Measuring-Module-Specic Settings
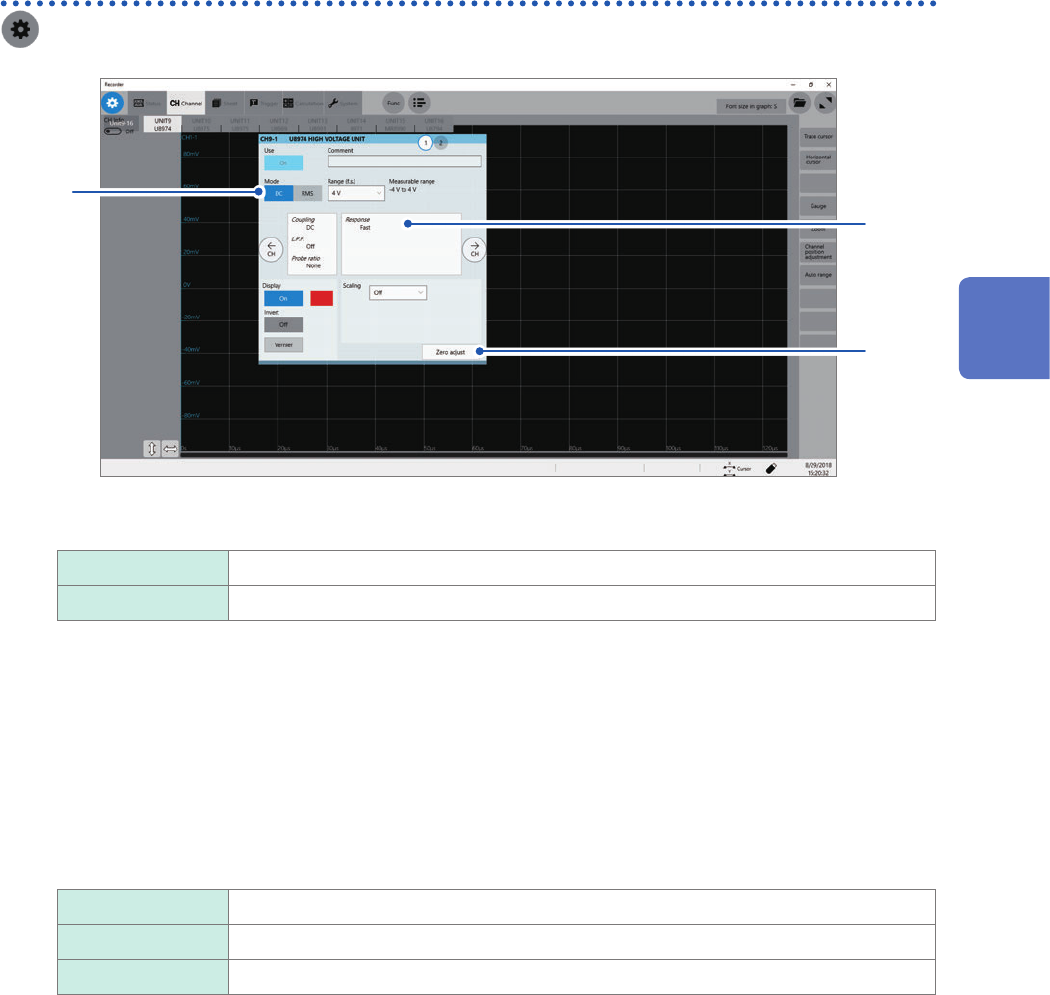
Conguring Model U8974 High Voltage Unit settings
> [Channel] > [U8974]
3
1
2
1
In the [Mode] area, click the [DC] or [RMS] to choose a measurement mode.
DC
For voltage measurement
RMS For RMS measurement
2
(When you have changed the measurement mode) Click [Zero adjust].
The instrument performs zero-adjustment. Execute zero-adjustment without any input.
3
Click the area that includes [Response].
The setting dialog box appears.
4
Click the [Response] box, and then from the list, choose a response time for RMS
measurement.
Fast
Sets the response time at 150 ms.
Normal Sets the response time at 500 ms.
Slow Sets the response time at 2.5 seconds.
Setting the response time to [Slow] can stabilize measured values if frequency is relatively low or voltage
uctuates severely.
5
Click [Close].
The setting dialog box closes.
3
Advanced Functions
60
Conguring Measuring-Module-Specic Settings
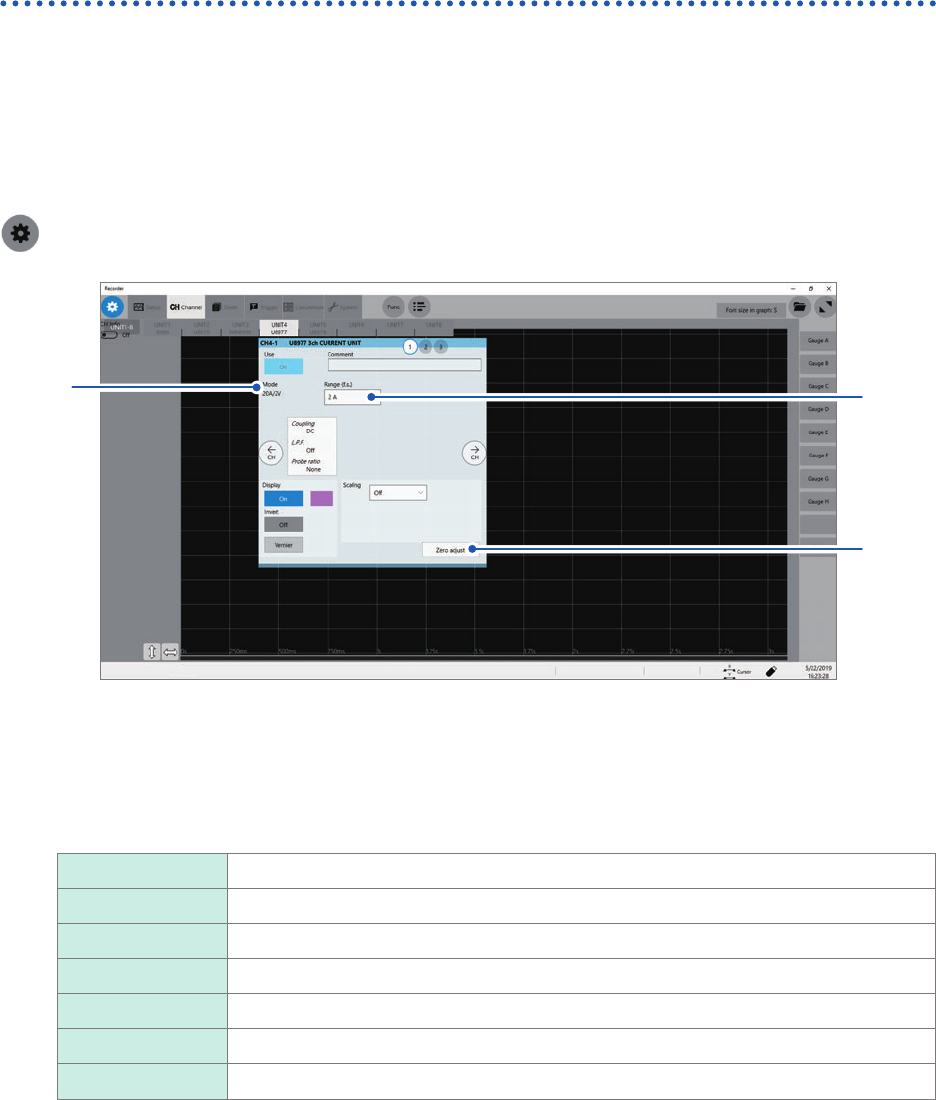
Conguring Model U8977 3CH Current Unit Settings
Each of Model 9709, Model CT6860 series, and Model CT6840 series consists of a current sensor
with the sub model-number “-05,” which has a metal connector, and that without the sub model-
number “-05,” which has a black plastic connector.
You can directly connect a current sensor that has the sub model-number “-05,” which has a
metal connector, with Model U8977 U8977 3CH Current Unit. Using Model CT9900 Conversion
Cable, you can connect a current sensor without the sub model-number “-05,” which has a plastic
connector (PL23), with Model U8977 3CH Current Unit.
> [Channel] > [U8977]
3
1
2
Current sensors to be connected determine whether the instrument automatically recognizes mode
or whether you have to choose a current sensor setting.
1
(When the instrument automatically recognizes mode) Conrm the output rate displayed in
the [Mode] area.
Available measurement ranges, which depend on automatically recognized output rates, are as follows:
20A/2V 2 A, 4 A, 10 A, 20 A, 40 A, 100 A
50A/2V 4 A, 10 A, 20 A, 40 A, 100 A, 200 A
200A/2V 20 A, 40 A, 100 A, 200 A, 400 A, 1 kA
500A/2V 40 A, 100 A, 200 A, 400 A, 1 kA, 2 kA
1000A/2V 100 A, 200 A, 400 A, 1 kA, 2 kA, 4 kA
2000A/2V 200 A, 400 A, 1 kA, 2 kA, 4 kA, 10 kA
None When no current sensor is connected.