00191413-01.pdf - 第507页
User Manual Line Computer UNIX 16 MaDaMaS Software Version 501.xx 01/99 Issue 16.2 MaDaMaS Evaluation User Interface 16 - 11 NOTE The scre en pri ntout s creat ed by mean s of the "Pri nt to a fi le" op tion ar…
16 MaDaMaS User Manual Line Computer UNIX
16.2 MaDaMaS Evaluation User Interface Software Version 501.xx 01/99 Issue
16 - 10
16.2.2 FILE Menu
This section only contains a description of the "Print" menu option. The remaining menu options are described
in detail in chapt. 2.
16.2.2.1 Setting Printer Options
- Printer
This menu item contains the menu options "Screen printout" and "Graphic printout".
The "Screen printout" option permits a printout of the current evaluation window to be printed out on
the printer set under "OPTIONS --> Printer", or the screen contents can be printed to a file.
The "Graphic printout" permits the complete evaluation currently displayed to be output to the selected
printer.
Creating a hardcopy:
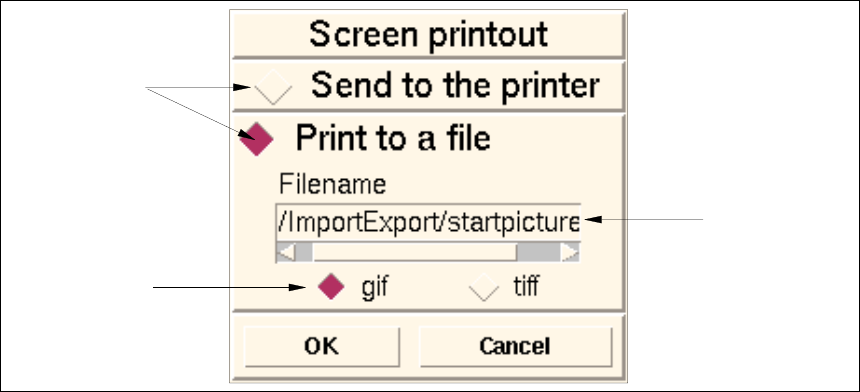
● Click on FILE --> Printer --> Screen printout.
The following window for setting the printer options is opened.
● Activate the Send to the printer button if the screen contents are to be output to the printer.
● Click on OK.
The window is closed and the current evaluation screen is printed out.
● Activate the Print to a file button if the screen printout is to be printed to a file.
● Click on the button adjacent to the desired file format.
● Click on OK.
The window is closed and the screen contents (after a signal tone has sounded twice) are stored
as a file under the name of the current evaluation screen and with the set file format in the path
"/u/ImportExport".
name
of print file
file format of
the print file
command
button

User Manual Line Computer UNIX 16 MaDaMaS
Software Version 501.xx 01/99 Issue 16.2 MaDaMaS Evaluation User Interface
16 - 11
NOTE
The screen printouts created by means of the "Print to a file" option are displayed as files in the Import/
Export data partner and can be copied using the Data Manager (see chapt. 4).
The files can be identified by their names (e.g. "pick-up reliability".gif or "pick-up reliability".tiff). An excep-
tion is the "Overall view" window as it is stored under the name "startpicture.gif" or "startpicture.tiff".
Starting the graphic printout:
● Click on FILE --> Printer --> Graphic printout.
The current evaluation is output to the printer.
16.2.3 EVALUATIONS Menu
The desired evaluation type can be selected by means of the menu options of these menus.
NOTE
Whenever an evaluation type is selected on the menu, also the underlying evaluation period (time base) must
be selected. The end of this period is always the current time, the start can be set using the three icons in the
upper portion of the command area (see section 16.2.5).
- "Overall view" evaluation type
● Select EVALUATIONS --> Overall view.
The current status of every station of the line since the last evaluation period set under "Time
basis" is displayed (see section 16.2.6).
- "Pick-up reliability" evaluation type (only possible for placement stations)
● Select EVALUATIONS --> Pick-up reliability.
For all stations of the line the total number of the components placed, identity errors and vacuum
errors occurred since the last evaluation period set under "Time basis" are displayed (see section
16.2.7).
- "Availability" evaluation type (available for all stations)
● Select EVALUATIONS --> Availability.
The availability data of all stations of the line is displayed for the period that has elapsed since the
last evaluation period that was set under "Time basis" (see section 16.2.8).
- "Performance" evaluation type (only possible for placement stations)
● Select EVALUATIONS --> Performance.
The performance of all placement stations of the line is displayed for the period that has elapsed
since the last evaluation period that was set under "Time basis" (see section 16.2.9).
16 MaDaMaS User Manual Line Computer UNIX
16.2 MaDaMaS Evaluation User Interface Software Version 501.xx 01/99 Issue
16 - 12
16.2.4 OPTIONS Menu
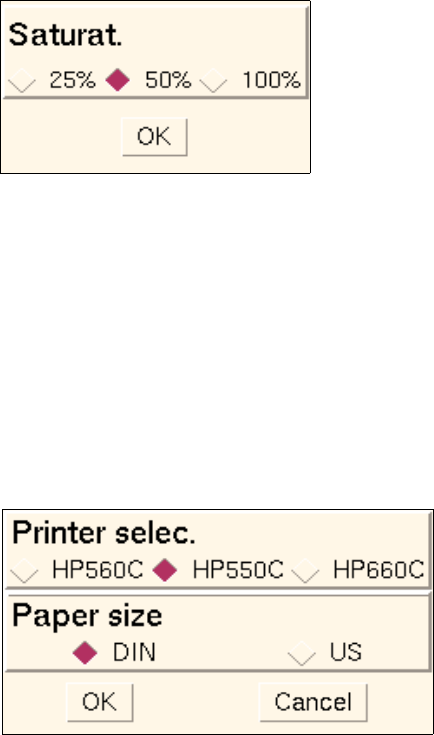
- Colors
This option permits the color intensity (saturation) of the graphical displays to be selected in 3 steps.
● Select OPTIONS --> Color setting.
The following window is opened.
● Click on button in front of the desired value.
● Confirm your selection with OK.
The window is closed. The graphics displayed in the view area are shown in the selected color
intensity.
- Printer
This option permits a printer installed in the LC system to be selected on which the MaDaMaS data
are to be printed out. In addition, the required paper size can be set as well.
● Select OPTIONS --> Printer.
The following window is opened.
● Activate the respective buttons in front of the desired printer and the paper size.
● Confirm your selection with OK.
The window is closed.