SM_SXDX12_intern_03-2017_en.pdf - 第25页
Service Work Prepare the guide carriage Y-guide carriage / Y-loose bearing Replace Service Manual (Internal) SIPLACE SX1/SX2/DX1/DX2 25 2.6.1 Prepare the guide carriage ▪ P lace the "adapte r with groo ve" 0307…
Service Work
Y-guide carriage / Y-loose bearing Replace
24 Service Manual (Internal) SIPLACE SX1/SX2/DX1/DX2
2.6 Y-guide carriage / Y-loose bearing Replace
Required spare parts
2 x 03059084Sxx Guide Carriage Y MRC 25-G2-V1
Includes:
1 x 03059084-xx Guide Carriage Y MRC 25-G2-V1
1 x 00316894-xx DIN 125-A 3.2-140HV-A2
1 x 03069101-xx ISO 4762 - M 4 x 16-8.8, zinc, DSP
1 x 03074058-xx Adapter with groove
4 x 03046828-xx DIN912-M6 x 12-8.8, zinc. DSP
1 x 03076849Sxx Running Block LR205-2RSR
Includes:
2 x 03076849-xx Running Block LR205-2RSR
2 x 03042601-xx Roller axle D25
2 x 03042601-xx ISO 4762 - M 10 x 35-A2-70
2 x 03076895-xx Slice Distance- 34x20.5x3.0
Consumables required:
02101037-xx LOCTITE 241 SCHRAUBENSICH. Medium strenght
00318197-xx Thread red lock
Tools required
1 x 60519813-xx Gantry lift, SX1/2 CoD
1 x 60519814-xx gantry carrier, SX1/2 CoD
4x 03082592-xx Cardboard lid for 03064172-01
2x 03097870-xx Plastic wedge, 65 x 180mm → wedge, plastic, 65 x 180mm
1 x 03097897-xx copper hammer, 750 g
4 x 03097977-xx safety cover Y magnets SIPL.SX1 - → safety cover Y-magnet SIPL.SX1_2
1 x 00375988-xx label: Warning of a magnetic field
1 x 00386029-xx label: Warning hand injuries
1 x 00386030-xx label warning for strong magnets
1 x 00195600-xx TI Safety note maglev, D + E
2 x 03067676-xx Transport Lock X-Rail, cpl
1 x 00376625-xx Torque wrench with reversible ratchet
1 x 03065304-xx spacer for Y magnets
1 x 03071361-xx read head MS20.xxM / test device PG-U
1 x 03090774-xx feeler gauge 0,75mm plastic
Standard tool kit from service suitcase
1 x 00376492-xx set-hexagon socket cranked screw key
1 x 00096290-xx open end wrench set
1 x 00376516-xx Wrench set 1/4 inch
1 x 00094020-xx feeler gauges
1 x 00376515-xx flashlight
Service Work
Prepare the guide carriage Y-guide carriage / Y-loose bearing Replace
Service Manual (Internal) SIPLACE SX1/SX2/DX1/DX2 25
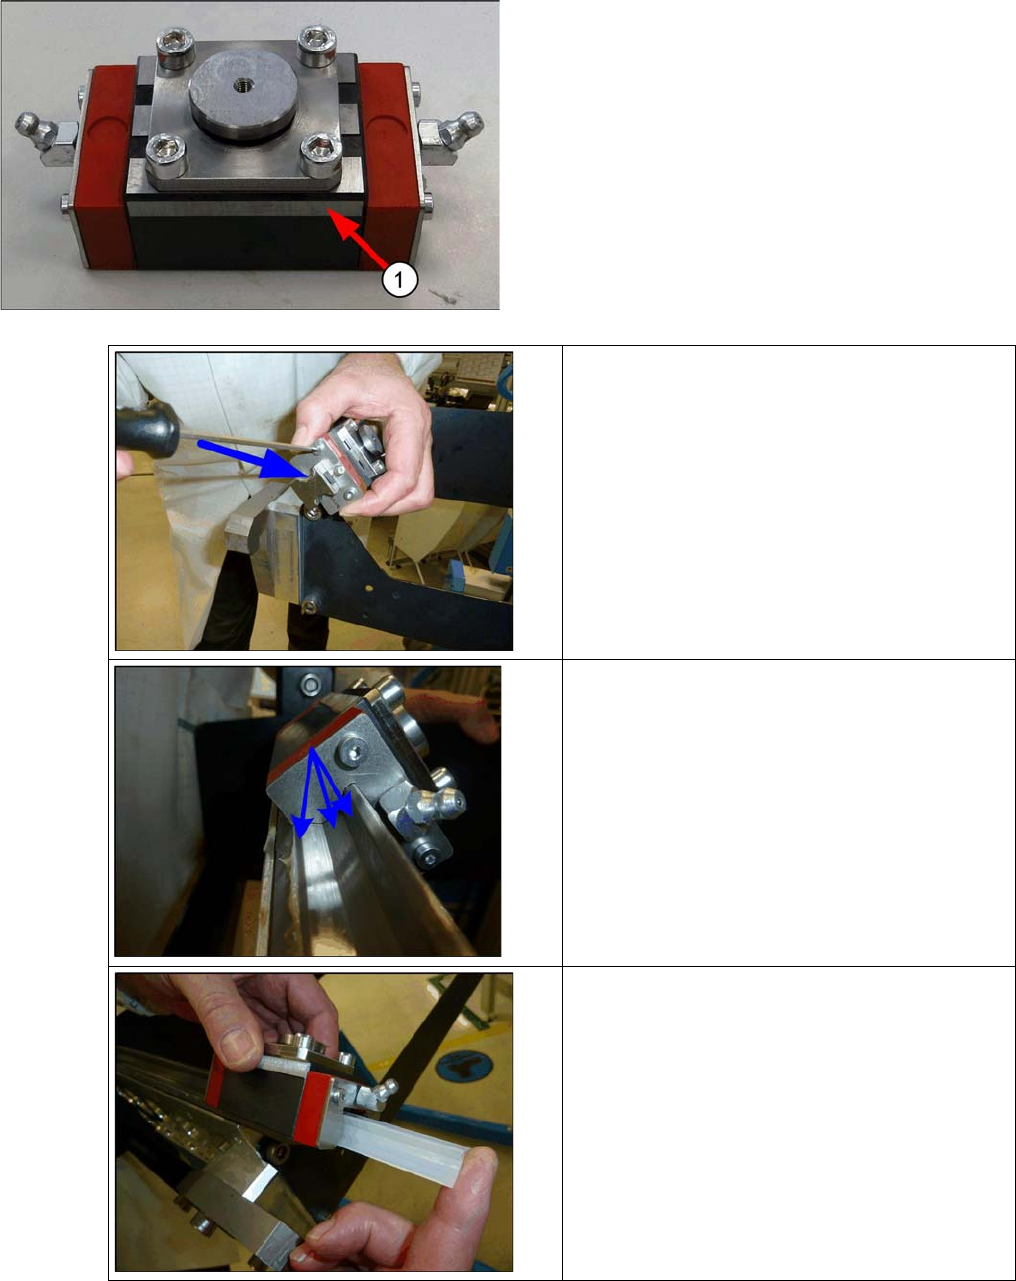
2.6.1 Prepare the guide carriage
▪ Place the "adapter with groove" 03074058-xx on the
guide carriage Y MRC 25-G2-V1 03059084-xx and fix
it with 4 DIN912-M6 x 12-8.8, verz.DSP bolts
[03046828-xx] The screws are by hand tightened.
▪ Press the adapter as shown in the image away from
the ground surface.
▪ The ground surface is later used as installation edge
at the gantry
.
▪ Tighten the screws (10Nm) and mark the position
with the "thread red lock paint" .
▪ 1. ground surface
▪ Insert the new guide carriages into the guide
rail. (for example on the gantry carrier)
▪ Ask the stripping plates so that they do not r
ub
a
gainst the guide rail. An air gap must be on
both sides between the rail and wipers .
▪
▪ Insert this again onto the plastic rail.
Service Work
Y-guide carriage / Y-loose bearing Replace Replacing the storage Cart
26 Service Manual (Internal) SIPLACE SX1/SX2/DX1/DX2
Unplug the cable trailing.
See also Chapter 3.3.12 SX1_2 Service Manual Y-trailing cable exchange [03075584-xx]
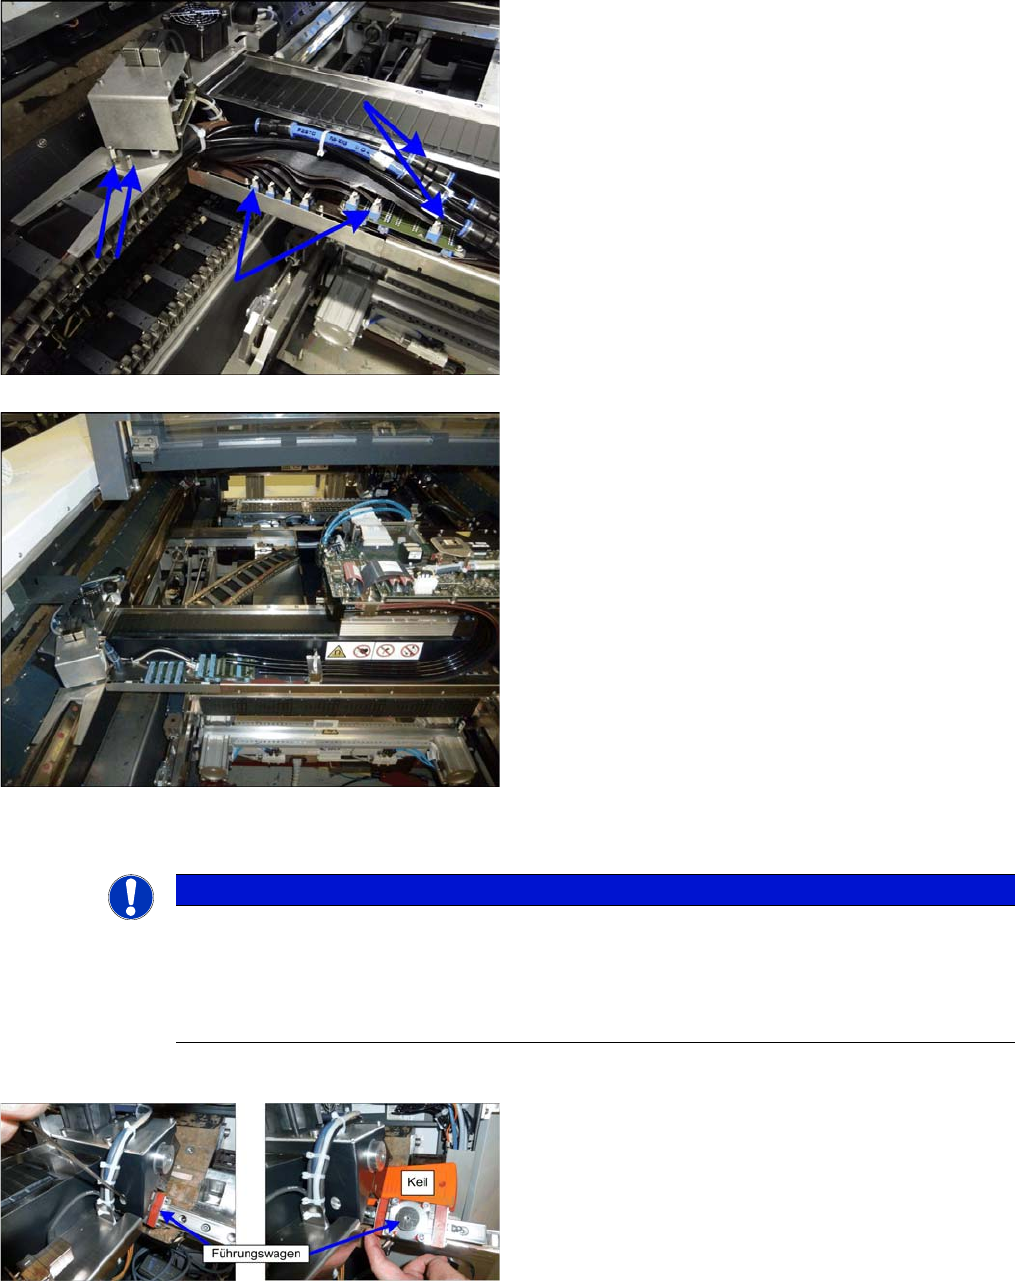
2.6.2 Replacing the storage Cart
▪ Dismantle each two magnets as described in chapter "replacement / extension of Y magnets.
▪ Unplug the ribbon cable and hose the Y-trailing cable
to the portal interface X-and Y-axis drag.
▪ Release the two hexagons spacer bolts at the Y sen-
sor module holder.
▪ Connect the trailing cable so in the machine, that it
can not be damaged, when the gantry will be moved
out of the machine.
NOTICE
In certain circumstances there is a one 40μ thin slice placed underneath the adapters.These
are not part of the pact, and spare parts are placed depending gantry. If the document is placed
under the head-side or on the gantry side of the fixed bearing dependents on the hysteresis by
the gantry island fabrication. This must be used again for the new bearing. This is inserted be-
tween "adapter with groove (bearing mushroom" and gantry.
Slide the gantry to the outside, so that the magnets do not
have any effect on it anymore.
Loose the screw of the guide carriage.
Place a plastic wedge under the motor, so that you can
pull out the guide carriage. Slide the guide carriage off the
guide rail on the additional transport protection from the
spare parts kit guide carriage.