KE-2030使用说明书 - 第205页
4 – 106 ⑤ X1, Y 1, Z These paramet ers set t he coordinates of the f eeder component pickup posit ion. W hen the items “Sply”, “Pos”, “T ype”, and “Lane” are set , these values are automatically calculated and shown. Onc…

4 – 105
① Sply (Supply)
See the description of "Sply" for a tape feeder.
② Angl (Angle)
See the description of "Angle" for a tape feeder.
③ Pos (Position)
This parameter sets the feeder mounting hole number into which the stick
feeder positioning pin is inserted.
●
When a number is changed, the parameters to the right of “Pos” are
initialized, then become blank.
As soon as a number is entered, overlap is checked for the existing tape
feeders, tray holders and bulk feeders. If the same number already exists,
the entry is rejected with an error message shown on the screen.
④ Lane
This parameter is used to specify the lane.
●
The lanes are numbered 1, 2, 3... from the left, facing the machine, both on
the front and rear sides. See the figure below.
If a lane is already occupied, the entry is rejected with an error message
shown.
Note that this “Lane” parameter cannot be entered in Pick data when you
select a stick changer, and it becomes disabled, and an asterisk mark “*”
appears.
1
39
41
79
41
39
1 79
F-
63
R-
63
Lane 3 Lane 2 Lane 1 Lane 2 Lane 1 Lane 1
Feeder mounting holes
Transport path
Lane 1 Lane 2 Lane 1
Lane 1
Example of lane numbers assignment

4 – 106
⑤ X1, Y1, Z
These parameters set the coordinates of the feeder component pickup position.
When the items “Sply”, “Pos”, “Type”, and “Lane” are set, these values are
automatically calculated and shown. Once a value is entered to each coordinate,
you can change it (by teaching also).
CAUTION
To avoid a risk of injury, do not place your hand in the machine, nor
move your face or head close to the machine while the machine is
performing teaching operation.
CAUTION
If the bank is never recognized (since the machine zeroes, or the bank
moves down then up), it may be recognized automatically before the
machine moves to the pick position. Since the head moves across the
feeder while the feeder bank is being recognized, do not place your
hand in the machine, nor move your face or head to the machine.
Especially, take care when the feeder bank is recognized not from the
menu but during teaching or tracking a pick position.
4 – 107
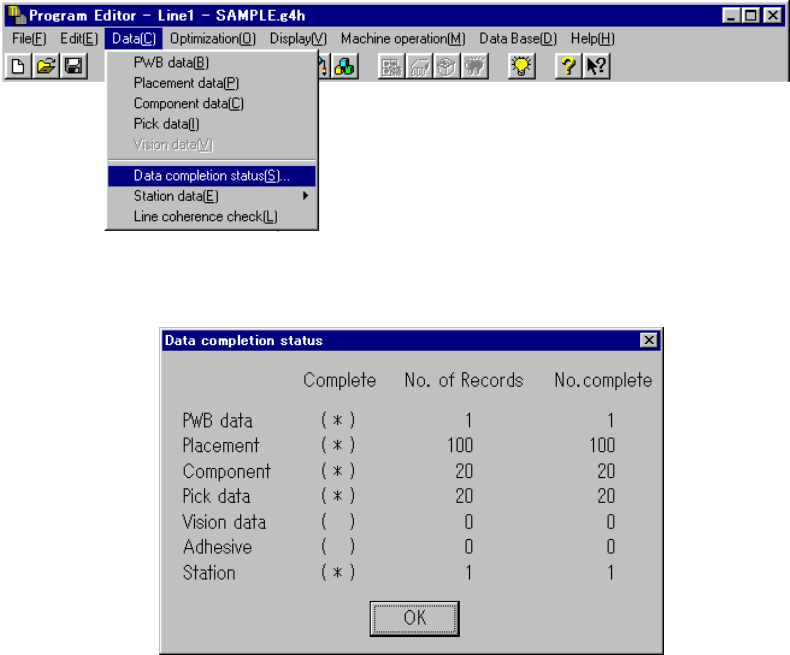
4.9 Checking Data Completion Status
4.9.1 Data completion status
Invoke this command from the Data menu.
When you click the [Data completion status] command, the following dialog box
appears on the screen.
The dialog box shown above displays the number of input records as the menu item
“No. of Records”, the number of completed records as the menu item “No. complete”,
and whether each type data is completed or not as the menu item “Complete”.
Each display item is described below:
① Complete
Displays whether each type of data is completed or not.
(*) data is completed.
( ) data is not completed.
If the value of the menu item “No.of Records” is equal to that of “No. complete”,
the data is handled as “completed”.
② No. of Records
Displays the number of input records regardless of whether each record is
completed or not, that is, displays the total number of records including
incomplete records.
③ No. of complete
Displays the number of records entered completely, that is, displays the number
of records whose necessary items are all entered.
When you click the <OK> button, the machine returns to the data screen from
which you invoked this command.