KE-2030使用说明书 - 第466页
6 − 120 6.6.2 Display of the production status W hen the <START> switch is pressed and the product ion starts, the status of the production (the sam e as that of the board pr oduction) appears on t he screen. For d…
6 − 119
⑧ Pick tracking
Using the radio button, set whether or not to perform pickup tracking before
blank run by the camera, and also the types of tracking.
⑨ Tracking Station
Select on which station the placement tracking or pick up tracking is to be
performed.
⑩ Automatic interval
Enter the interval of automatic run.
⑪ PWB wait time
Set the time-out duration which starts production if the IN sensor does not
detect the board transported by the IN station after it is clamped with the OUT
station.
⑫ Prod. station (Production station)
Specify a station that is to be used for producing PWBs. When you select
“Let” or “Right” station, the system uses a station only at one side to produce
PWBs. Even though you need a station at only one side to produce PWBs,
create Pick data for both stations in a production program.
6.6.1 Starting the blank run
To start the blank run, press the <START> switch on the operation panel after setting
the desired blank-run conditions.
CAUTION
The head starts to move immediately after the <START> switch is
pressed, and then "Blank run" starts.
To avoid a risk of injury, do not place your hand in the machine, nor
move your face or head close to the machine during operation of the
machine.
Before pressing the <START> switch, check that there is no one who is
working in the machine.
Before pressing the <START> switch, check that there is no one who
can be injured when the head starts to move.
Before pressing the <START> switch, check that there are no obstacles
(tools and jigs) attached or left in the machine.
The green signal lamp lights to indicate that the blank run operation is in progress.
CAUTION
If the feeder bank is never recognized (since the machine is zeroed, or
the bank moves down then up), it may be recognized automatically
before the machine moves to the pick position. Since the head moves
across the feeder while the feeder bank is being recognized, do not
place your hand in the machine, nor move your face or head close to
the machine. Especially, take care when the feeder bank is
recognized not from the menu but during teaching or tracking a pick
position.
6 − 120
6.6.2 Display of the production status
When the <START> switch is pressed and the production starts, the status of the
production (the same as that of the board production) appears on the screen.
For details, see the section "Display of the production status" of the "PWB
production".
Any production management information is not created.
For the item of "Result", the number increases with the increasing number of
produced boards but it is not loaded into the production management information.
The Pause, Stop, and Exit commands used during blank run operation are the same
as those during the board production.
6.6.3 Monitoring by camera
Same as the "Monitoring by camera" of "Trial run".
6 − 121
6.7 Checking
After a component is attached on a head, use each hardware device to perform
various types of inspection.
6.7.1 Single/continuous verification check •
••
• Single/continuous SOT check
Refer to the supplied "Component Verification Operating Instruction".
6.7.2 Laser height check
6.7.2.1 Checking the laser height
Two mode: "Continuous check" and "Single check" are provided to check the laser
height. See Table below for the function provided in each mode:
Table 6.7.2.1
[Tool] menu Operation mode Description
Single check Checks a component which caused an error in
Continuous check mode individually.
Laser check Continuous check Checks all components or components which satisfy the
specified conditions in a production program. In Single
check mode, you can individually check a component
which the system failed to check for some reason.
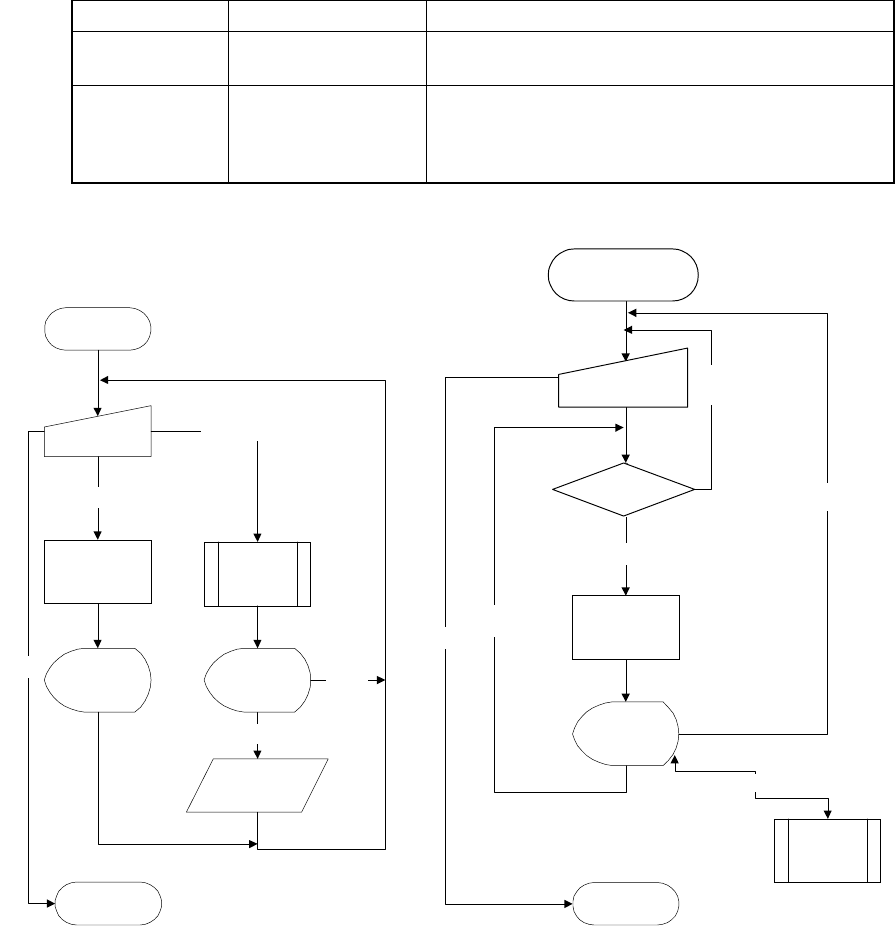
The operation flow for checking laser height is shown below.
レーザー高さ
単独検査開始
検査実行
(ダイアログ)
レーザー高さ
検査
結果表示
(ダイアログ)
レーザー高さ
単独測定終了
検査実行
終了
生産プログ
ラムへ結果
格納
確認
レーザー高さ
測定
レーザー高さ測定実行
結果表示
(ダイアログ)
キャンセル
レーザー高さ
連続測定開始
条件設定
(ダイアログ)
レーザー高さ検査
結果表示
(ダイアログ)
レーザ高さー
連続検査終了
対象部品あり
終了
次部品検査
対象
部品なし
検査対象
部品がある
か?
中止
レーザー高さ
単独検査
検査エラー
Start of laser
height single
check
Check (on the
dialog box)
Measurement of laser height
Execution of check
Check of laser
height
Measurement
of laser
height
Display of the
result (on the
dialog box)
Display of the
result (on the
dialog box)
Cancel
Check
Saving of the
result into a pro-
duction program
End
End of single
laser height
measurement
Figure 6.7.2.1.1 Operation flow for checking
the laser height in Single check mode
Figure 6.7.2.1.2 Operation flow for checking
the laser height in Continuous check mode
Any component
to be checked ?
Start of the continuous
laser height
measurement operation
Setting of the
conditions (on the
dialog box)
No component
satisfying the
conditions
Yes
Check of the
laser height
Display of the
result (on the
dialog box)
Check error
Single check
of the laser
height
Cancel
End
Check of the
next component
End of the
continuous laser
height check