00193922-01.pdf - 第196页
4 Setting up and commissioning User Manual SIPLACE HF Series 4.5 Setting up the placement machine Software Version SR.505.x x 05/2004 US Edition 196 4.5.12.6 F itting t he covers Æ Fix the grounding cable to eac h cover …

User Manual SIPLACE HF Series 4 Setting up and commissioning
Software Version SR.505.xx 05/2004 US Edition 4.5 Setting up the placement machine
195
4.5.12.4 HF/3 axis unit (gantry 3) - Connecting the plugs
Æ Connect the power cable as shown in the following diagram:
4
4
Æ Check the switch settings for S1
1: ON
2: ON
4.5.12.5 Fitting the axis unit
Æ Carefully lift the axis unit onto the rail in the extension kit.
Æ Make sure that you do not squash any cables.
Æ Push the axis unit into the extension kit as far as the stop.
Æ Connect the fan cable to the axis unit cable.
Æ Secure the axis unit with the fillister head screw.
Æ Insert the cover.
Æ Fix the grounding cable to the doors (item 2 in Fig. 4.5 - 14, page 188), as shown in Fig. 4.5 -
15 on page 190.
Æ Lock the doors.
HF/3 axis unit (gantry 3)
plug
Connecting cable
NOTE
Plug Cable
X21
X21
03009782
03009783
03009784
03009785
03009786 W1-W5
Secure connector with clips
X22
X22
03009802
03009803
03009804
03009805
03009807
Secure connector with clips
X4ur
X4ur 03009800 Snap connector into place
X4ut
X4ut 03009801 Snap connector into place
X1uo
X3uo
X5uo
X1uo
X3uo
X5uo
03009811
03009812
03009813
Insert as far as the stop
X1up
X3up
X5up
X1up
X3up
X5up
03009814
03009815
03009816
Insert as far as the stop
X9sq
X9sq 03010056 Screw tightly

4 Setting up and commissioning User Manual SIPLACE HF Series
4.5 Setting up the placement machine Software Version SR.505.xx 05/2004 US Edition
196
4.5.12.6 Fitting the covers
Æ Fix the grounding cable to each cover (item 5 in Fig. 4.5 - 14, page 188), as shown in Fig. 4.5
- 15 page 190.
Æ Fix each cover to the machine frame with 6 fillister head screws.
4.5.13 Fitting the main fault indicator
Æ Connect the main fault indicator cable to the cable of the basic machine.
Æ Fix the foot of the main fault indicator to the cross-beam of the basic machine.
4.5.14 Integrating the placement machine into the line
Æ Note the warning instructions described in section 4.5.2, page 162.
Æ The tools and equipment are listed in section 4.5.1, page 162.
User Manual SIPLACE HF Series 4 Setting up and commissioning
Software Version SR.505.xx 05/2004 US Edition 4.5 Setting up the placement machine
197
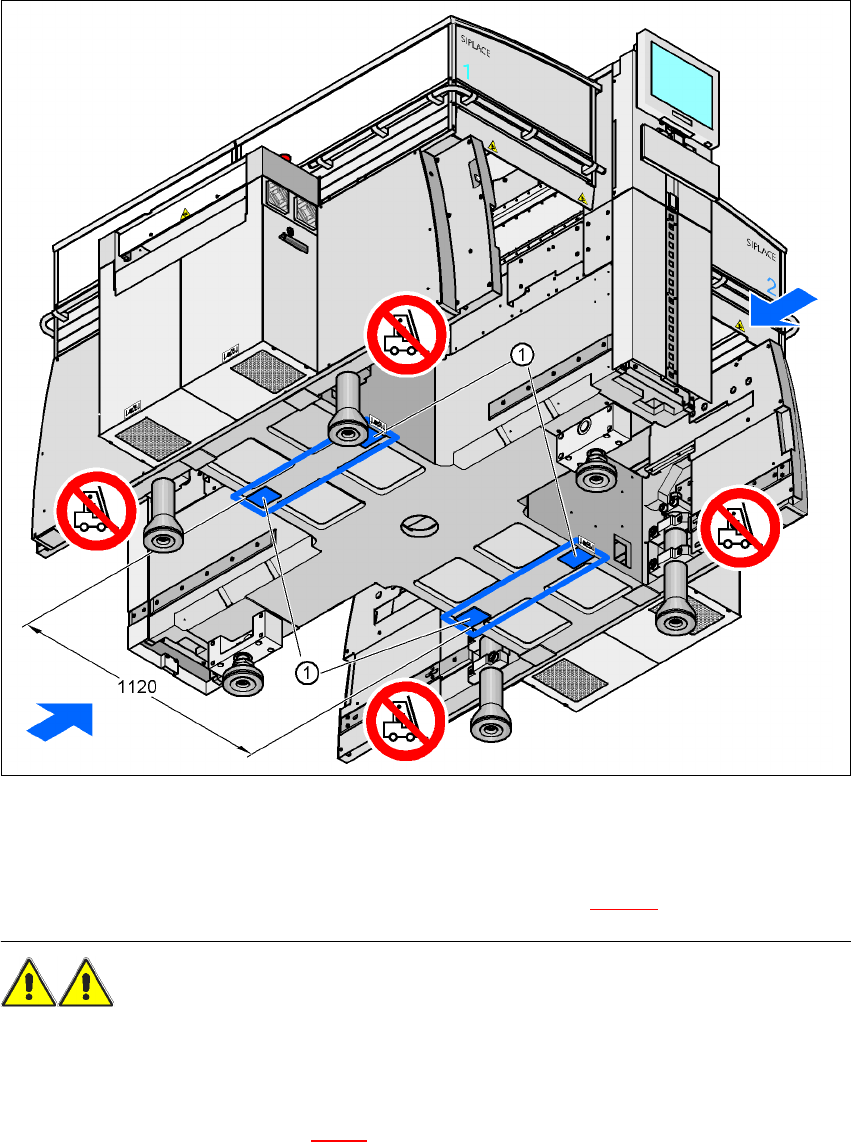
4.5.14.1 Positioning the fork-lift
4
Fig. 4.5 - 19 Contact surfaces - Forks across the direction of PCB transport
(1) Contact surfaces for the forks of the fork-lift
Æ Position the fork-lift across the direction of PCB transport and open the forks far enough so that
the machine's contact surface lies evenly on the forks (see Fig. 4.5 - 19
).
WARNING
Please note the following points
before
you raise the placement machine in order to avoid irre-
versible damage to the machine:
– The distance between the forks must be between 800 and 900 mm. The attachment surfaces
for the fork-lift are shown in Fig. 4.3 - 3
. The maximum distance between the contact surfaces
is 1120 mm. NEVER increase the distance between the forks so that the machine is lifted on
the side parts of the machine frame, since this would deform the machine frame.