00197551-01_MM_CPP-CP-Twin_Kunde_en.pdf - 第29页
Maintenance tasks for CPP 3.5.6 Cleaning the Light Barrier on the DP Drive Performing Main tenance Tasks Maintenance Manual SIPLACE Placement Heads CPP, C &P20, Twin 29 Checking error messages Cleaning the Light Barr…

Maintenance tasks for CPP
Performing Maintenance Tasks 3.5.5 Checking/Replacing the DP Vacuum Hoses
28 Maintenance Manual SIPLACE Placement Heads CPP, C&P20, Twin
3.5.5
3.5.5 Checking/Replacing the DP Vacuum Hoses
Checking/Replacing the DP Vacuum Hoses
3.5.6
3.5.6 Cleaning the Light Barrier on the DP Drive
Cleaning the Light Barrier on the DP Drive
Overview
NOTICE
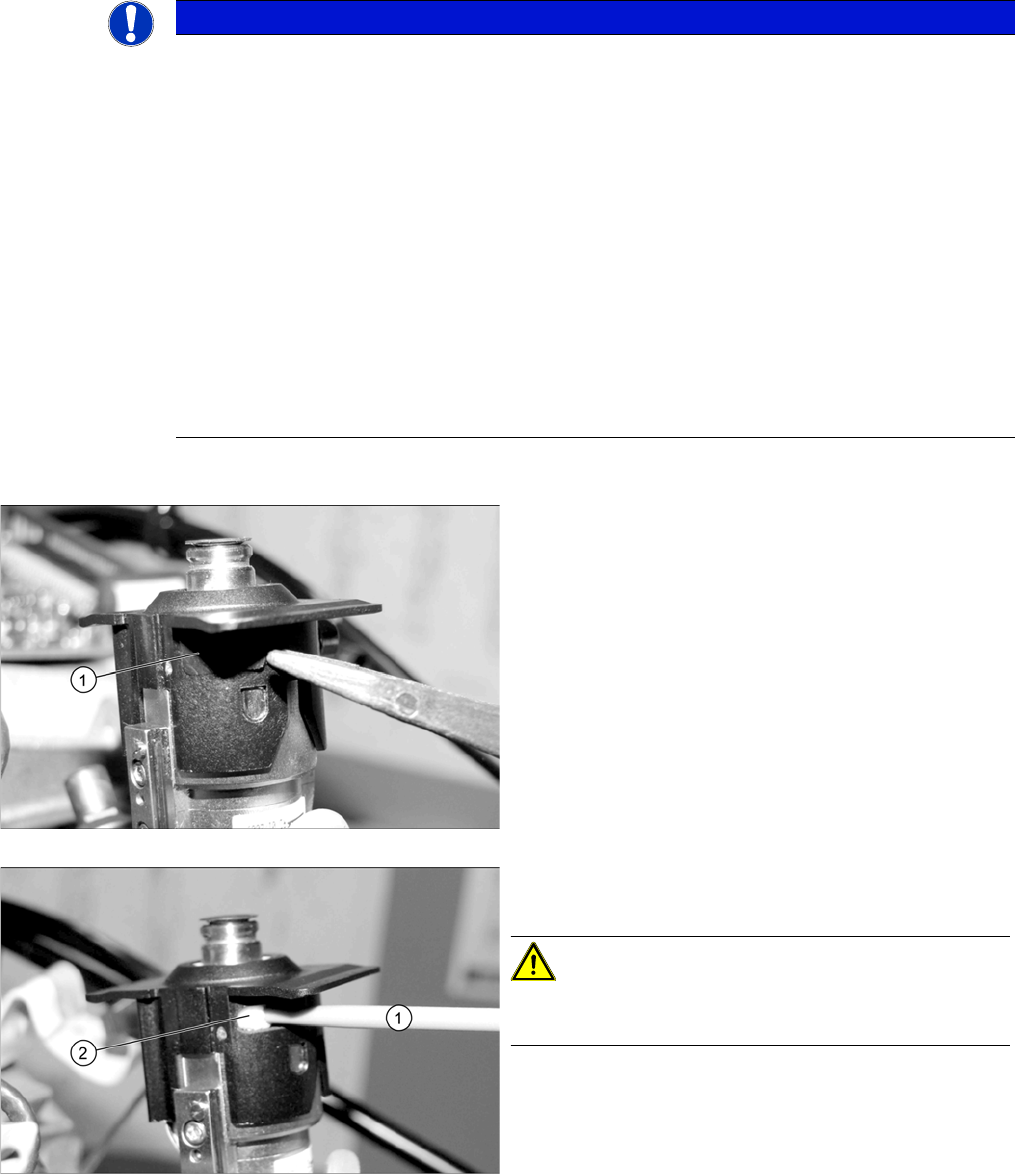
Tweezers
When replacing hoses, use the "tweezers, pointed, angled 150 mm" [00096487-xx], if required.
► Check the vacuum hoses.
If a vacuum hose (1) is damaged or leaky, this must
be replaced by authorized personnel. Refer to the
service manual for removal and installation details.
During checking, pay particular attention to the fol-
lowing parts of the hose:
⇨ (2) Level with the screw on the Single Core Solu-
tion (SCS)
⇨ (3) The area around the own segment
⇨ (4) The area around the neighboring segment
CAUTION!
When fitting the hose, make sure that this does not rub
against the cap of the own or neighboring segment.
Check the above mentioned areas when moving the seg-
ment in and out.
NOTICE!
All CPP heads from August 2011 and all Service CPP
heads are equipped with a service opening (1) on the DP
drive. Cleaning the light barrier and the switching ring can
be carried out via this service opening.
Maintenance tasks for CPP
3.5.6 Cleaning the Light Barrier on the DP Drive Performing Maintenance Tasks
Maintenance Manual SIPLACE Placement Heads CPP, C&P20, Twin 29
Checking error messages
Cleaning the Light Barrier on the DP Drive
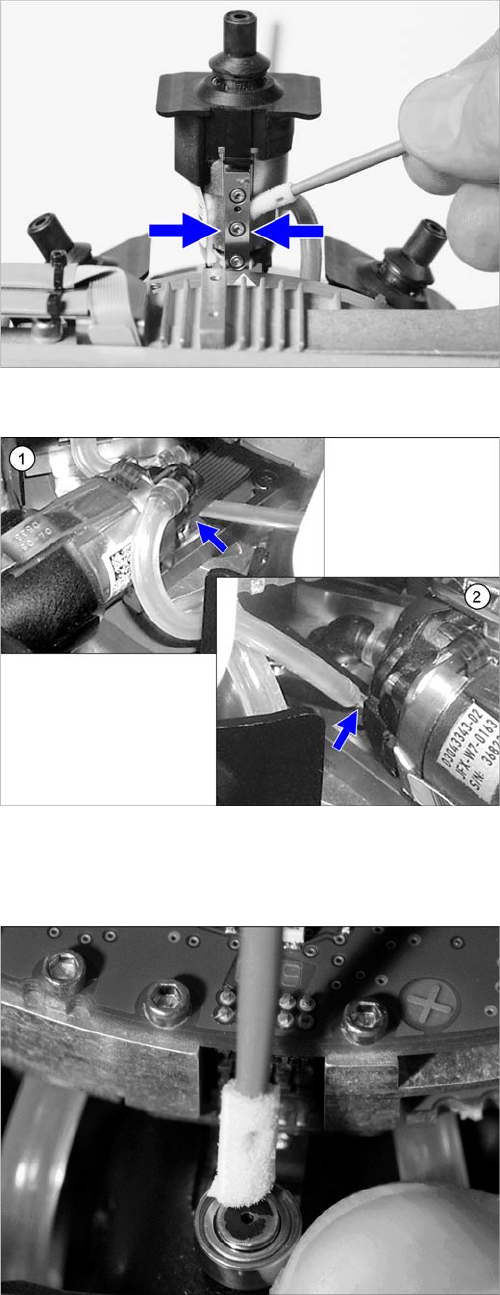
► Turn the segment several times. In doing so, the switching ring and the light barrier are cleaned.
► Repeat this procedure with a new cleaning stick until it is no linger dirty.
► Clean the surface around the service opening and close it with a new black sticker.
► Repeat these steps for all DP drives.
NOTICE
Checking error messages
We recommend to check the warnings and error messages issued at the station on a weekly
basis.
Cleaning should be done every six months. It is always necessary to clean the light barrier and
the switching ring when one of the following error messages is displayed in the station software.
► eWarning: 30483 – light barrier button of the segment is not working correctly (dirt on ZDS/
switching ring)
► eWarning: 30488 – Z axis knocks on board (dirt on ZDS/switching ring)
► eWarning: 30483 – light barrier button of the segment is not working correctly
► eWarning: 30507 – [DP axis, x gantry] Hardware warning occurred x times (if the warnings
above occur too often)
► eWarning: 30508 – [DP axis, gantry x] Hardware warning occurred more than 100 times (if
the warnings above occur too often)
► Mark the first segment by removing the nozzle.
► Remove the black sticker from the protective cap.
► Wet the cleaning stick [00388764-xx] (1) with isopro-
panol.
CAUTION!
Make sure you use the right cleaning sticks, otherwise
this could lead to damage.
► Insert the cleaning stick as shown into the service
opening (2) in such a way that is is located between
the light barrier and the switching ring.
Maintenance tasks for CPP
Performing Maintenance Tasks 3.5.7 Oiling the DP Segment Guide
30 Maintenance Manual SIPLACE Placement Heads CPP, C&P20, Twin
3.5.7
3.5.7 Oiling the DP Segment Guide
Oiling the DP Segment Guide
3.5.8
3.5.8 Oiling the DP Driver Bearing
Oiling the DP Driver Bearing
Cleaning the segment guide rail
► For this maintenance task, use the blue combitip with
Thermoplex ALN 1001/00.
► Set the multipette to 2 µl.
► Mark the first segment by removing a nozzle.
► Pull the segment out as far as the stop.
► Use a cleaning stick to clean the segment guide rail
on both sides.
Oiling the segment guide rail
► Apply 2 µl of lubricant to the center of each guide
track (left (2) and right side (1)) and then move the
segment manually approx. five times in and out.
► Apply another 2 µl of lubricant to the center of each
guide track (left and right side) and then move the
segment again manually approx. five times in and
out.
A total of 2 x 2 µl must be applied to each guide track.
► Move the segment back in again.
► Turn the star on to the next segment.
► Repeat these steps on all segments.
► Fit the removed nozzle back into place.
► Clean the driver bearing with a cleaning stick.