00197465-01_SM_CP20-A-M_EN.pdf - 第25页
3 Service Work Conveyor 3.5 Replacing the Silencer [03043707-xx] Service Manual SIPLACE C&P20, C&P20A, C&P20M 25 ► Fit the silencer. Tighten the s cr ew faste ning the silence r hand -tight. ► Follow the remo…
3 Service Work Conveyor
3.4 Replacing the Hold Circuit -Vacuum Unit [03005123-xx]
24 Service Manual SIPLACE C&P20, C&P20A, C&P20M
3.4
3.4 Replacing the Hold Circuit -Vacuum Unit [03005123-xx]
Replacing the Hold Circuit -Vacuum Unit [03005123-xx]
Parts, equipment and tools
▪ Holding circuit vacuum unit [03005123-xx]
▪ Torque screwdriver Torque Vario 10-60 Ncm [00386132-xx]
▪ Torque interchangeable blades 2.5 mm, hexagonal [03090019-xx]
▪ Tools for removing the head, if needed (see also the service manual for your machine)
Preparation
► Remove the head from the machine. For removal and installation details of the placement head, read
the service manual for your machine.
Removal
► Loosen the screw fastening the silencer and and remove the silencer.
► Loosen the three screws fastening the holding circuit.
► Carefully lever the holding circuit off the locating pins. Make sure that the O-ring is not damaged.
Installation
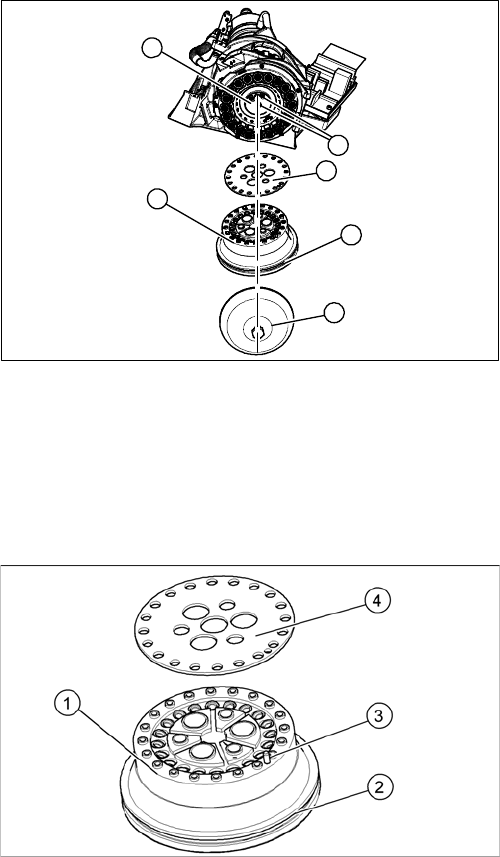
► Correctly position the seal disk on the holding circuit. Make sure all openings are aligned.
► If the O-ring is damaged, replace it with a new one.
► Position the holding circuit (with seal disk) correctly onto the locating pins in the star carrier.
► Fix the holding circuit into place with the three fastening screws. Tighten the screws with 35 Ncm.
1. Silencer
2. Hold circuit
3. O-ring
4. Seal disk
5. 3 x fastening screws on the holding circuit
5
1
5
4
3
2
1. Hold circuit
2. O-ring
3. Locating pins (on star carrier)
4. Seal disk
3 Service Work Conveyor
3.5 Replacing the Silencer [03043707-xx]
Service Manual SIPLACE C&P20, C&P20A, C&P20M 25
► Fit the silencer. Tighten the screw fastening the silencer hand-tight.
► Follow the removal instructions in reverse order for further installation.
3.5
3.5 Replacing the Silencer [03043707-xx]
Replacing the Silencer [03043707-xx]
Parts, equipment and tools
▪ Silencer [03043707-xx]
▪ Tools for removing the head, if needed (see also the service manual for your machine)
Overview
Preparation
► Remove the head from the machine. For removal and installation details of the placement head, read
the service manual for your machine.
Removal
► Loosen the screw fastening the silencer.
► Carefully lever out the silencer.
Installation
► Follow the removal instructions in reverse order for further installation. Also observe the following
instructions:
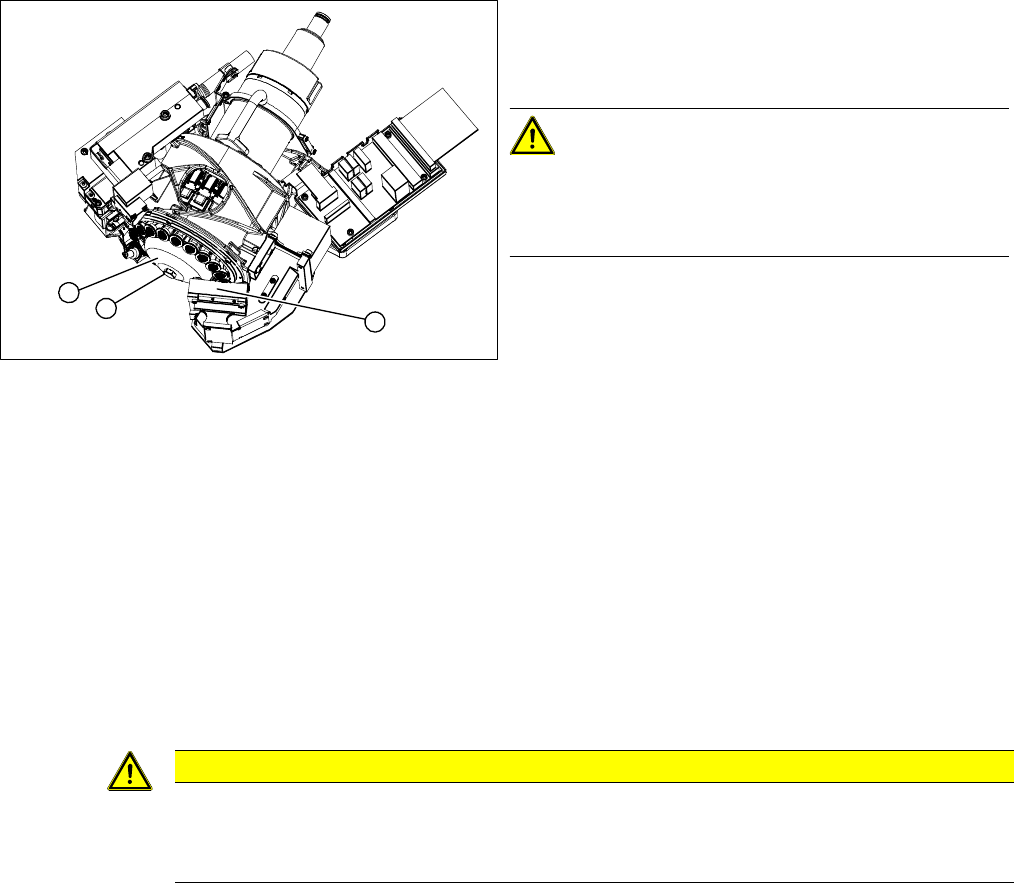
1. Silencer for holding circuit
2. Fastening screw [03005119-xx]
3. Lens system of component camera
CAUTION!
Camera
Make sure that you do not damage or contaminate the
camera lens system.
1
3
2
CAUTION
Installation instructions
► Carefully press the new silencer down, onto the holding circuit.
► Carefully retighten the screw manually (hand-tight only).
3 Service Work Conveyor
3.6 Replacing the Seal Disk on the Hold Circuit [03005120-xx]
26 Service Manual SIPLACE C&P20, C&P20A, C&P20M
3.6
3.6 Replacing the Seal Disk on the Hold Circuit [03005120-xx]
Replacing the Seal Disk on the Hold Circuit [03005120-xx]
Parts, equipment and tools
▪ Seal disk [03005120-xx]
▪ Tools for removing the head, if needed (see also the service manual for your machine)
Overview
Preparation
► Remove the head from the machine. For removal and installation details of the placement head, read
the service manual for your machine.
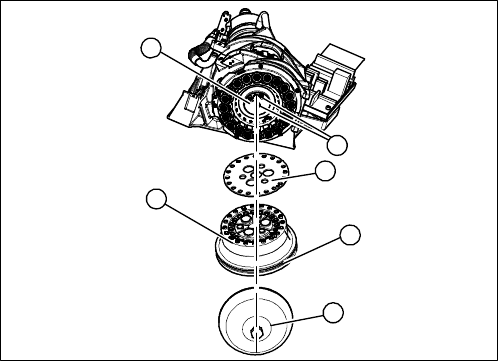
Removal
► Loosen the screw fastening the silencer and remove the silencer.
► Loosen the three screws fastening the holding circuit.
► Carefully lever the holding circuit off the locating pins and remove the seal disk . Make sure that the
O-ring is not damaged.
Installation
► Follow the removal instructions in reverse order for installation.
1. Silencer
2. Hold circuit
3. O-ring
4. Seal disk
5. 3 x fastening screws on the holding circuit
5
1
5
4
3
2