2OM-1075-002.pdf - 第137页
AHB01ESPP 3 . 1 "Run Mode" T ab The corresponding tab sheet enables the operator to change the opera- tion mode, the test run mode, the stop mode, and the start mode. • • • • • Sheet Layout When the "Run M…
AHB01ESPP
3. "OPN. MODE" Window (Submenu)
••
••
• Window Layout
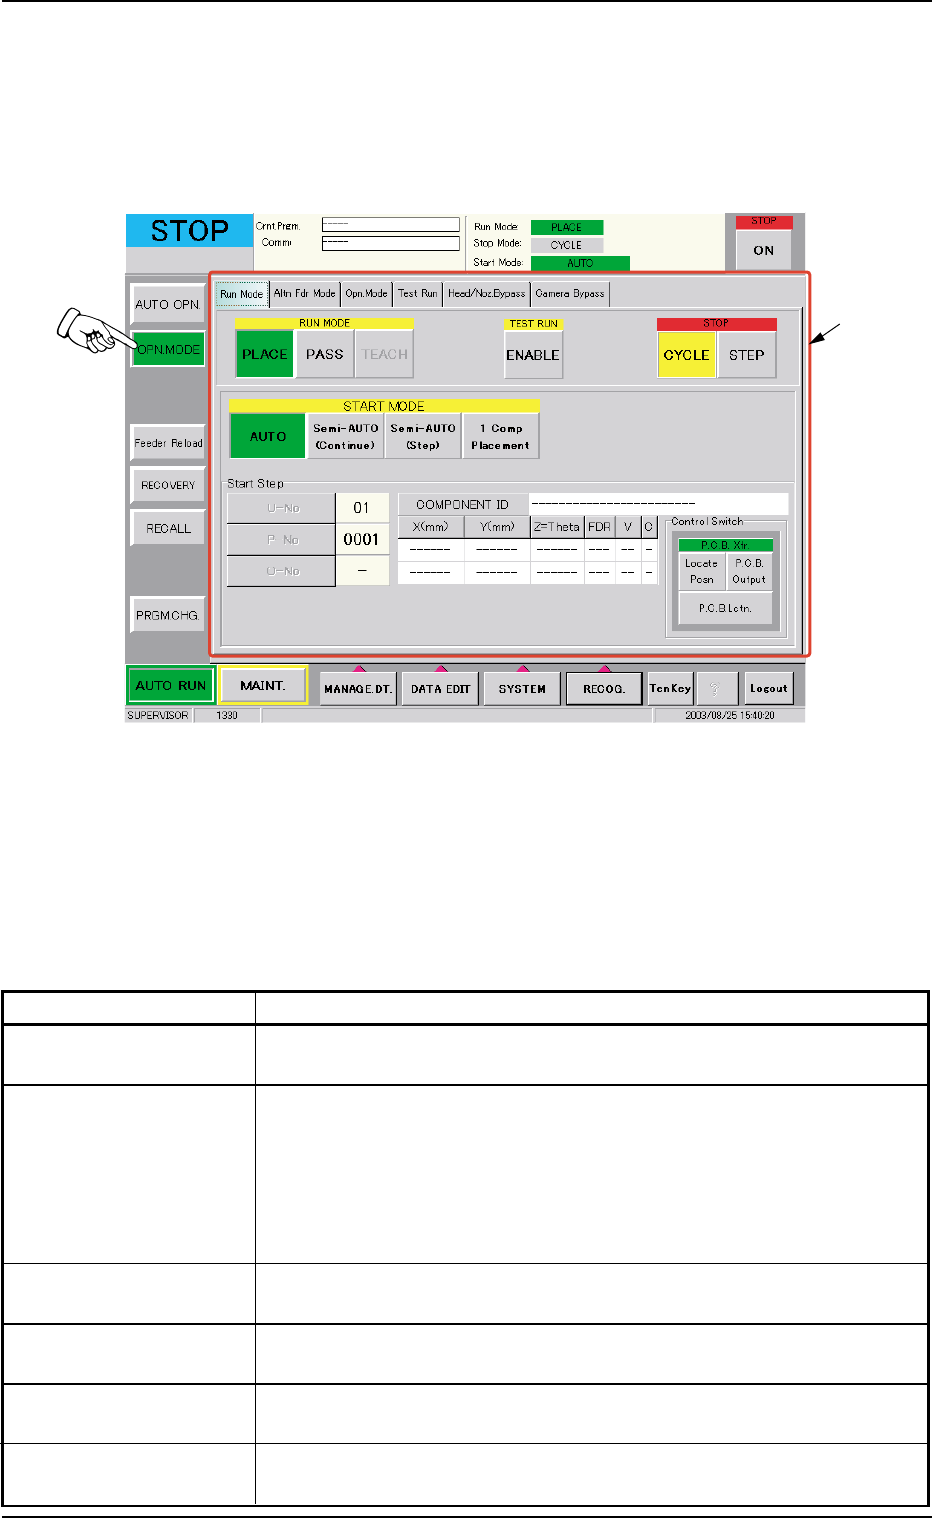
When the [OPN. MODE] button on the "AUTO OPN" submenu bar is
pressed, the following window (submenu) opens.
Fig. 2E7 "OPN. MODE" Window (submenu)
••
••
• Window Composition
*1 Tabs and Tab Sheets
The "OPN. MODE" window (submenu) is provided with the follow-
ing 6 tabs. When a tab is pressed, the corresponding tab sheet
appears inside the window.
Table 2E2
Tabs Description
Run Mode The corresponding tab sheet enables the operator to change the
operation mode and specify the stop and start methods.
Altn Fdr Mode The corresponding tab sheet enables the operator to set the
feeder alternate mode.
When "Enable" is specified for the alternate feeder mode, it be-
comes possible to check how the alternate feeder function is
working (feeder status) and issue a command that indicates the
completion of component replenishment for the related feeder.
Opn. Mode The corresponding tab sheet enables the operator to specify vari-
ous modes such as "Recovery Mode", "Auto. Fdr. Axis Set", etc.
Test Run The corresponding tab sheet enables the operator to specify a test
pattern.
Head/Noz. Bypass The corresponding tab sheet enables the operator to operate the
machine without using the specified head(s) or nozzle(s).
Camera Bypass The corresponding tab sheet enables the operator to operate the
machine without using the specified camera(s).
3. "OPN. MODE" Window (Submenu)
0308-004 5-11
*1
AHB01ESPP
3.1 "Run Mode" Tab
The corresponding tab sheet enables the operator to change the opera-
tion mode, the test run mode, the stop mode, and the start mode.
••
••
• Sheet Layout
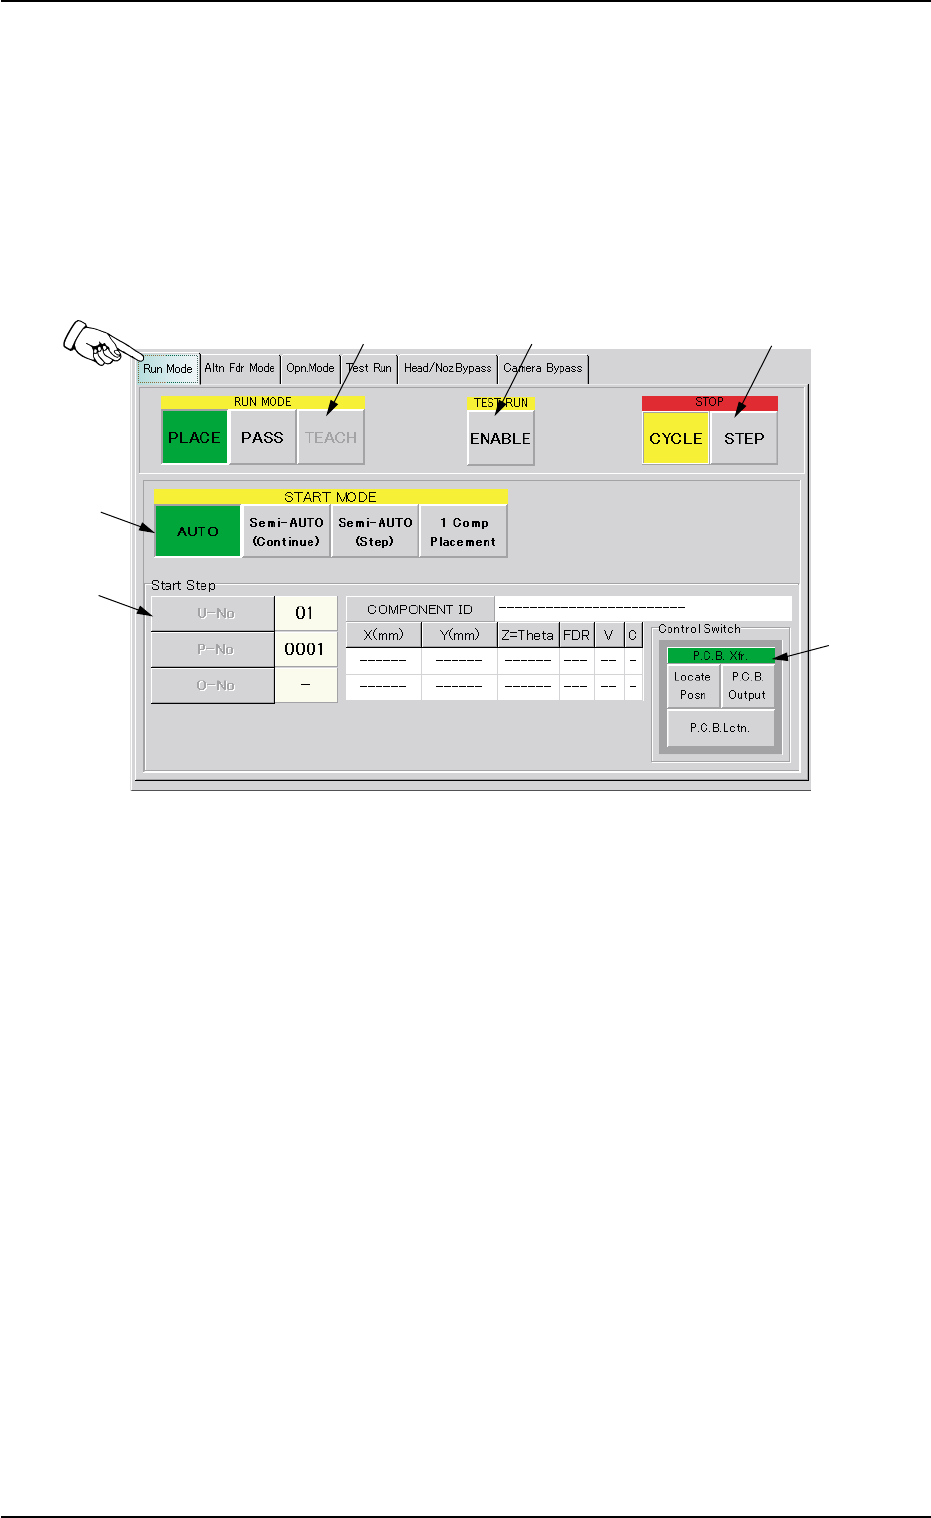
When the "Run Mode" tab is pressed in the "OPN. MODE" window
(submenu), the following tab sheet appears inside the window.
Fig. 2E8 "Run Mode" Tab Sheet
••
••
• Sheet Composition
*1 RUN MODE ([AUTO], [PASS], and [TEACH] Buttons)
Press one of the following buttons to change the current running
mode.
[PLACE] Button : Press this button to perform the automatic op-
eration.
[PASS] Button : Press this button to perform the pass opera-
tion.
[TEACH] Button : Press this button to perform the teaching op-
eration.
The selected running mode is displayed at the upper right field of
the "AUTO OPN." window (status bar).
3.1 "Run Mode" Tab
0308-004 5-12
*1
*2
*3
*4
*5
*6

AHB01ESPP
*2 TEST RUN
Press the [ENABLE] button to perform a test run.
"TEST RUN" appears beside "Run Mode" on the "AUTO OPN." win-
dow (upper right field of the status bar).
When the machine is set in the "TEST RUN" mode, normal
automatic operation cannot be performed because param-
eters for the test run are specified.
*3 STOP
Press either one of the following buttons to specify a stop mode.
[CYCLE] Button : Press this button to stop the machine after 1-
cycle operation.
[STEP] Button : Press this button to stop the machine step by
step.
The selected stop mode is displayed at the upper right field of the
"AUTO OPN." window (status bar).
When the [ON] button (entitled "STOP") is pressed, the se-
lected stop mode becomes valid.
*4 START MODE
Press one of the following buttons to specify a start mode.
[AUTO] Button : Press this button to start the automatic opera-
tion.
[Semi-AUTO (Continue)] Button :
Press this button to start the semi-automatic
operation.
[Semi-AUTO (Step)] Button :
Press this button to start the semi-automatic
operation with the specified step No.
The step No. can be specified in "*5".
[1 Comp Placement] Button :
When this button is pressed, the machine
places one component and stops running.
*5 Start Step
Press one of the following buttons to specify a start step.
[U-No] Button : Specify the unit.
[P-No] Button : Specify the step No. in the placement data (P).
[O-No] Button : Specify the step No. in the placement data (O).
3.1 "Run Mode" Tab
0308-003 5-13
Note
Note