2OM-1075-002.pdf - 第138页
AHB01ESPP *2 TEST RUN Press the [ENABLE] button to perform a test run. "TEST RUN" appears beside "Run Mode" on the "AUTO OPN." win- dow (upper right field of the status bar). When the machin…
AHB01ESPP
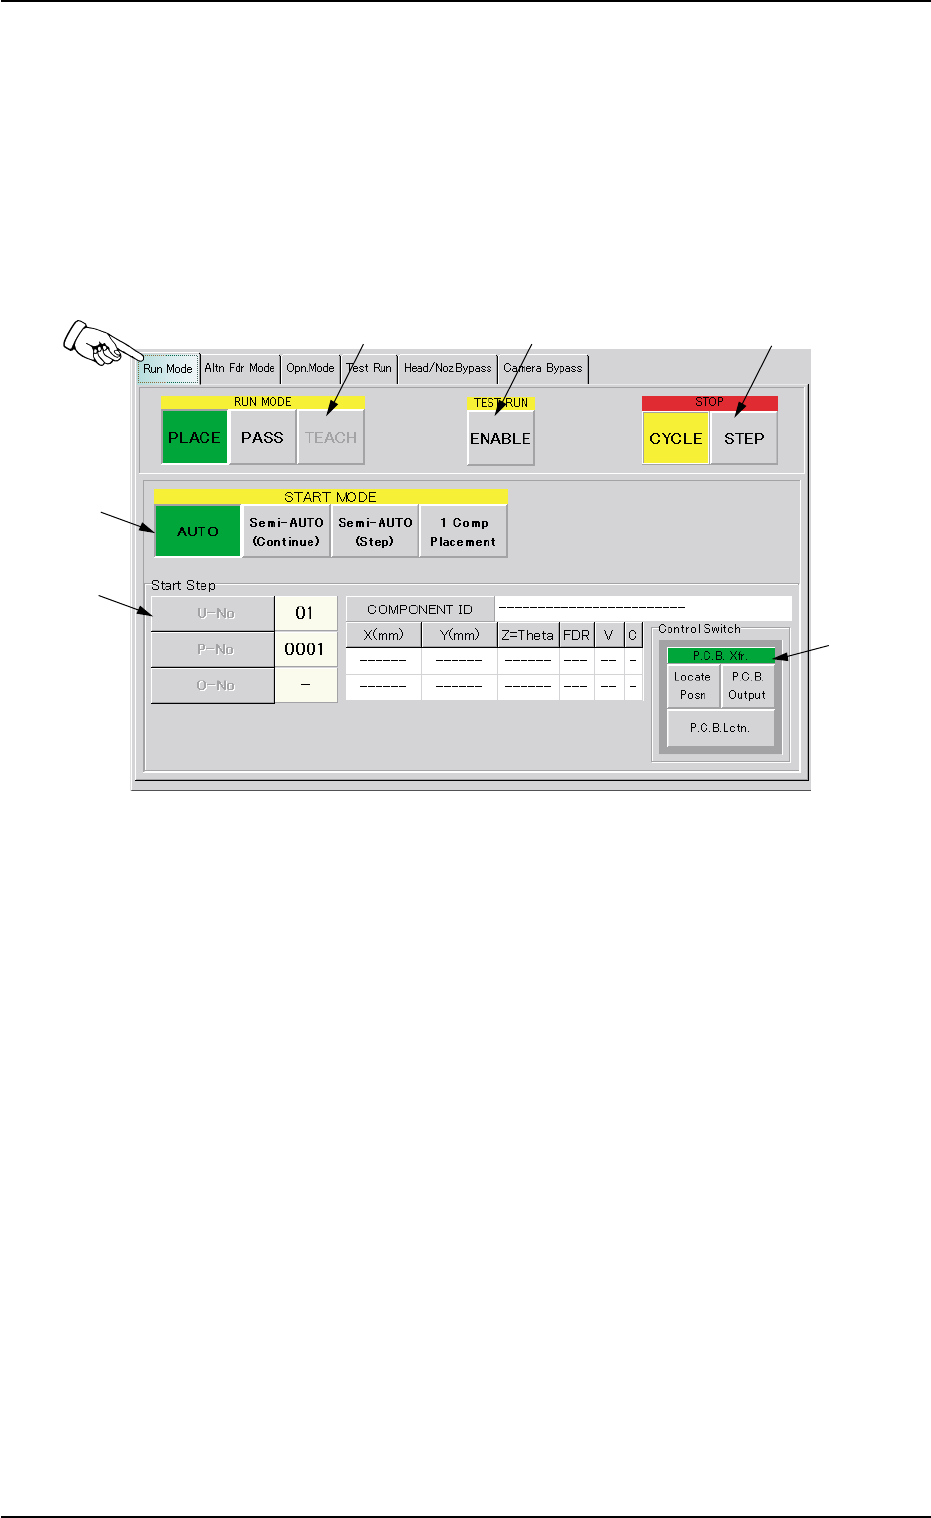
3.1 "Run Mode" Tab
The corresponding tab sheet enables the operator to change the opera-
tion mode, the test run mode, the stop mode, and the start mode.
••
••
• Sheet Layout
When the "Run Mode" tab is pressed in the "OPN. MODE" window
(submenu), the following tab sheet appears inside the window.
Fig. 2E8 "Run Mode" Tab Sheet
••
••
• Sheet Composition
*1 RUN MODE ([AUTO], [PASS], and [TEACH] Buttons)
Press one of the following buttons to change the current running
mode.
[PLACE] Button : Press this button to perform the automatic op-
eration.
[PASS] Button : Press this button to perform the pass opera-
tion.
[TEACH] Button : Press this button to perform the teaching op-
eration.
The selected running mode is displayed at the upper right field of
the "AUTO OPN." window (status bar).
3.1 "Run Mode" Tab
0308-004 5-12
*1
*2
*3
*4
*5
*6

AHB01ESPP
*2 TEST RUN
Press the [ENABLE] button to perform a test run.
"TEST RUN" appears beside "Run Mode" on the "AUTO OPN." win-
dow (upper right field of the status bar).
When the machine is set in the "TEST RUN" mode, normal
automatic operation cannot be performed because param-
eters for the test run are specified.
*3 STOP
Press either one of the following buttons to specify a stop mode.
[CYCLE] Button : Press this button to stop the machine after 1-
cycle operation.
[STEP] Button : Press this button to stop the machine step by
step.
The selected stop mode is displayed at the upper right field of the
"AUTO OPN." window (status bar).
When the [ON] button (entitled "STOP") is pressed, the se-
lected stop mode becomes valid.
*4 START MODE
Press one of the following buttons to specify a start mode.
[AUTO] Button : Press this button to start the automatic opera-
tion.
[Semi-AUTO (Continue)] Button :
Press this button to start the semi-automatic
operation.
[Semi-AUTO (Step)] Button :
Press this button to start the semi-automatic
operation with the specified step No.
The step No. can be specified in "*5".
[1 Comp Placement] Button :
When this button is pressed, the machine
places one component and stops running.
*5 Start Step
Press one of the following buttons to specify a start step.
[U-No] Button : Specify the unit.
[P-No] Button : Specify the step No. in the placement data (P).
[O-No] Button : Specify the step No. in the placement data (O).
3.1 "Run Mode" Tab
0308-003 5-13
Note
Note
AHB01ESPP
Starting the Automatic Operation
After specifying the start mode and the start step, press the [START]
button on the front operation panel. The machine starts the auto-
matic operation.
*6 "Control Switch" Group Box
The following operation buttons are provided.
"P.C.B. Xfr." Buttons
When the [ENABLE] button on the operation panel is pressed in 2
seconds after the [Locate Posn] button, the P.C.B. is transferred to
the locate position.
When the [ENABLE] button on the operation panel is pressed in 2
seconds after the [P.C.B. Output] button, the P.C.B. is transferred to
the output conveyor buffering position.
When the [ENABLE] button on the operation panel is pressed in 2
seconds after the [P.C.B. Lctn.] button, the backup base moves up
to the point where the P.C.B. is positioned.
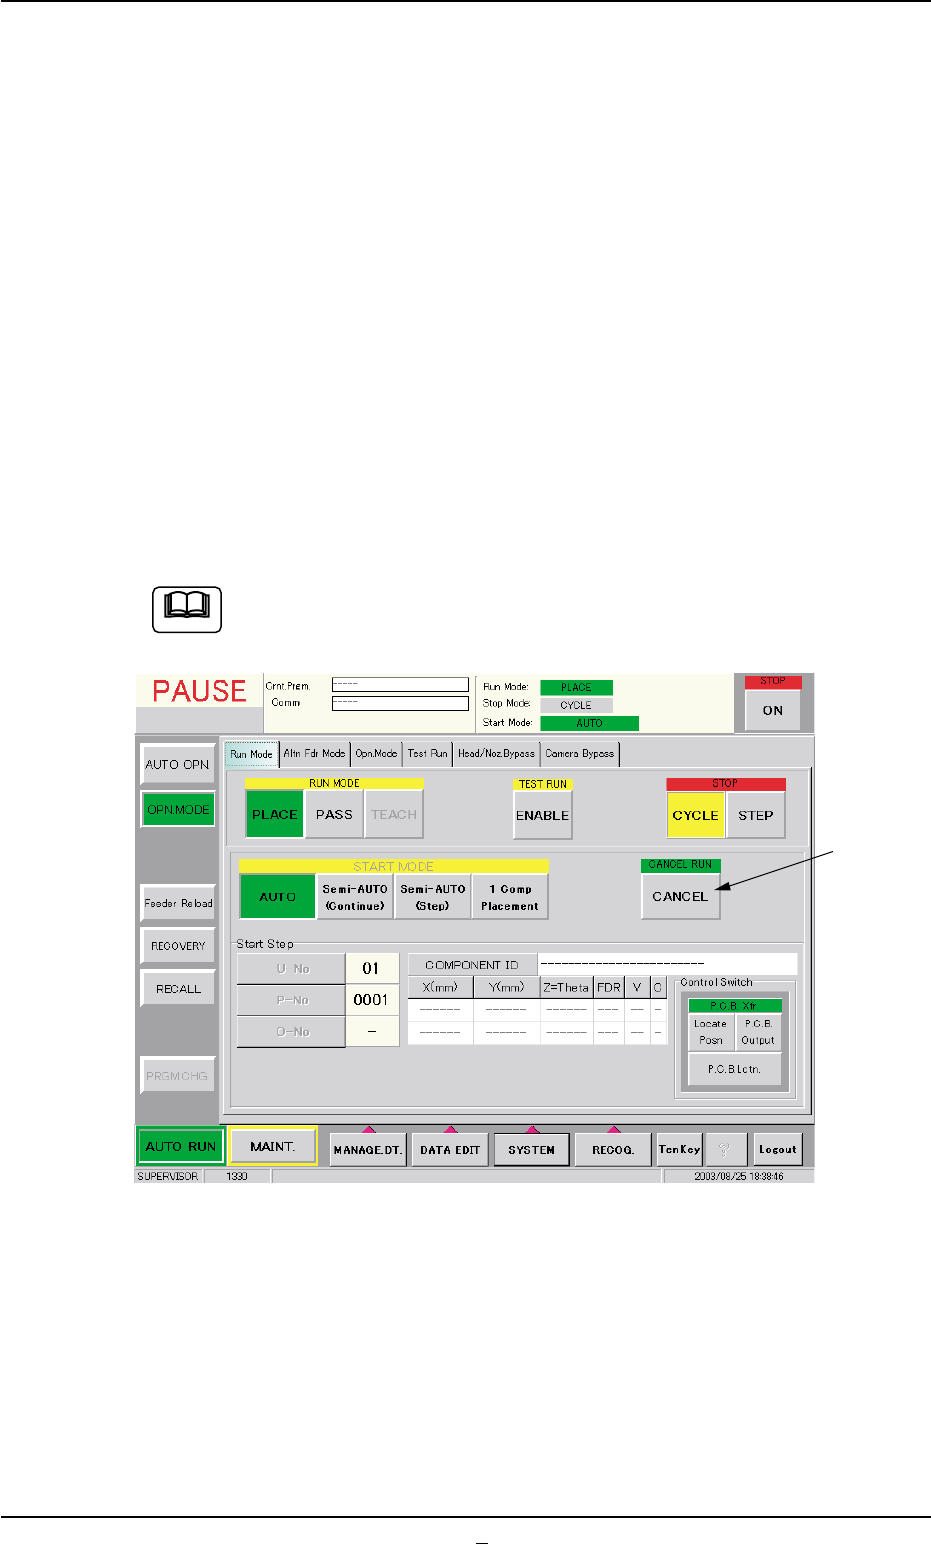
When the machine is in the "PAUSE" mode, a [CANCEL] but-
ton appears in the "Run Mode" tab sheet.
Fig. 2E9 "Run Mode" Tab Sheet ("PAUSE" Mode)
*7 [CANCEL] Button
When this button is pressed, "PAUSE" mode is canceled and the
machine is set in the "STOP" mode.
0308-004 5-14
3.1 "Run Mode" Tab
*7
Note